This article provides steps on how to start and run a meet on the ScoreVision Tennis Scorekeeper App.
Set Up A Tennis Meet In The Cloud: Adding a Season
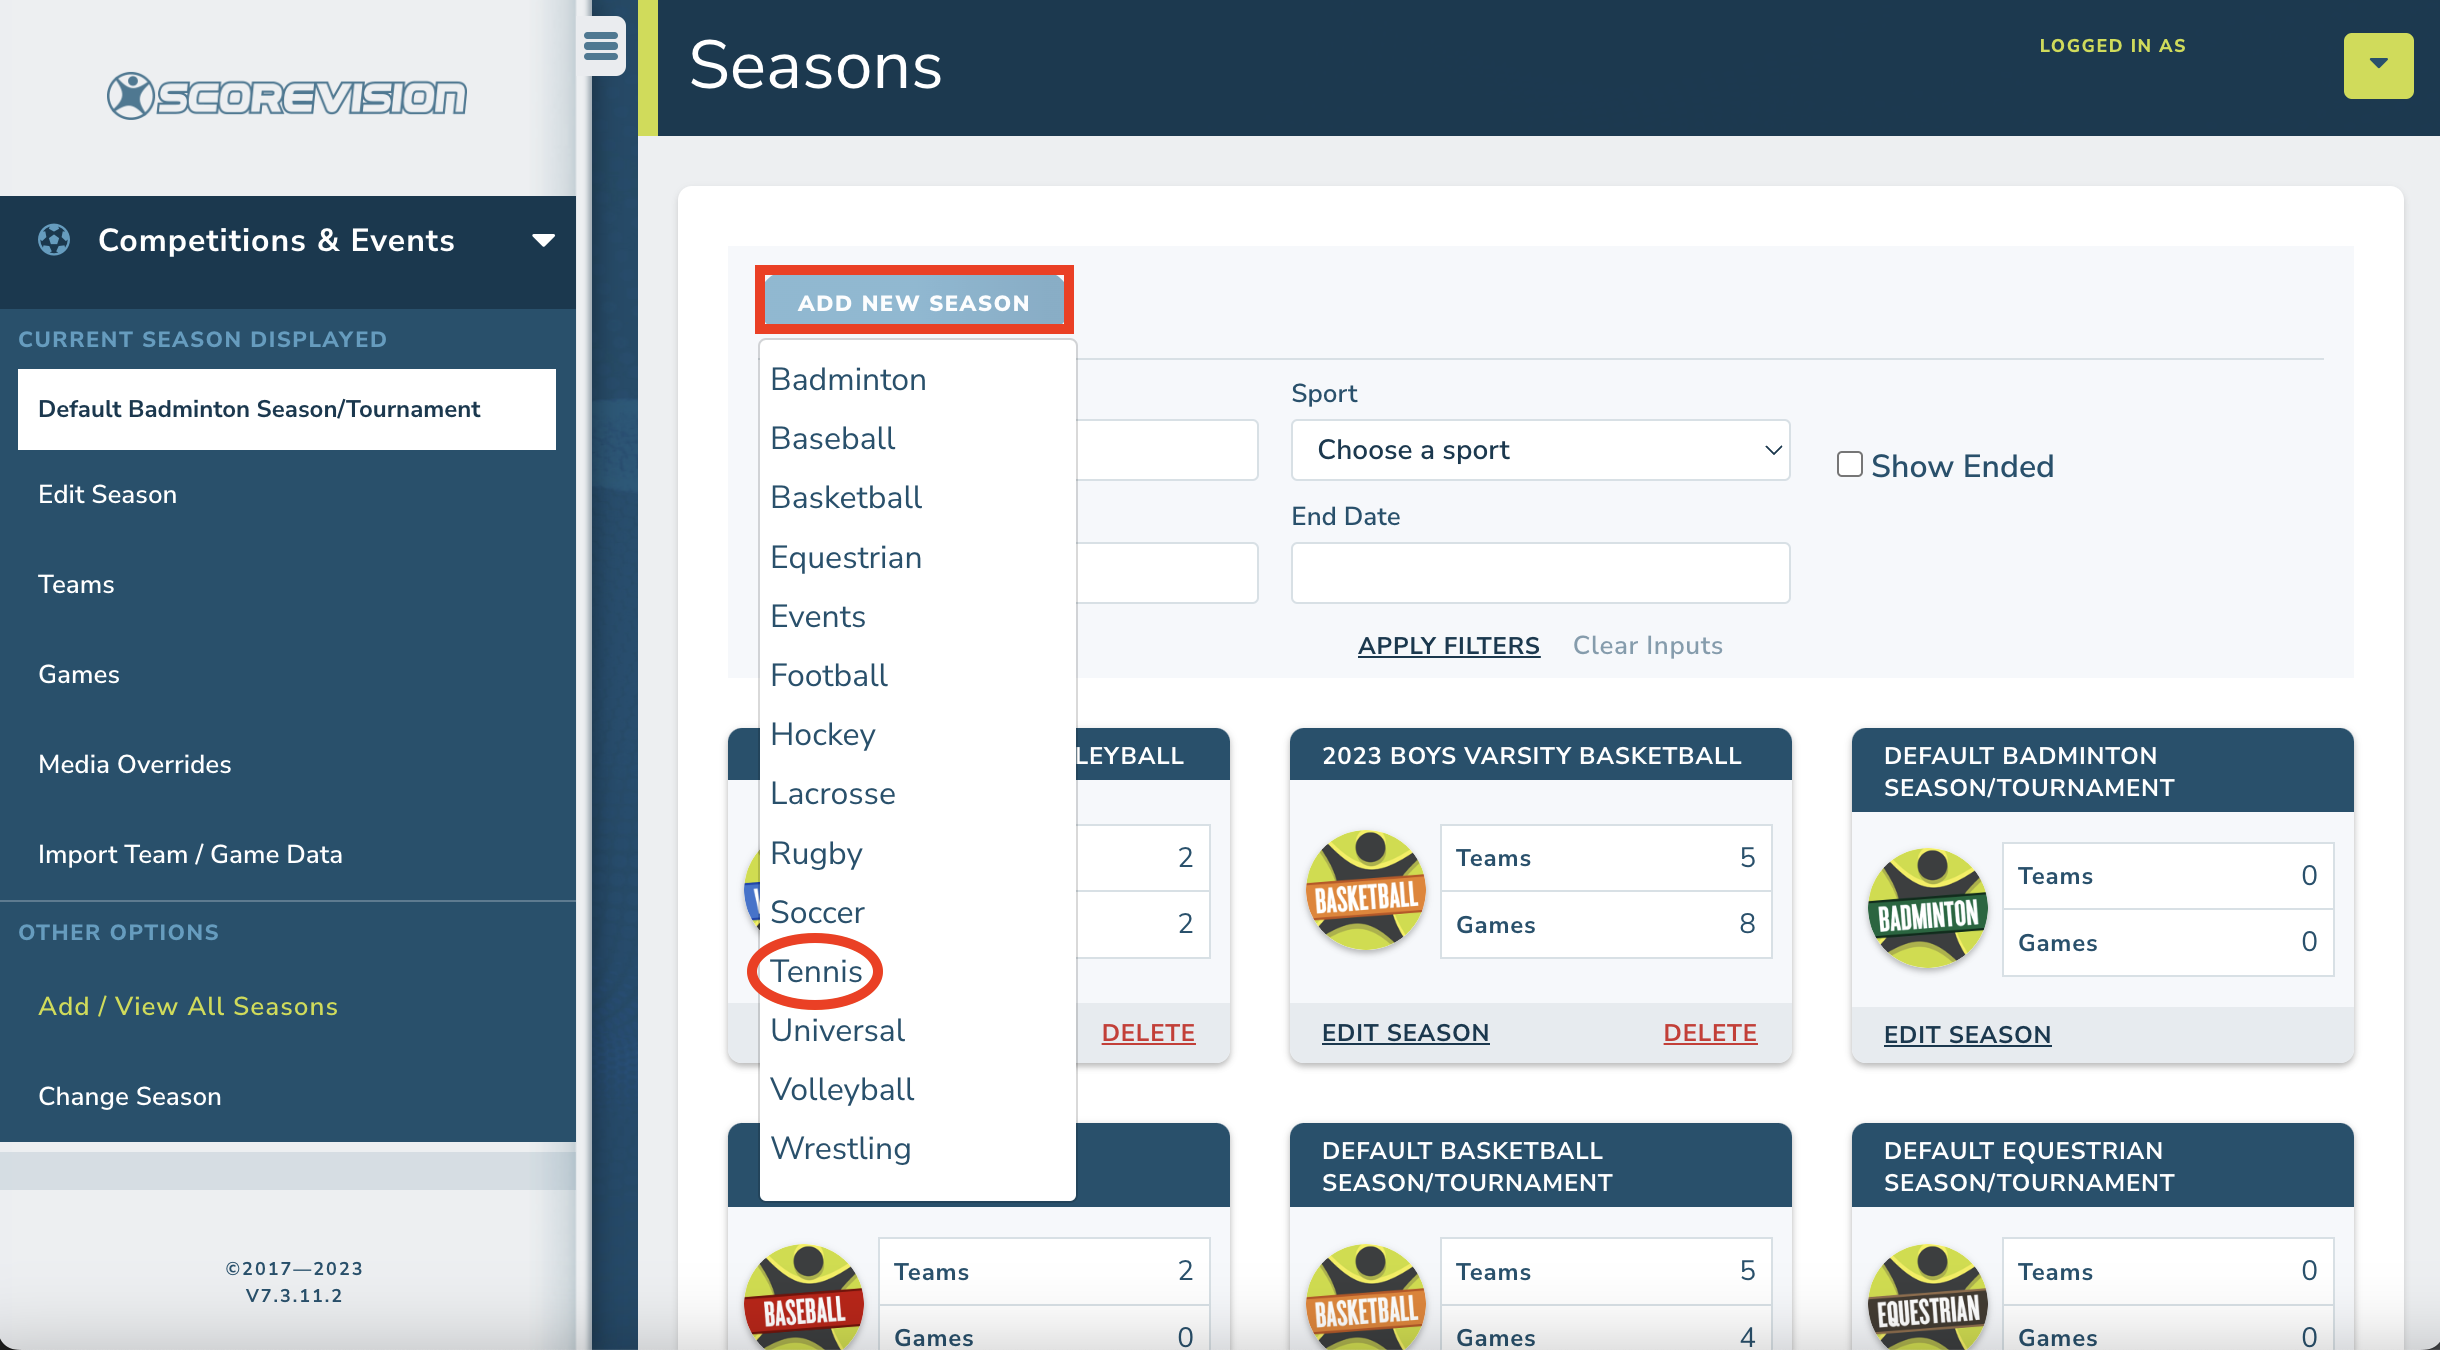
1. Log in to the cloud website using your ScoreVision credentials. Click on COMPETITIONS & EVENTS from the menu on the left and then choose ADD/VIEW ALL SEASONS.


2. Click on ADD NEW SEASON in the main window and choose TENNIS from the drop-down menu.
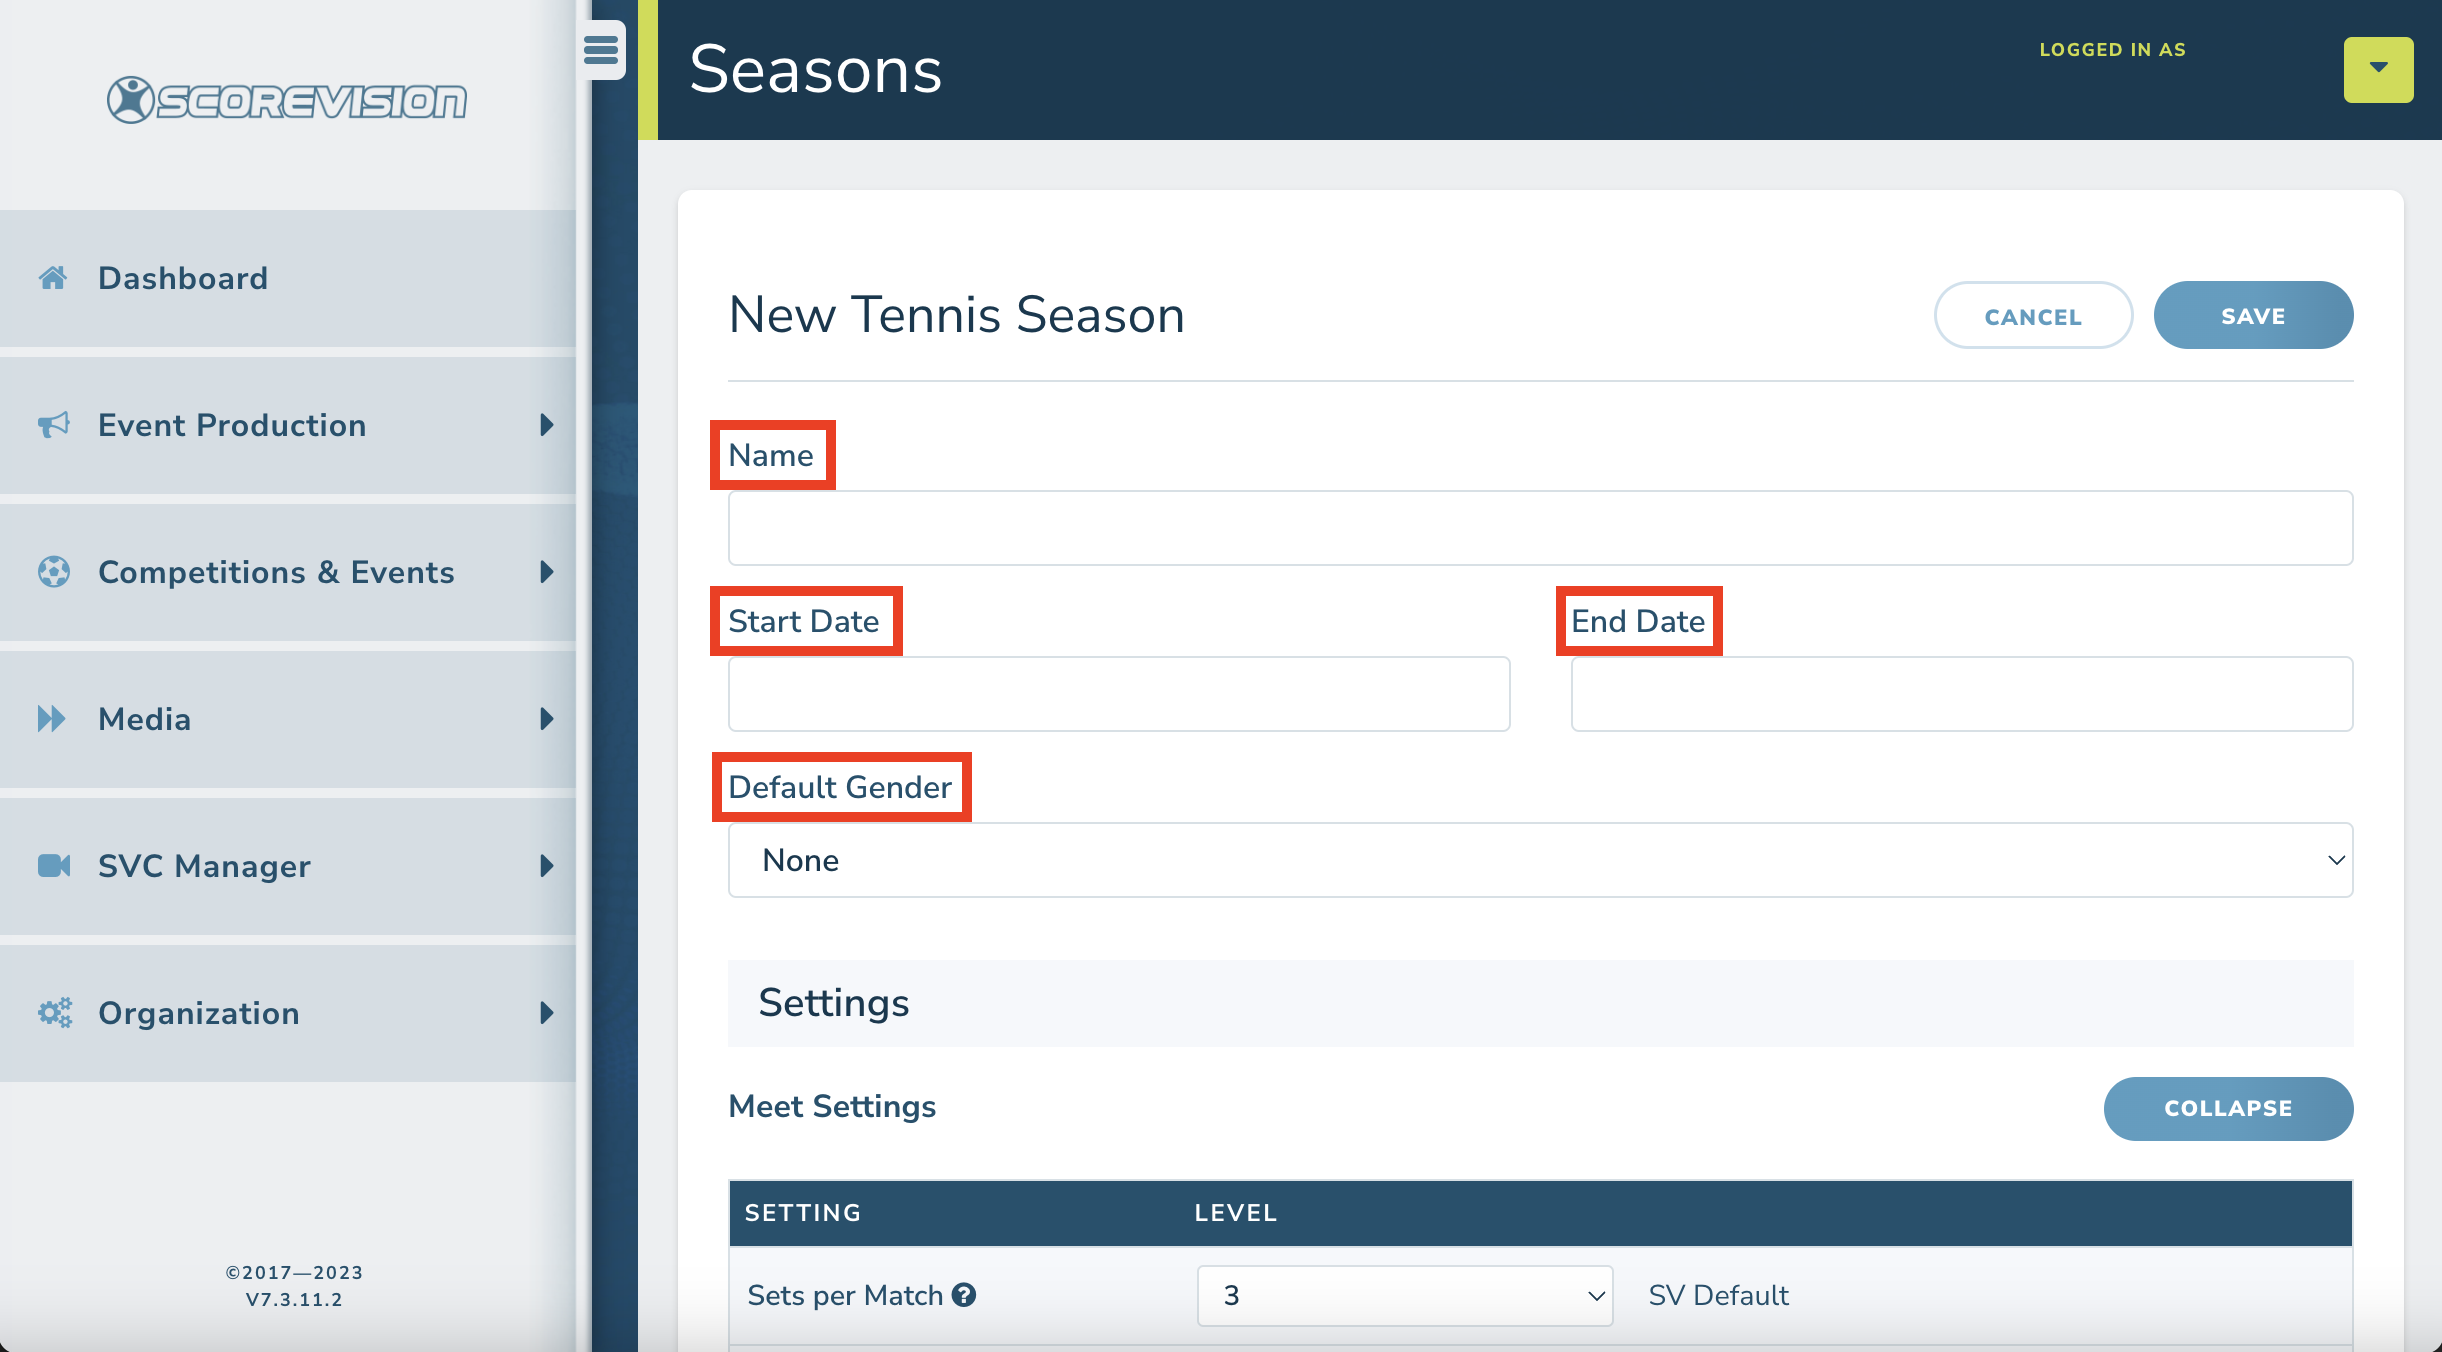
3. Type a name for your season. It is best to create different seasons for each level of play so be specific when naming such as 2023 Varsity Girls, 2023 Boys JV, 2023 Freshmen Girls, etc. Choose a start date and end date, and set the gender. NOTE: We recommend overshooting your end date. Consider pushing the date back to ensure playoffs and state competitions will be concluded.
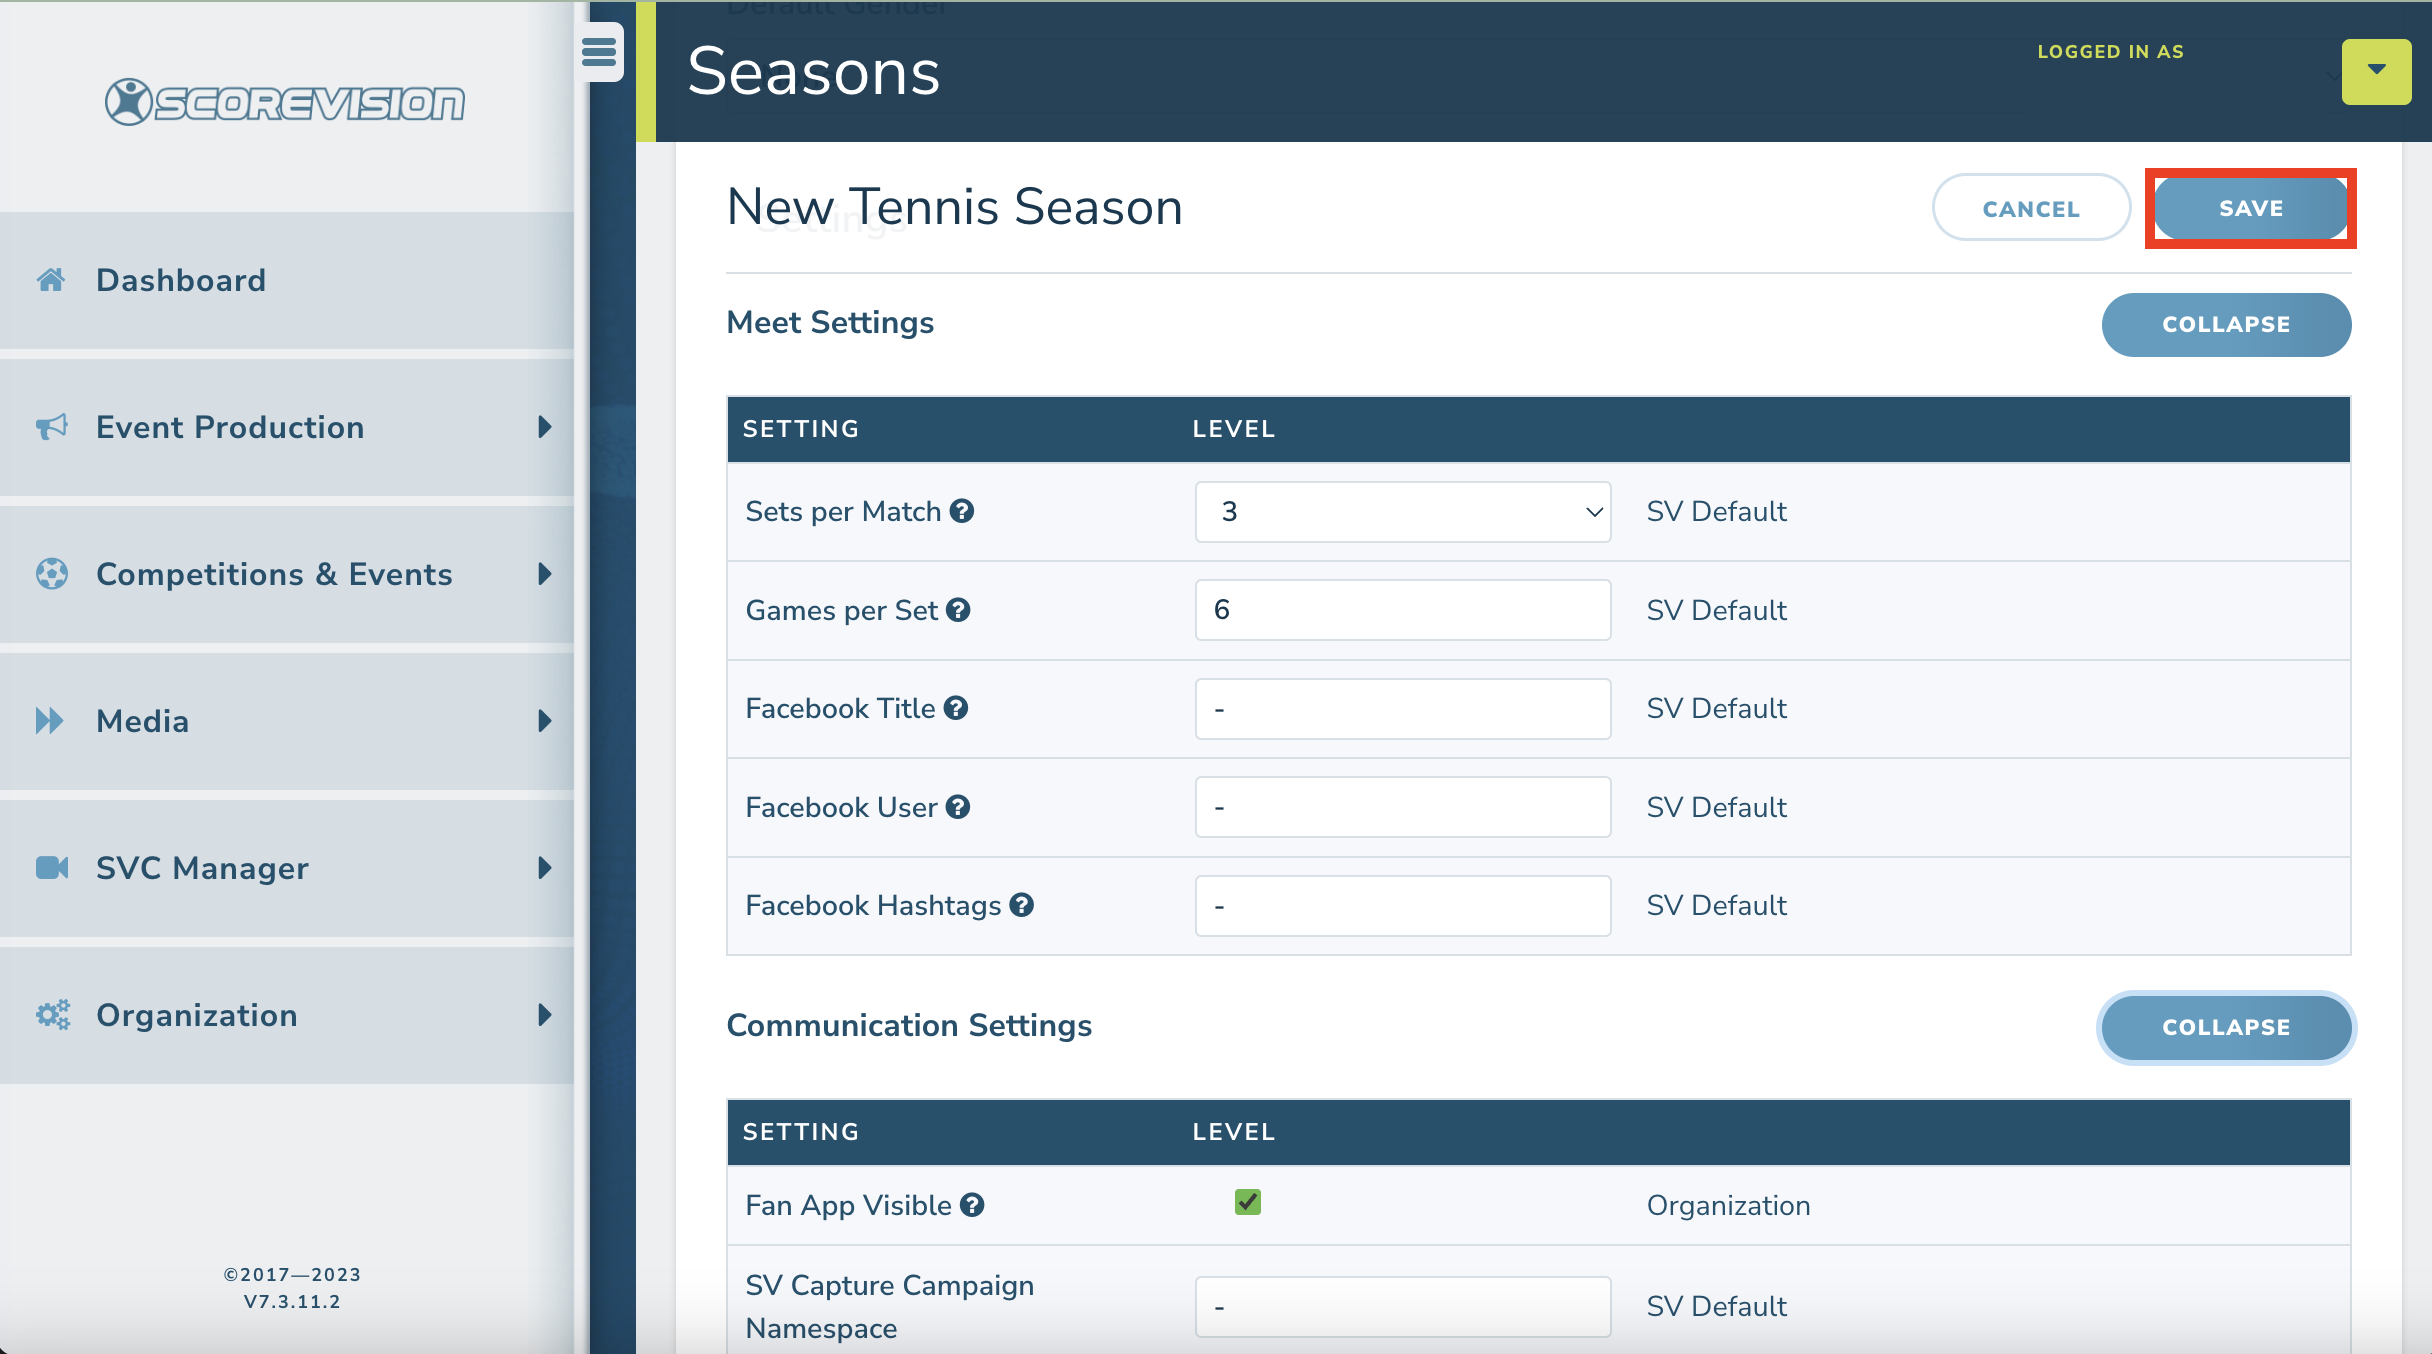
4. Scroll down to view and adjust settings for your season. You can adjust the number of sets per match and games per set. In the Communication Settings, be sure the box is checked for Fan App Visible if you would like information from this season to be shown on the Fan App. When you are finished with the settings, click SAVE.
Set Up A Tennis Meet In The Cloud: Adding Teams
1. Before creating a new Meet in the Cloud, be sure to enter the competing teams for the Meet into the proper Season. With your season listed in the white box labeled CURRENT SEASON DISPLAYED, click on the Teams section in the navigation panel under Competitions & Events. Start by selecting the Teams tab in the sidebar navigation. Once the page has loaded, you can either select the Add Team button or the Add Team card.
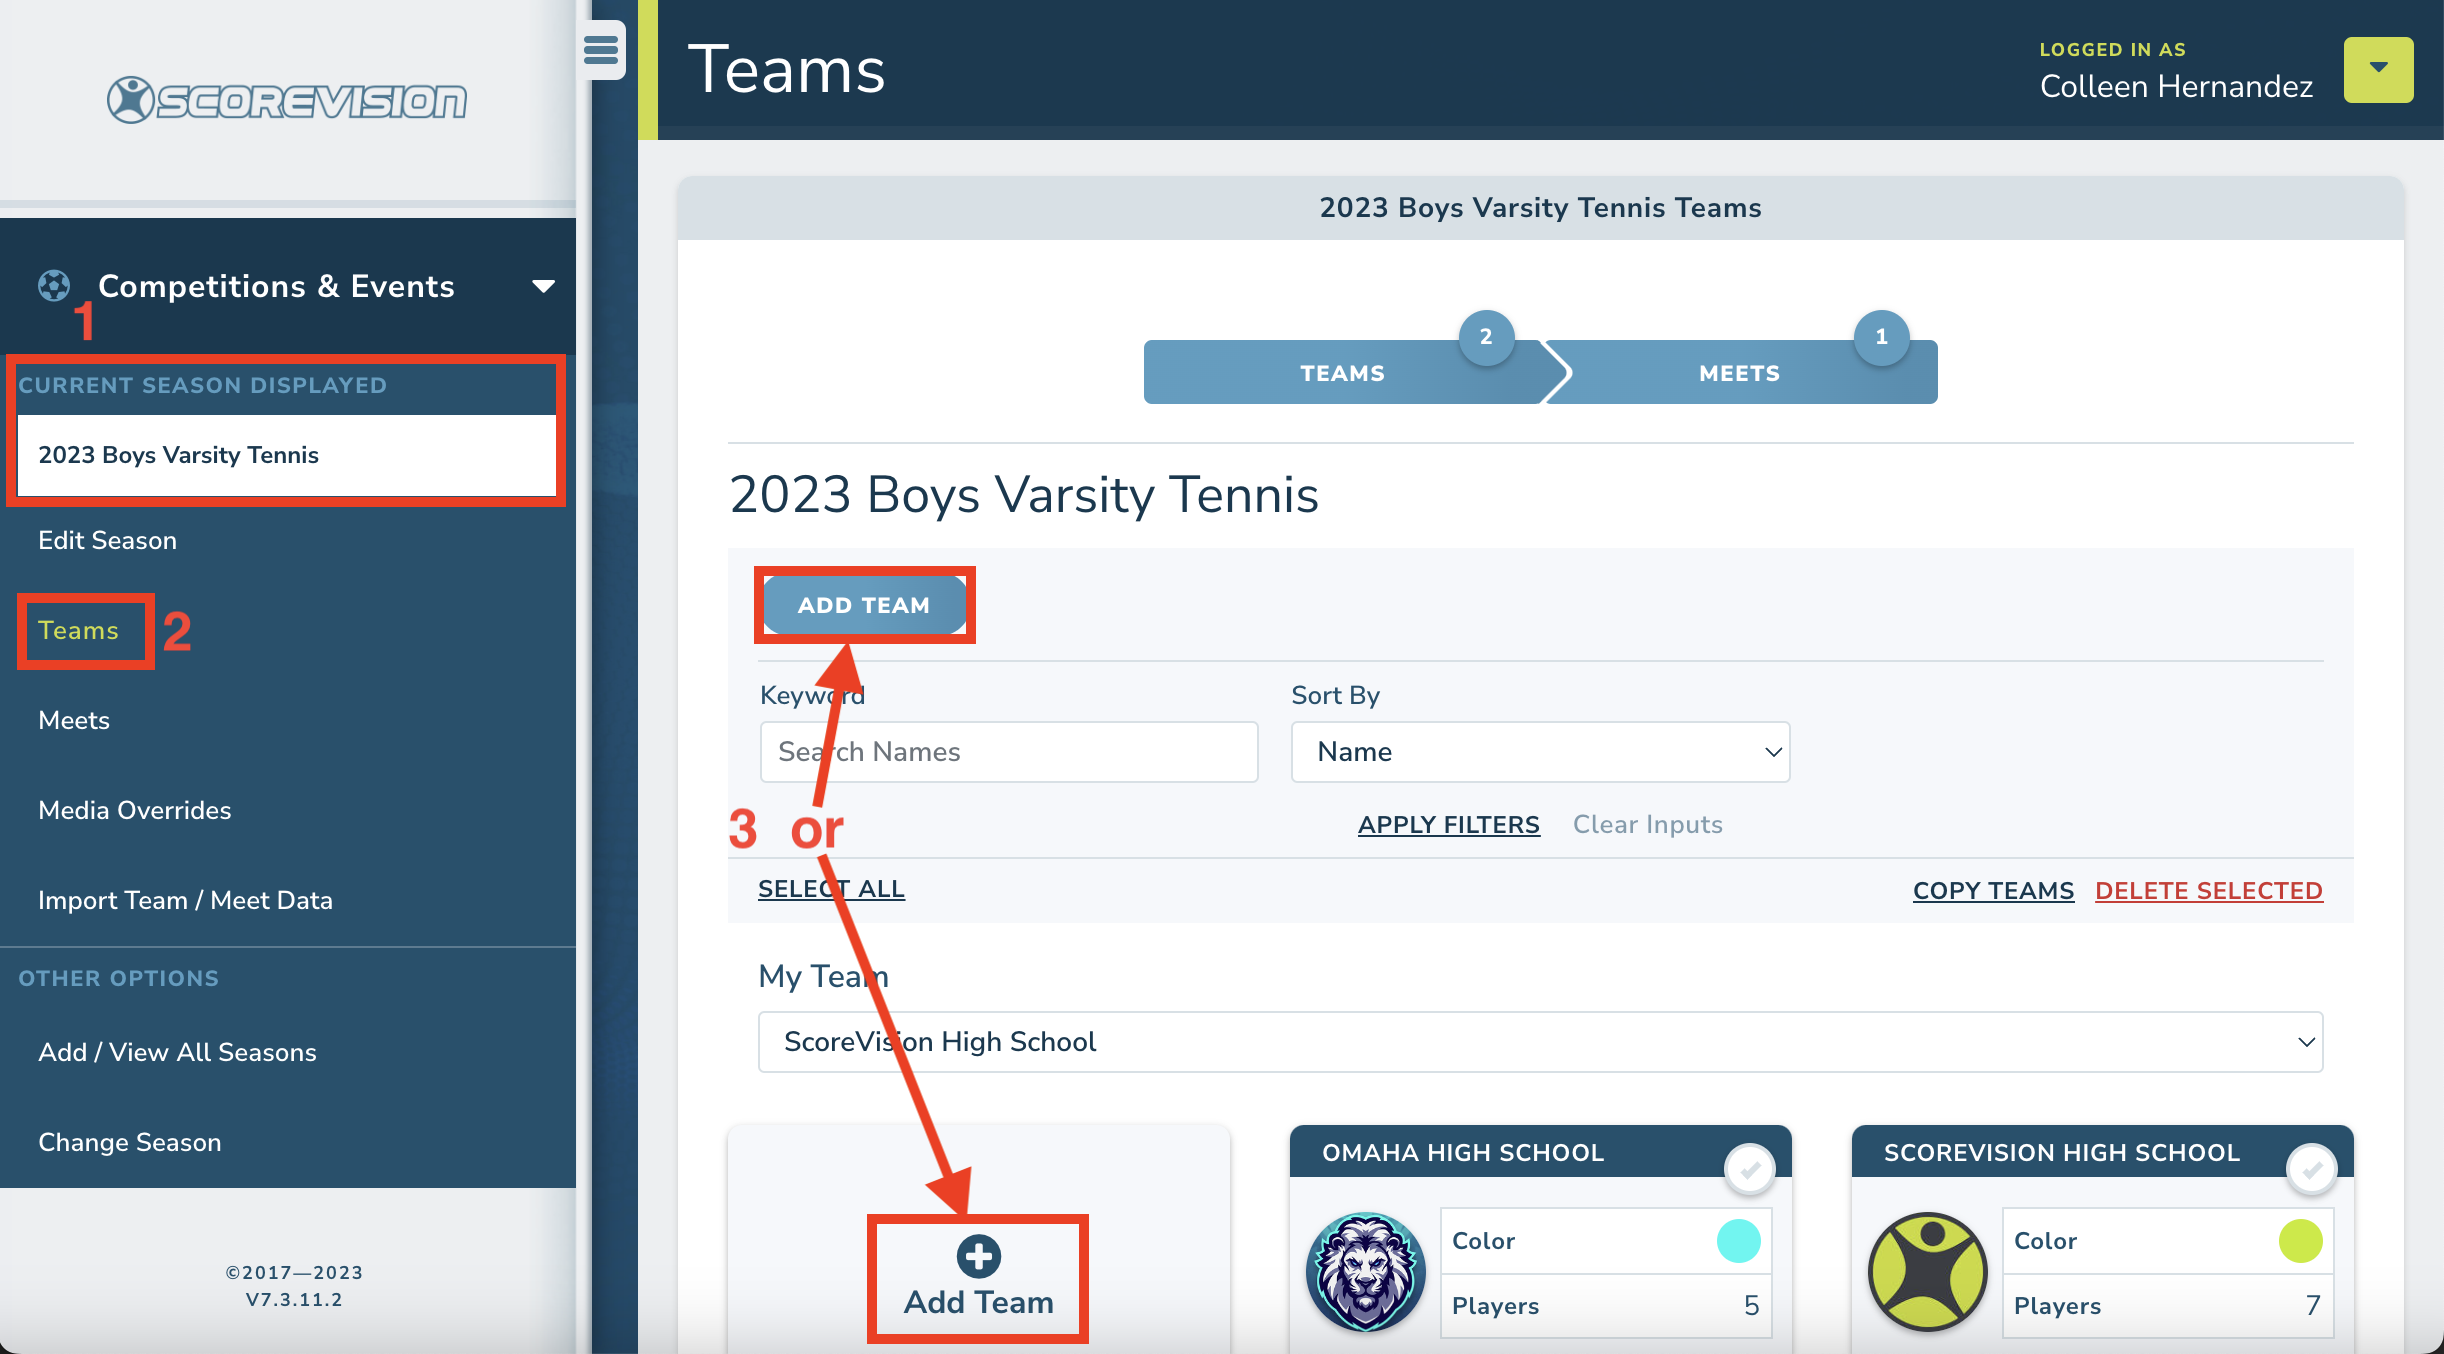
Teams already created will be in a cards list. You can modify these teams by selecting the Edit button at the bottom of the card.
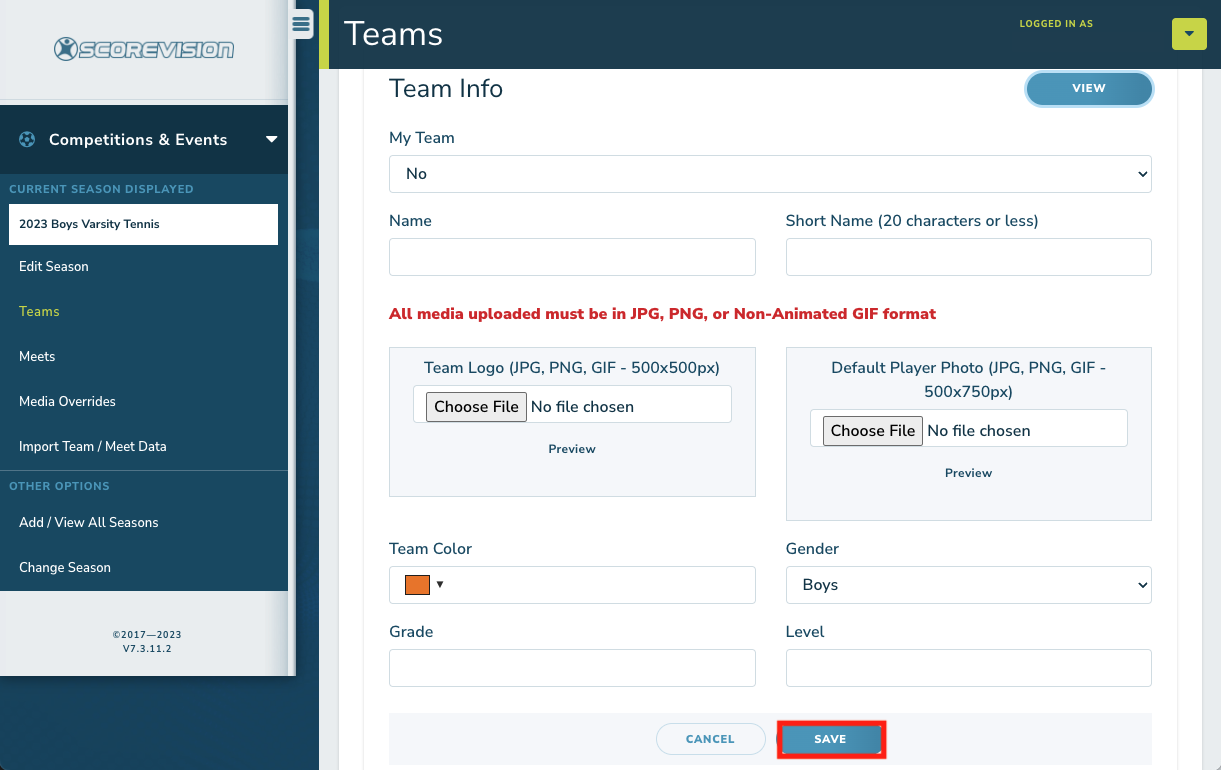
2. After selecting the Add Team button or card, you will be guided to the Team form page. Here you can add basic team information including colors and logos. NOTE: If the team you are creating is your Organization’s team, select Yes in the My Team select menu — this will relay this particular team’s schedules and roster to the Fan App.
Set Up A Tennis Meet In The Cloud: Adding Players
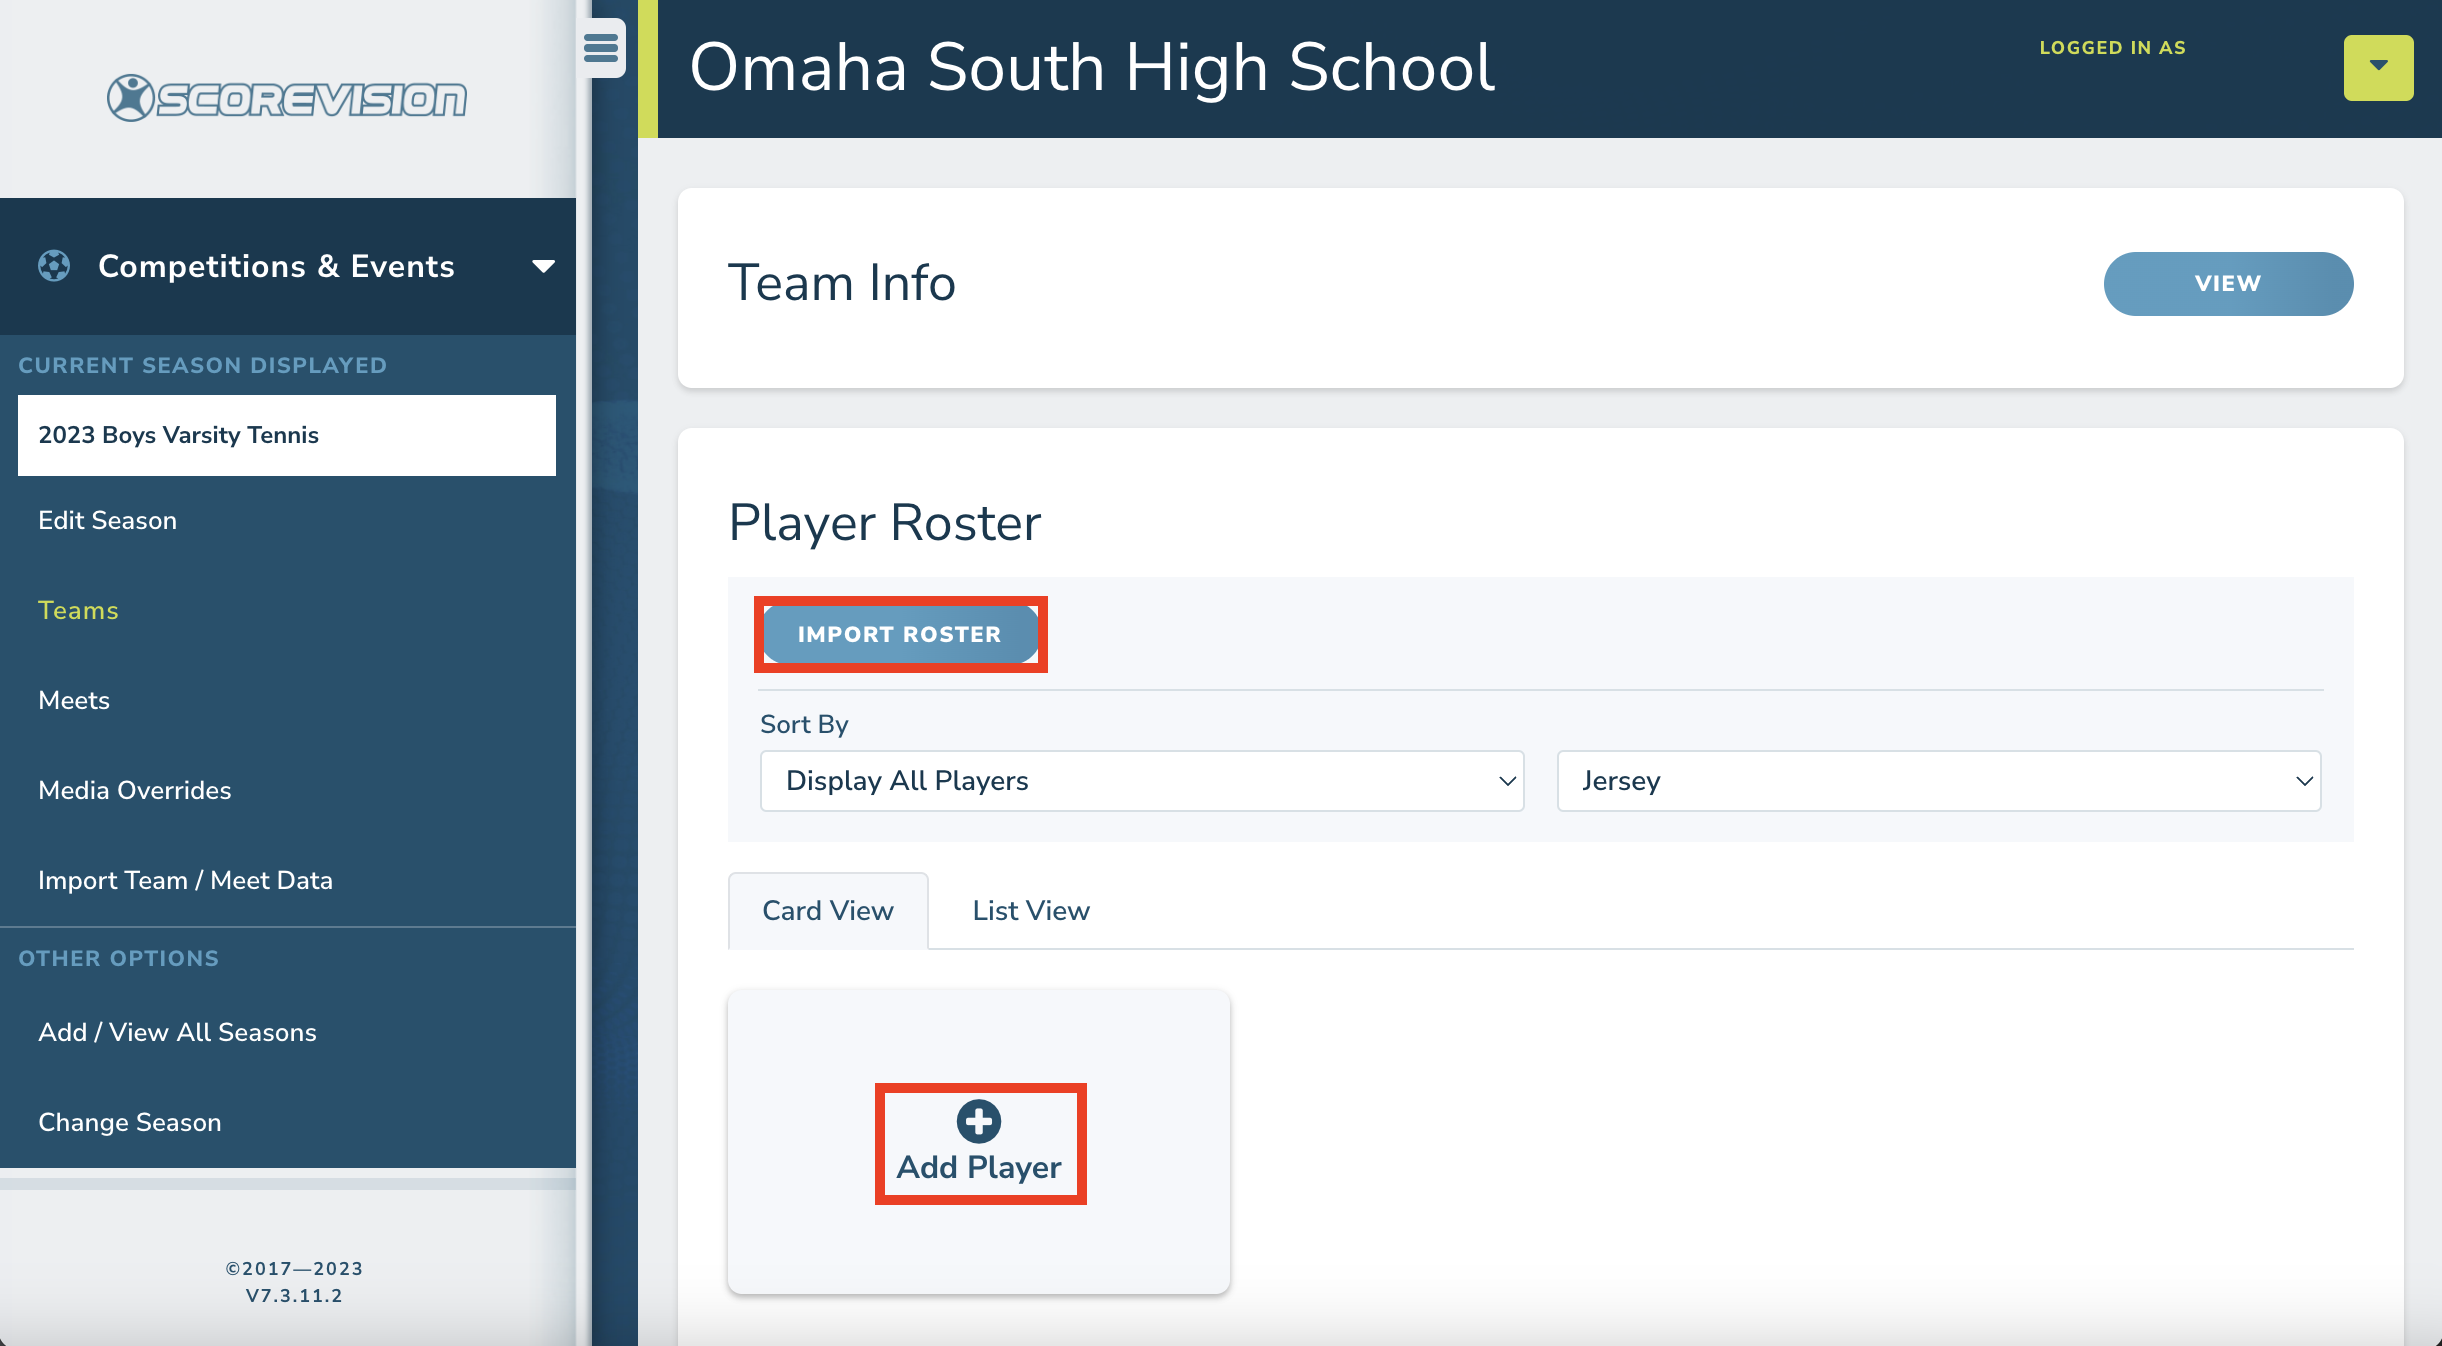
1. Once you’ve completed the team form, you will automatically guide you to the section where players can be added to the team. Start adding players by pressing the Add Player card or you can import an entire roster by selecting the Import Roster button.
After selecting the Import Roster button, you will be guided to a new screen that provides instructions on how to use this feature.
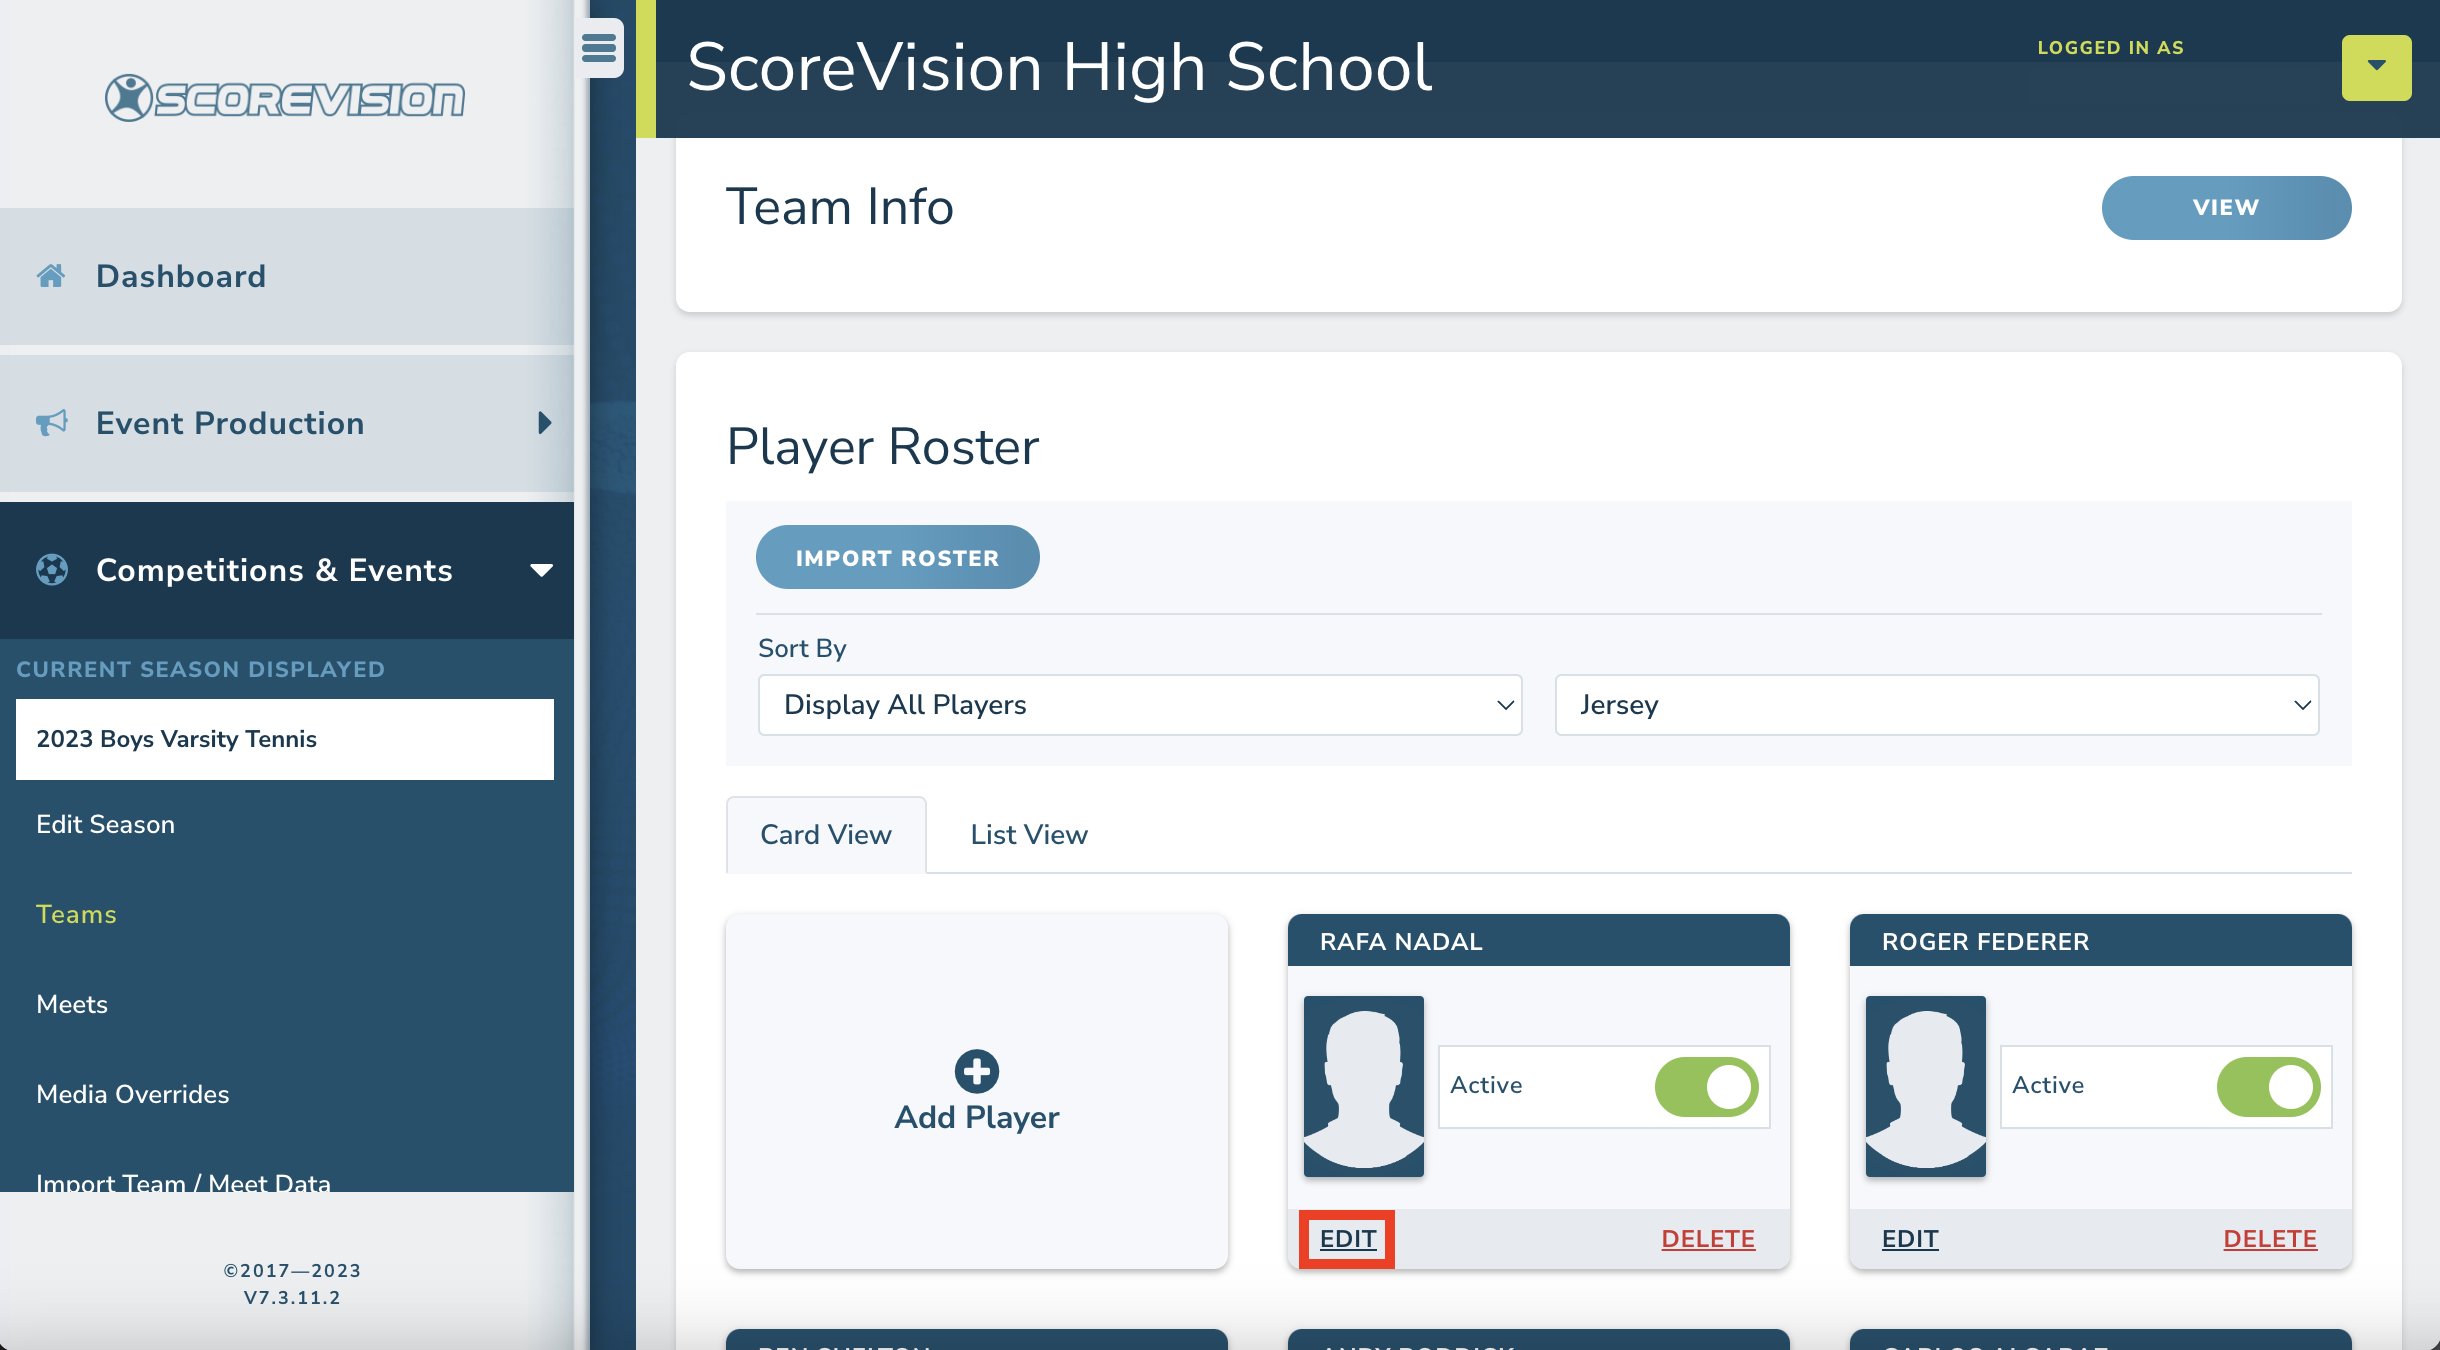
Players already created will be in a cards list. You can modify these players by selecting the Edit button.
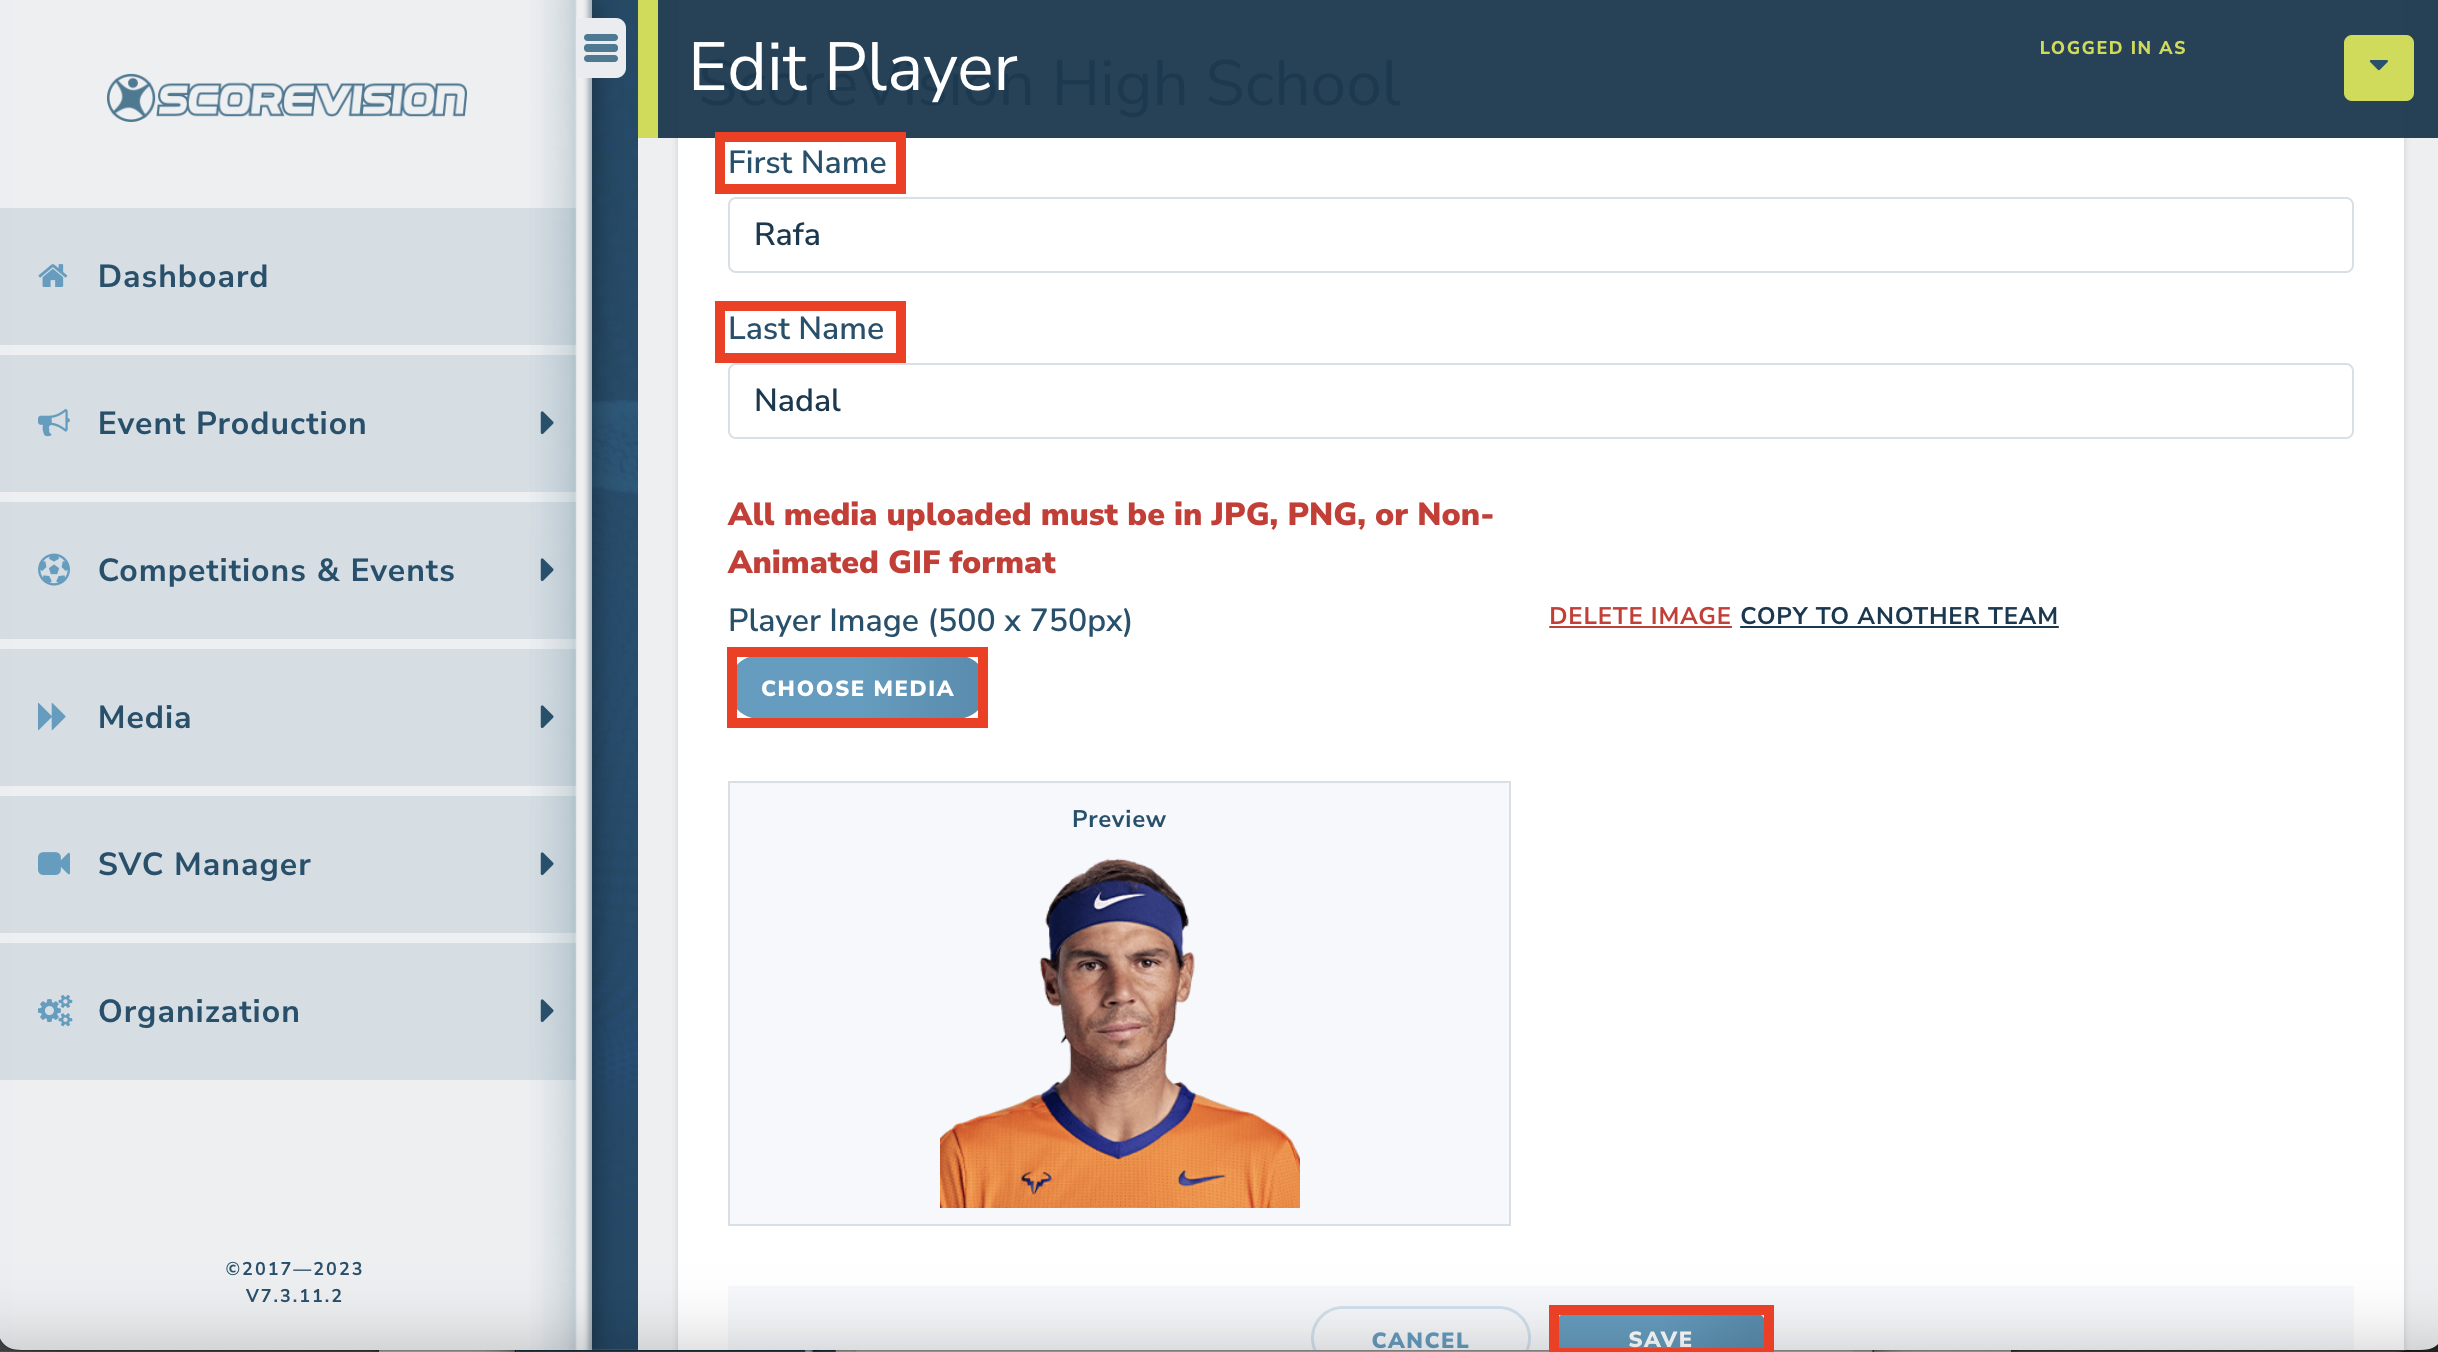
2. Adding a new player requires the player’s first and last name. You have the option to add a profile image that will be used on the scoreboard displays and in the Fan App. Once you have entered all the required information, select the Save button to save the record — or choose the Add Another button to save the current record and to start adding another player to the roster.
Set Up A Tennis Meet In The Cloud: Creating Meets
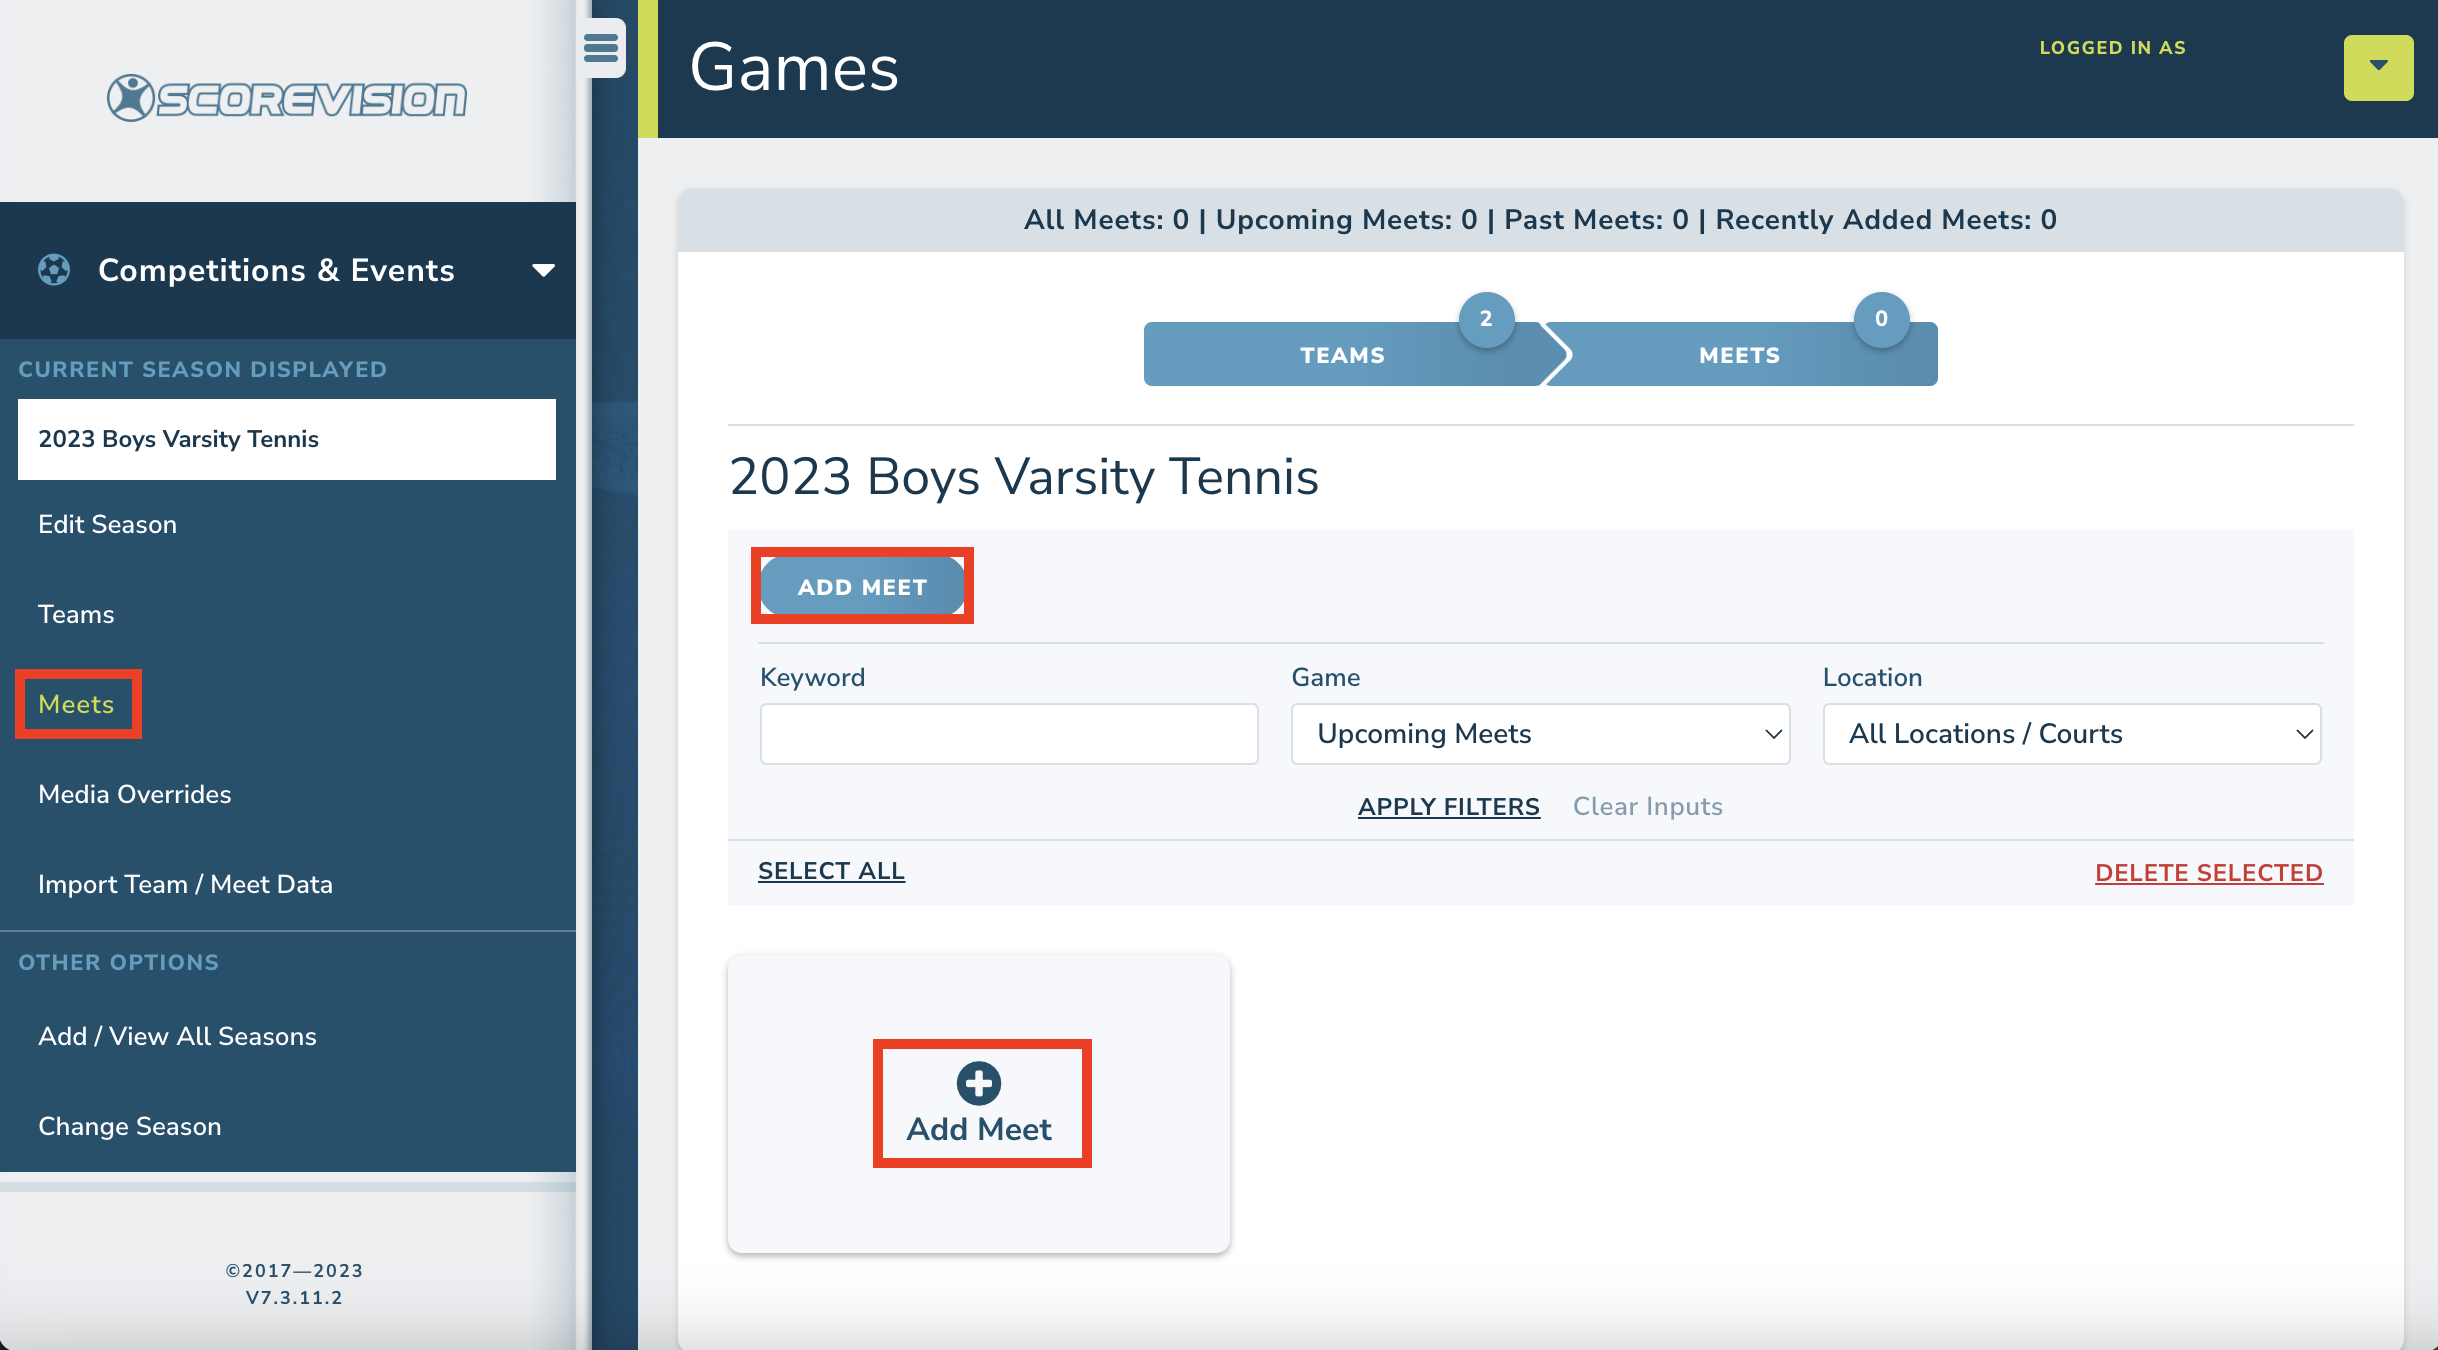
1. Once the teams and players have been added, you’re ready to create a Meet in the Season to which your teams are associated. In the sidebar navigation, select the Meets tab under Competitions & Events. In this section you will be able to create new Meets or edit existing ones. To add a new Meet, select either the Add Meet button or the Add Meet Card.
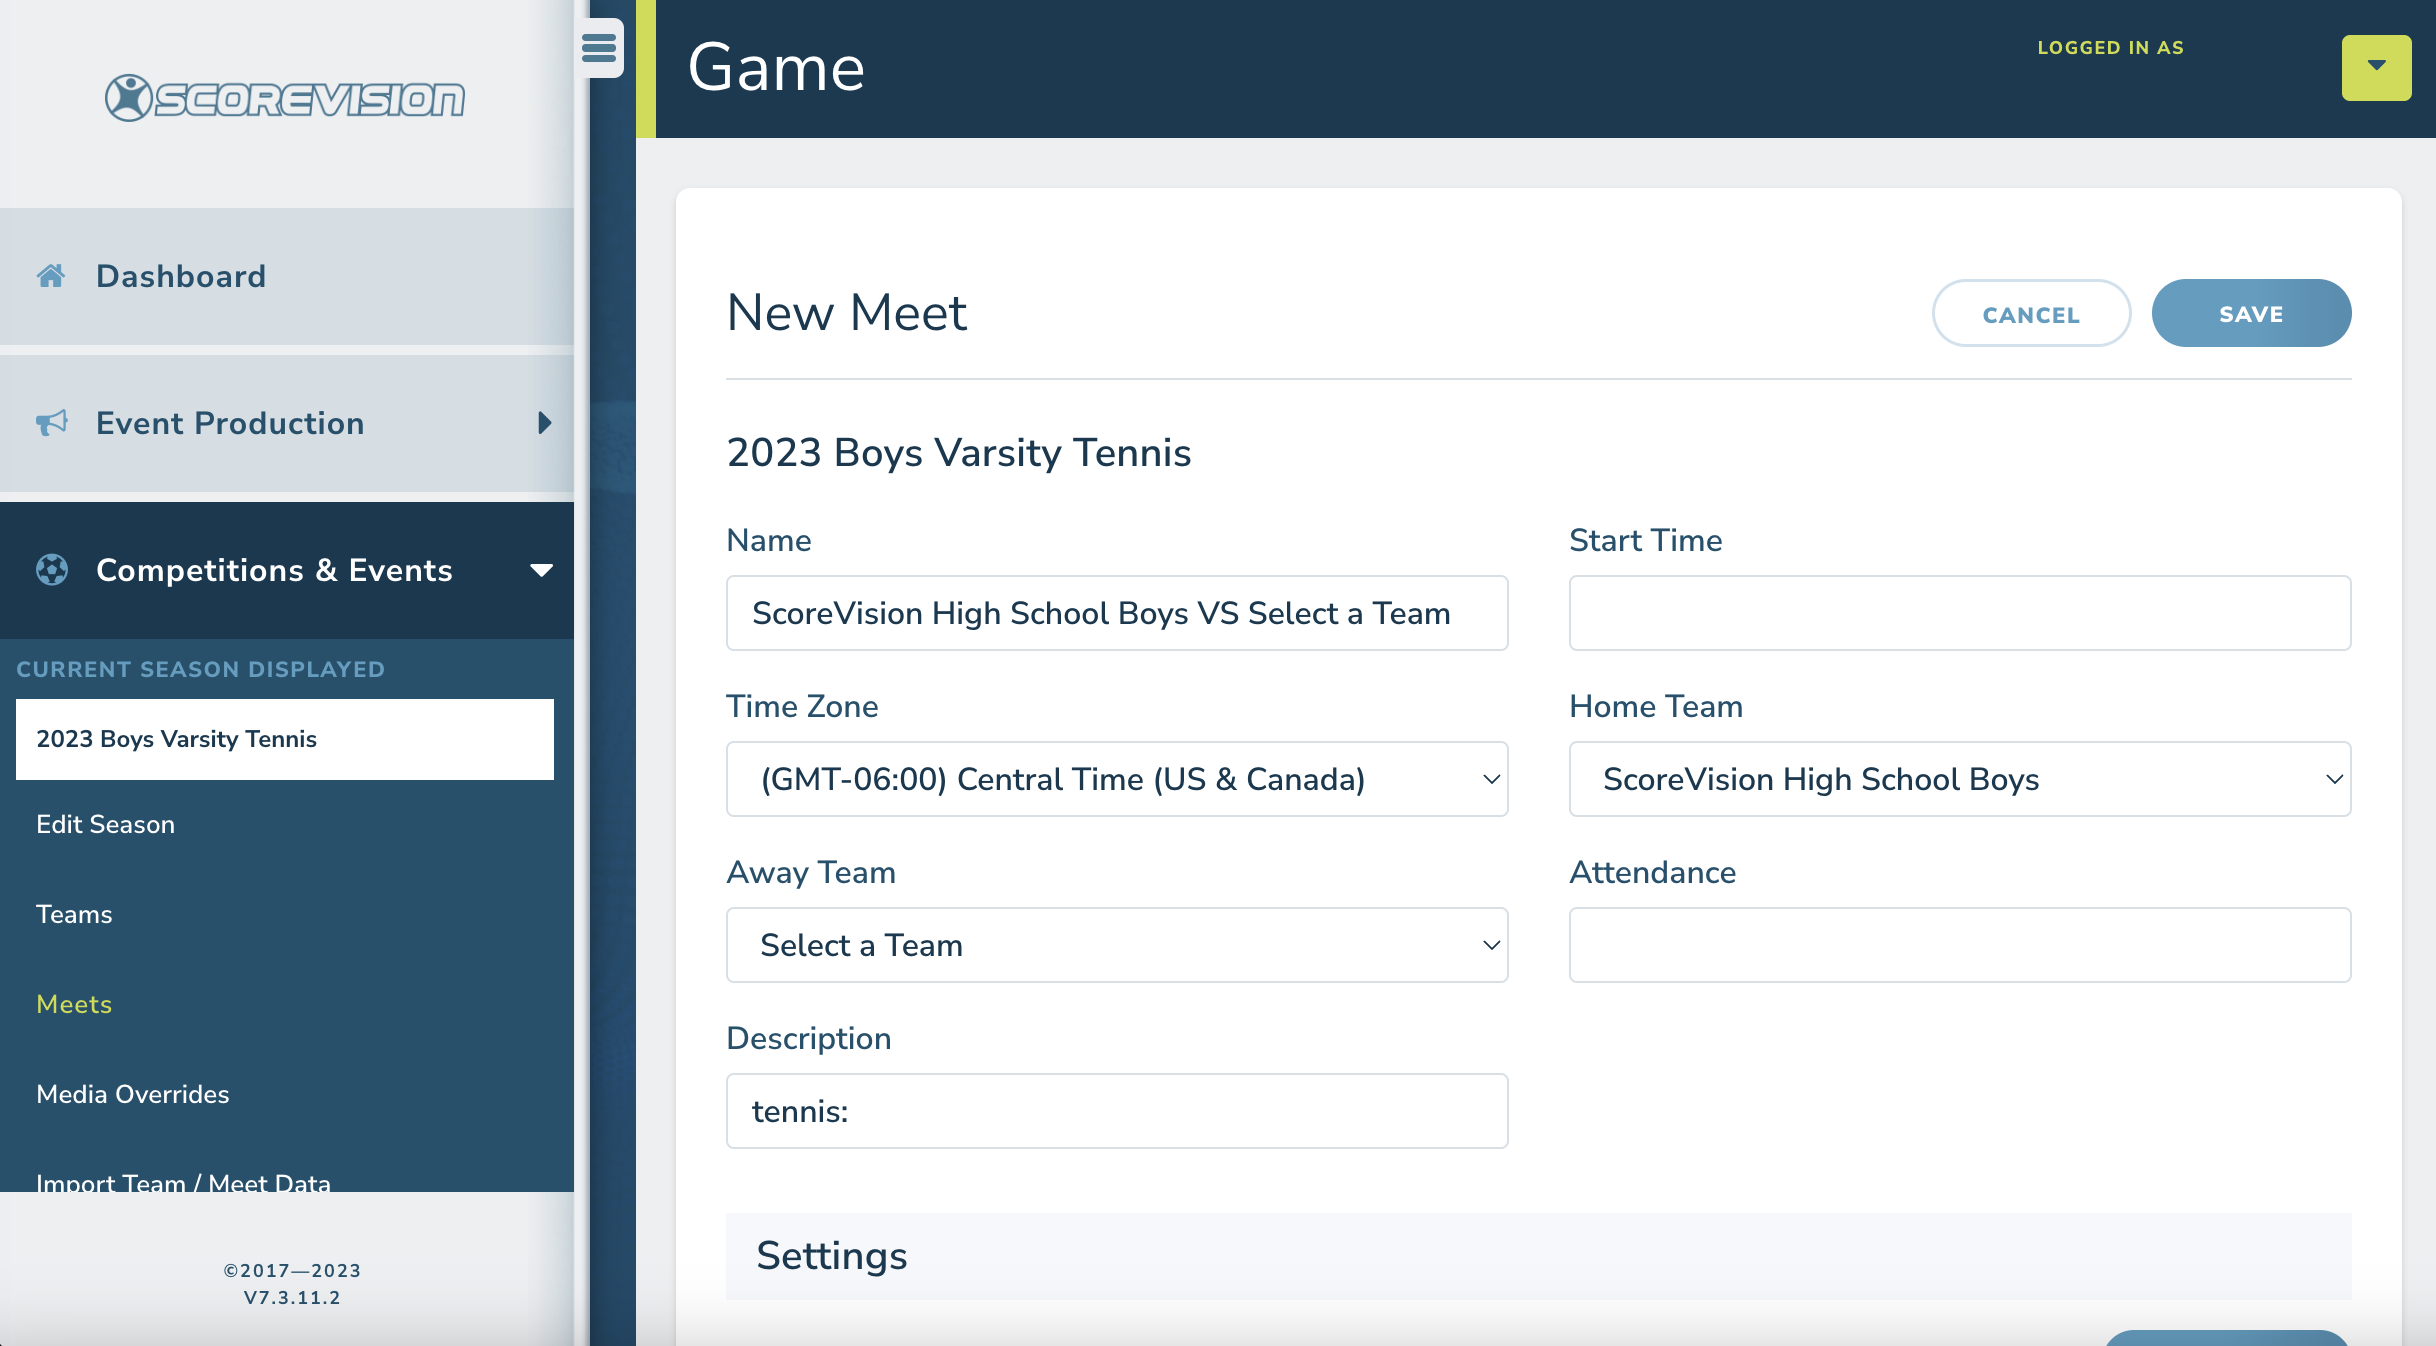
2. To create a new Meet, enter the basic information about the Meet including selecting the two teams participating in the Meet (dual) and start time/date.
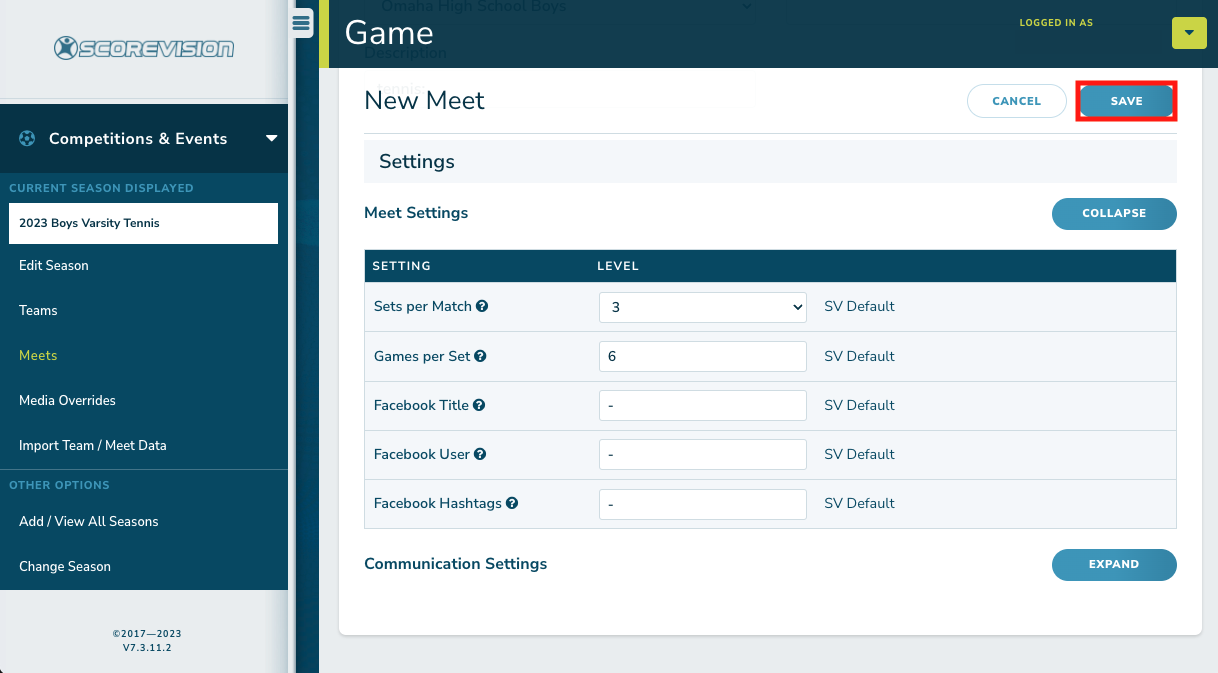
3. After adding the basic Meet information, scroll down and review the Meet Settings. The settings will be pre-populated with defaults from the Cloud but can be overridden at this point for this individual Meet as necessary. When finished, press the Save button.
Set Up A Tennis Meet In The Cloud: Adding Matches to Meets
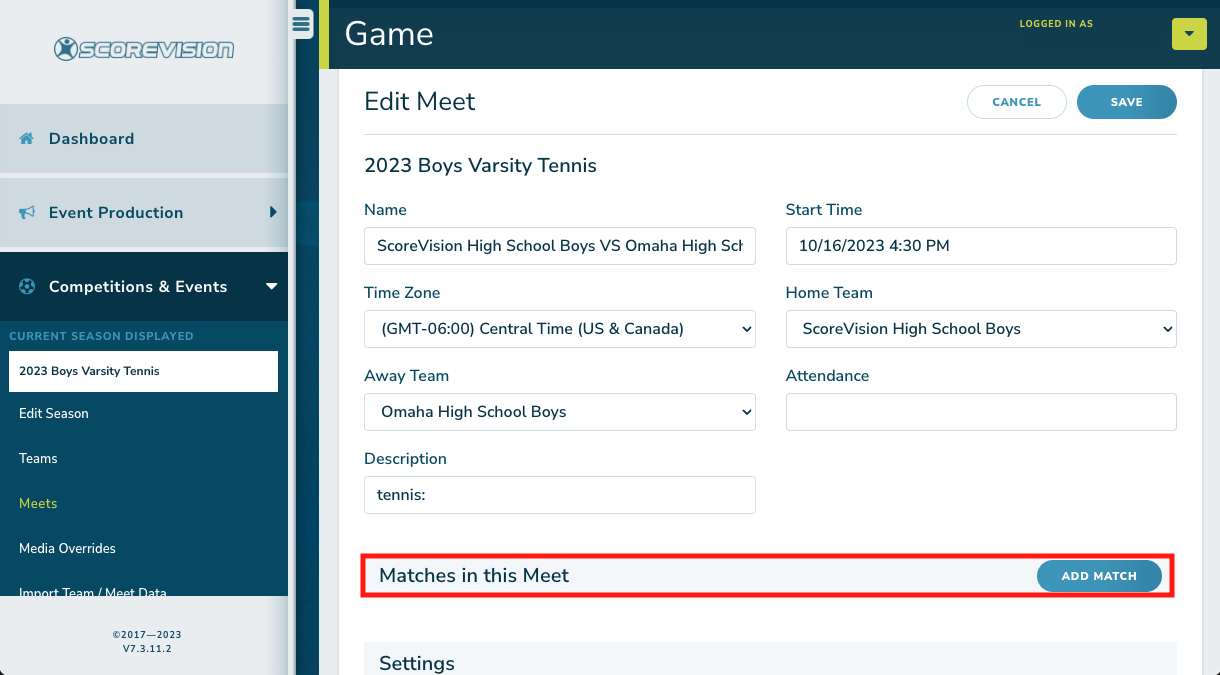
1. At this point, the general Meet information is recorded and a new section titled Matches in this Meet will be availed. Now you need to add the matches that will be played at this Meet. Press the Add Match button to get started.
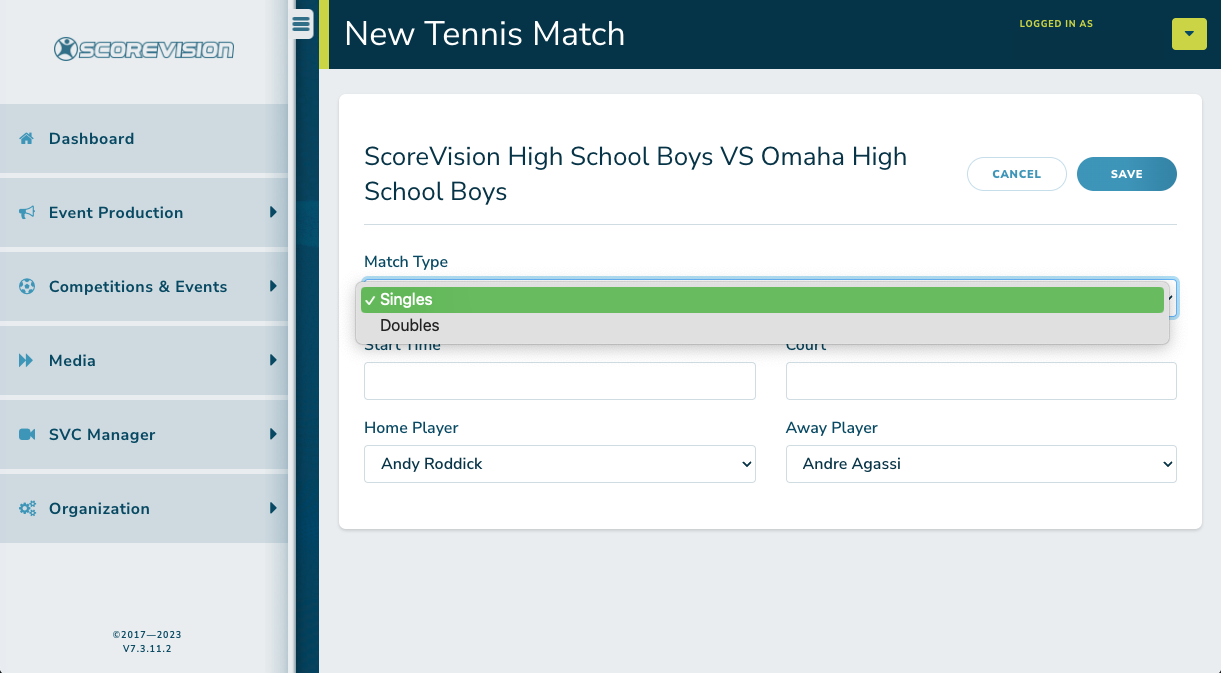
2. Triggering the Add Match button guides you to the New Match form screen. Choose the Match Type. Then enter a Start Time and Court. Select the players who will be participating in this Match and press the Save button. NOTE: The teams you selected for the Meet on the previous screen must have players added to their rosters so that they can be selected from the player menus.
Selecting Doubles as the Match Type will avail an additional player selection field for each team.


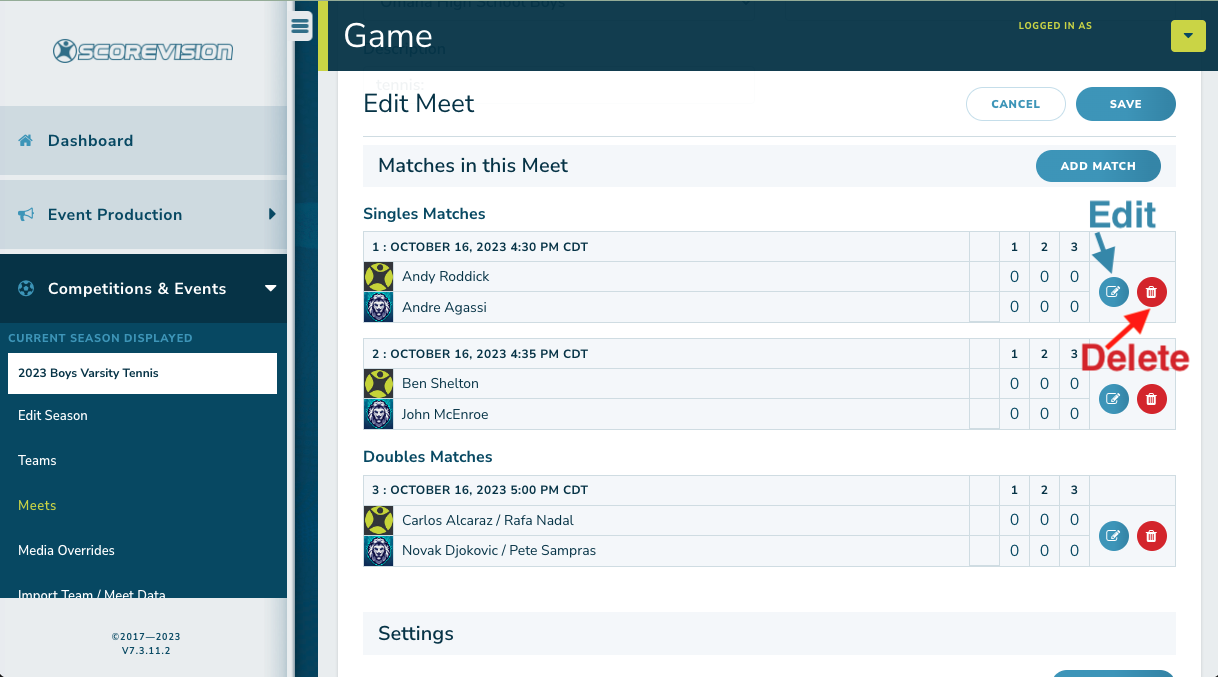
3. The Match will be added to the list for this Meet (as shown below). Follow this same procedure to add all the Matches for this Meet that you wish to score during the event. Matches can be edited or deleted using the action buttons.
Connecting Your Scorekeeper App to a Scoreboard Display
1. Log in to your Scorekeeper App using your ScoreVision credentials. Once logged in, there are two different approaches you can take to scoring Tennis Matches:
- MULTI-MATCH SCORING, SHOW MULTIPLE MATCH’S SCORES ON ONE DISPLAY: For any given Meet, you have the option to display multiple Match’s scores—whether in progress or not—on a single display
- SINGLE MATCH SCORING, SHOWING EACH MATCH’S SCORE ON ITS OWN DISPLAY: If you have separate scoreboards for each court—or you wish to feature a single game— you have the option to show the score for a specific game on a single scoreboard display
Connecting You Scorekeeper App: Multi-Match Scoring On One Display
1. Once logged into the app, choose YES or NO next to "Do you want to connect to a scoreboard display?" based on if you will display Multi-Match Scoring or Single Match Scoring.
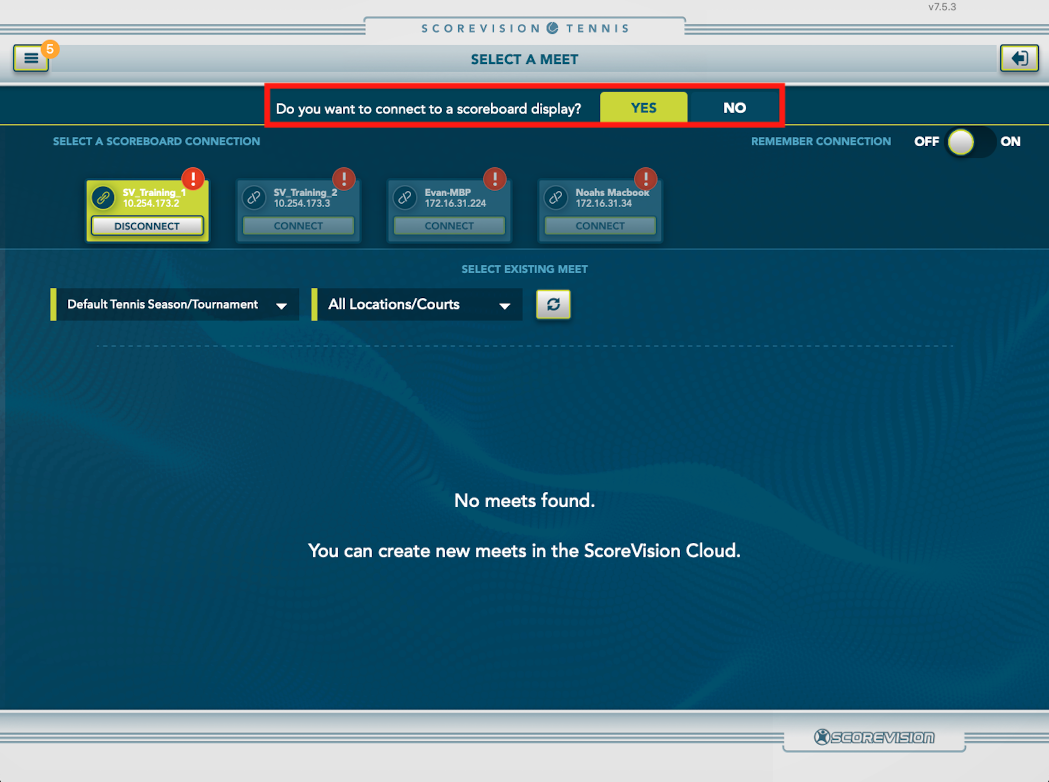
- For Multi-Match scoring, choose NO next to "Do you want to connect to a scoreboard display?" Your scorekeeper will be saving scoring results to the Cloud, so having a persistent Internet connection (WiFi or LTE) for your scoring device is critical. The ScoreVision Producer App will be the device controlling the scoreboard displays.
- For Single Match scoring, choose YES next to "Do you want to connect to a scoreboard display?" A list of available ScoreVision scoreboards should appear in the “Select A Scoreboard Connection” bin. Press the Connect button for the one you wish to use for your game. Upon successful connection, the scoreboard card will turn green and an icon will appear to confirm connectivity is engaged. The ScoreVision Producer App should NOT be used in this case to control the scoreboard view.
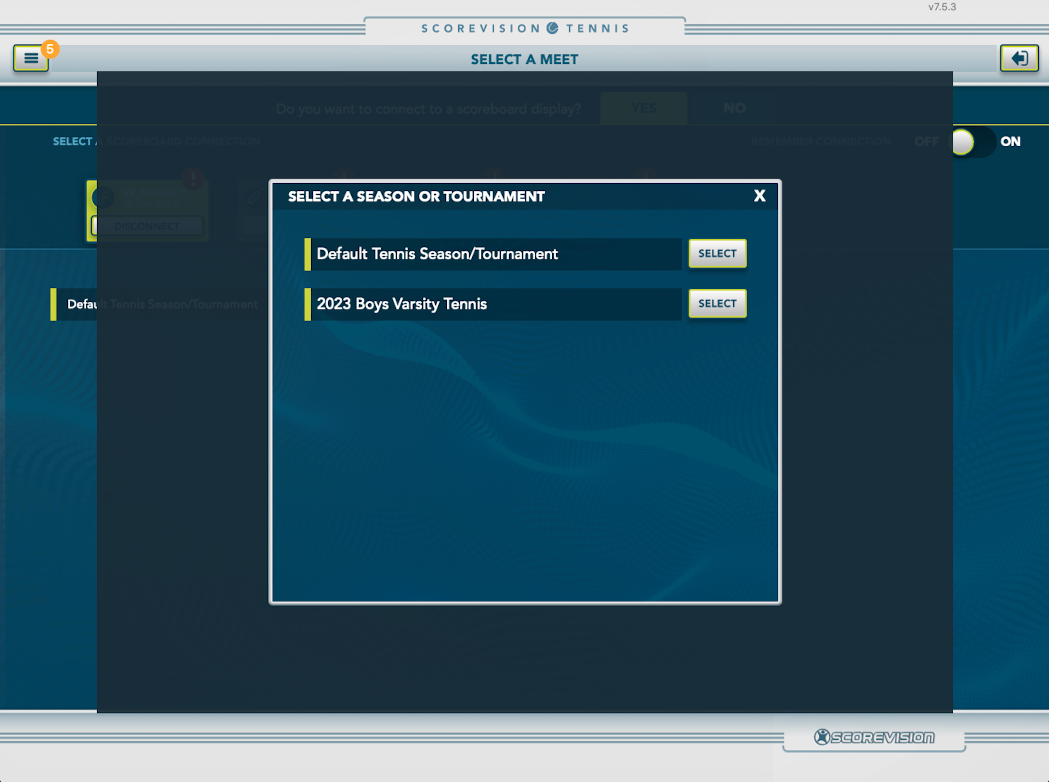
2. Now, find the Meet you wish to score from the list of available events (loaded from the Cloud). If you don’t see the Meet you are expecting, you may need to use the Seasons and Locations filter. Press DEFAULT TENNIS SEASON/TOURNAMENT to bring up a list of any active seasons created in the cloud.
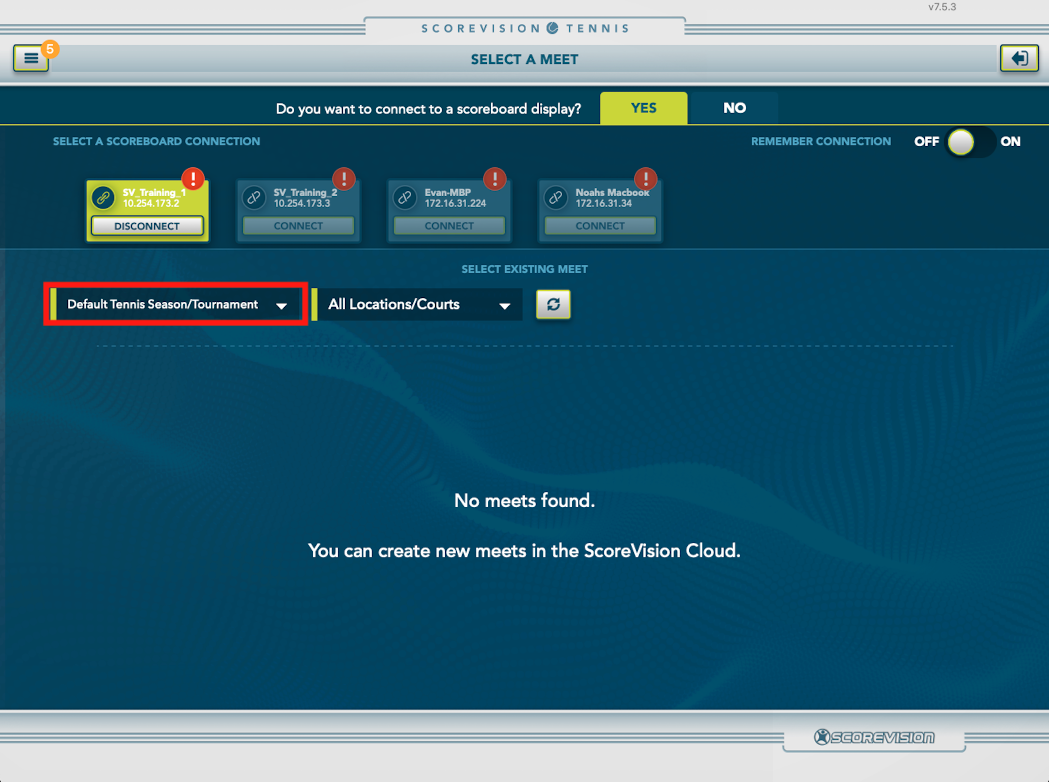
A list of available pre-made seasons will appear in a pop-up window. Select the season that you want to use. NOTE: If Default Season/Tournament is the only season available in the list, seasons will need to be created in the cloud.
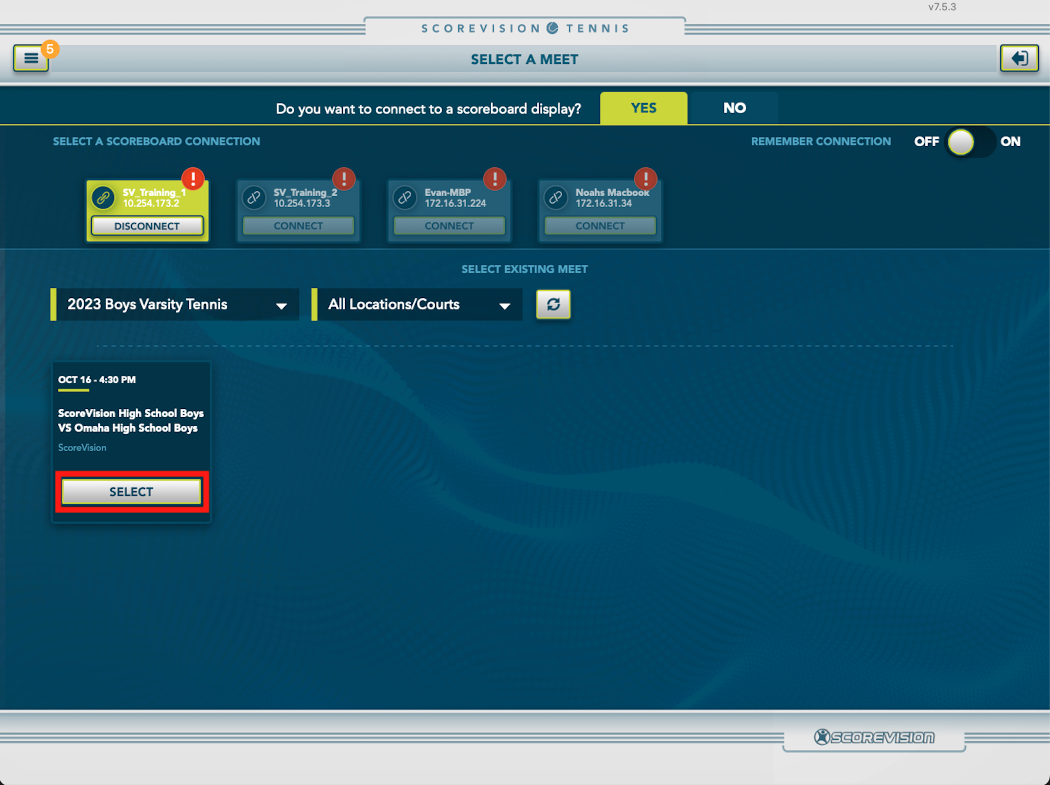
3. Once you’ve located your Meet, press the Select button on its card.
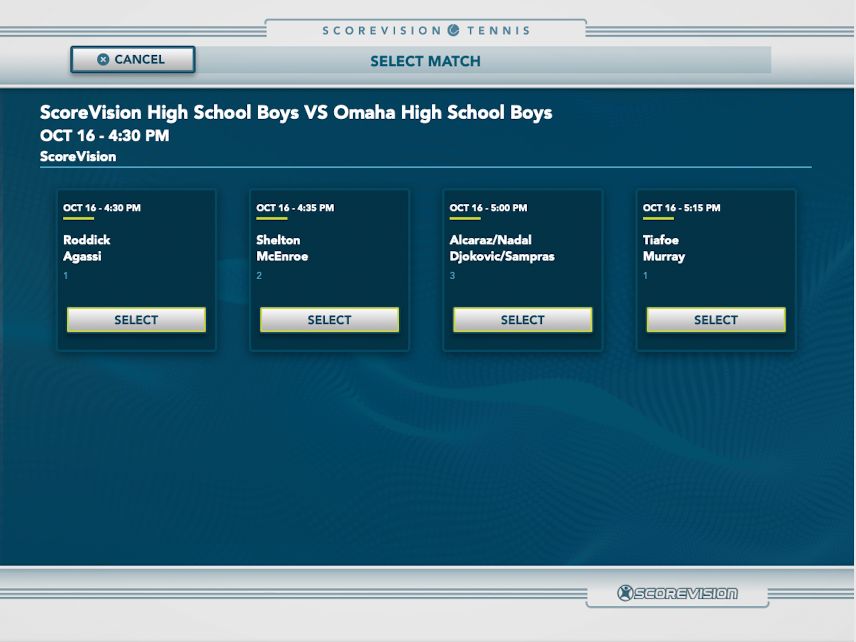
4. After selecting the Meet, a list of Matches associated to that Meet will appear. Select the individual match that you wish to score. Make sure that you are scoring the proper Match by double-checking the time, player names and court identifier.
Score a Match Via Scorekeeper
1. After selecting the Match you wish to score, you’ll be presented with the scorekeeping controller that will enable you to score the competition game-by-game and set-by-set. Scoring is easy using the Tennis Scorekeeper’s intuitive interface. Add a POINT, FAULT, or ACE for each player as needed using their respective scoring node.
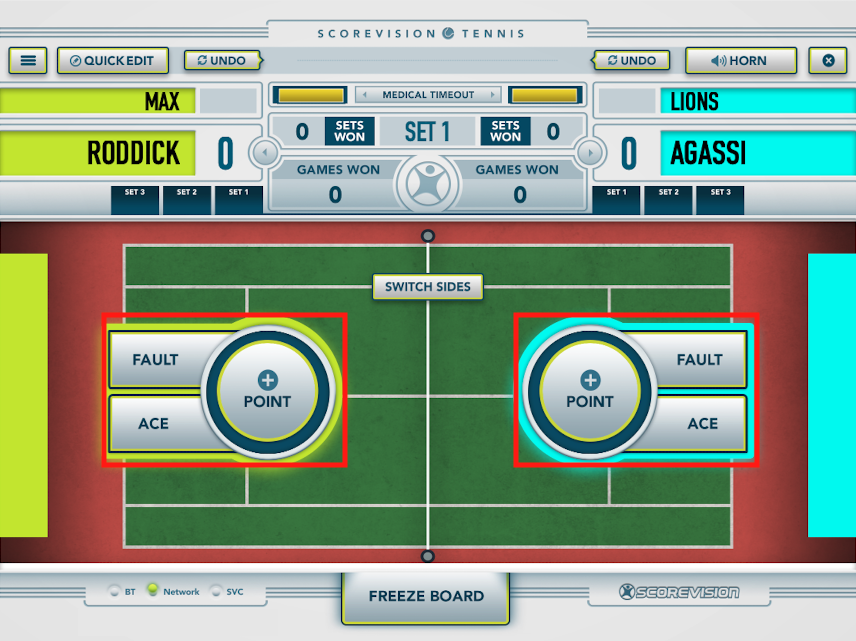
A view of the information that relays to the scoreboard is displayed in the segment at the top of of the controller.
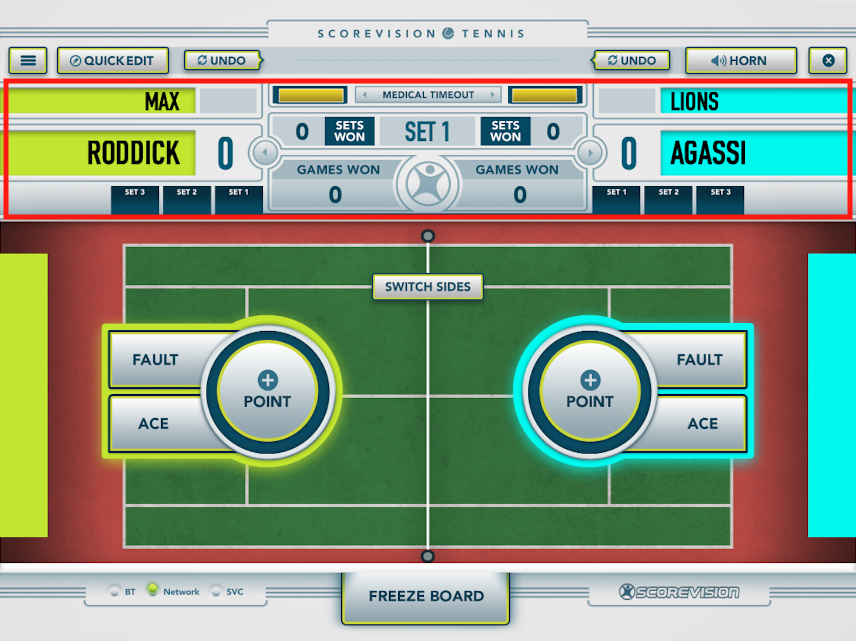
2. If a FAULT is attributed to a player, the scoring interface display a DOUBLE FAULT button for that player so points can be applied properly if the double fault occurs.


3. The ScoreVision Tennis Scorekeeper follows standard USTA scoring rules. In order to win the game, a player must win at least four points based on the point system noted below:
- 0 points = Love
- 1 point = 15
- 2 points = 30
- 3 points = 40
- Tied score = All
- 40-40 = Deuce
4. The ScoreVision Tennis Scorekeeper utilizes tiebreak set format for set scoring. In a tiebreak set, a player or team needs to win six games win a set. If the score gets to 5-5 (5-all), one player must win the next two games to win the set. If the score reaches 6-6 (6-all) in the set, a tiebreak game is played. NOTE: Advantage Set scoring is not supported by the ScoreVision Tennis Scorekeeper.
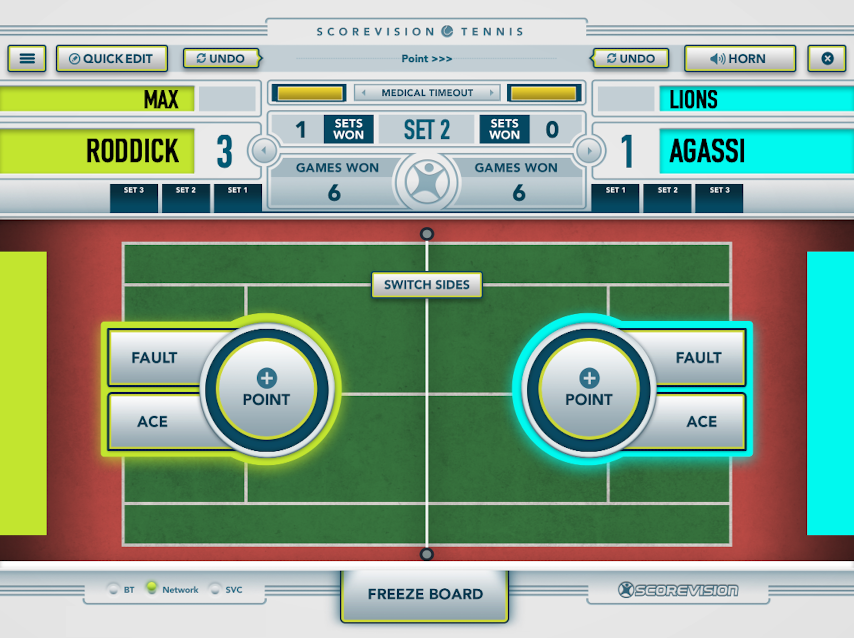
5. The match scoring format used by the ScoreVision Tennis Scorekeeper is best-of-three tiebreak sets. This means that if a player doesn’t win the first two sets, the third set will decide the match!
Transitioning From Game to Game or Set to Set
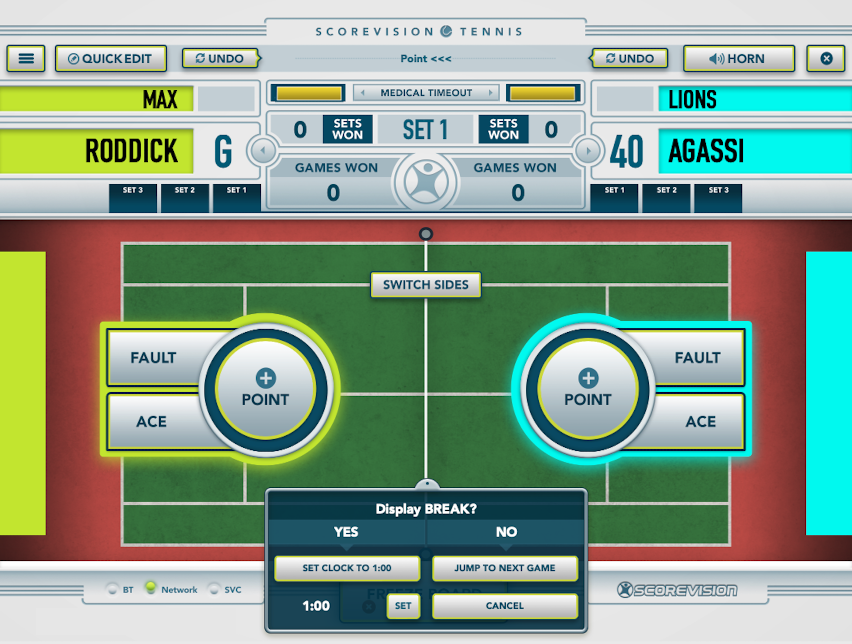
1. Once a game score meets the winning-score conditions, a modal prompt will appear and give the person keeping score an option to accept the score and advance to the next game by pressing JUMP TO NEXT GAME button or return to scoring the current game by pressing the CANCEL button.
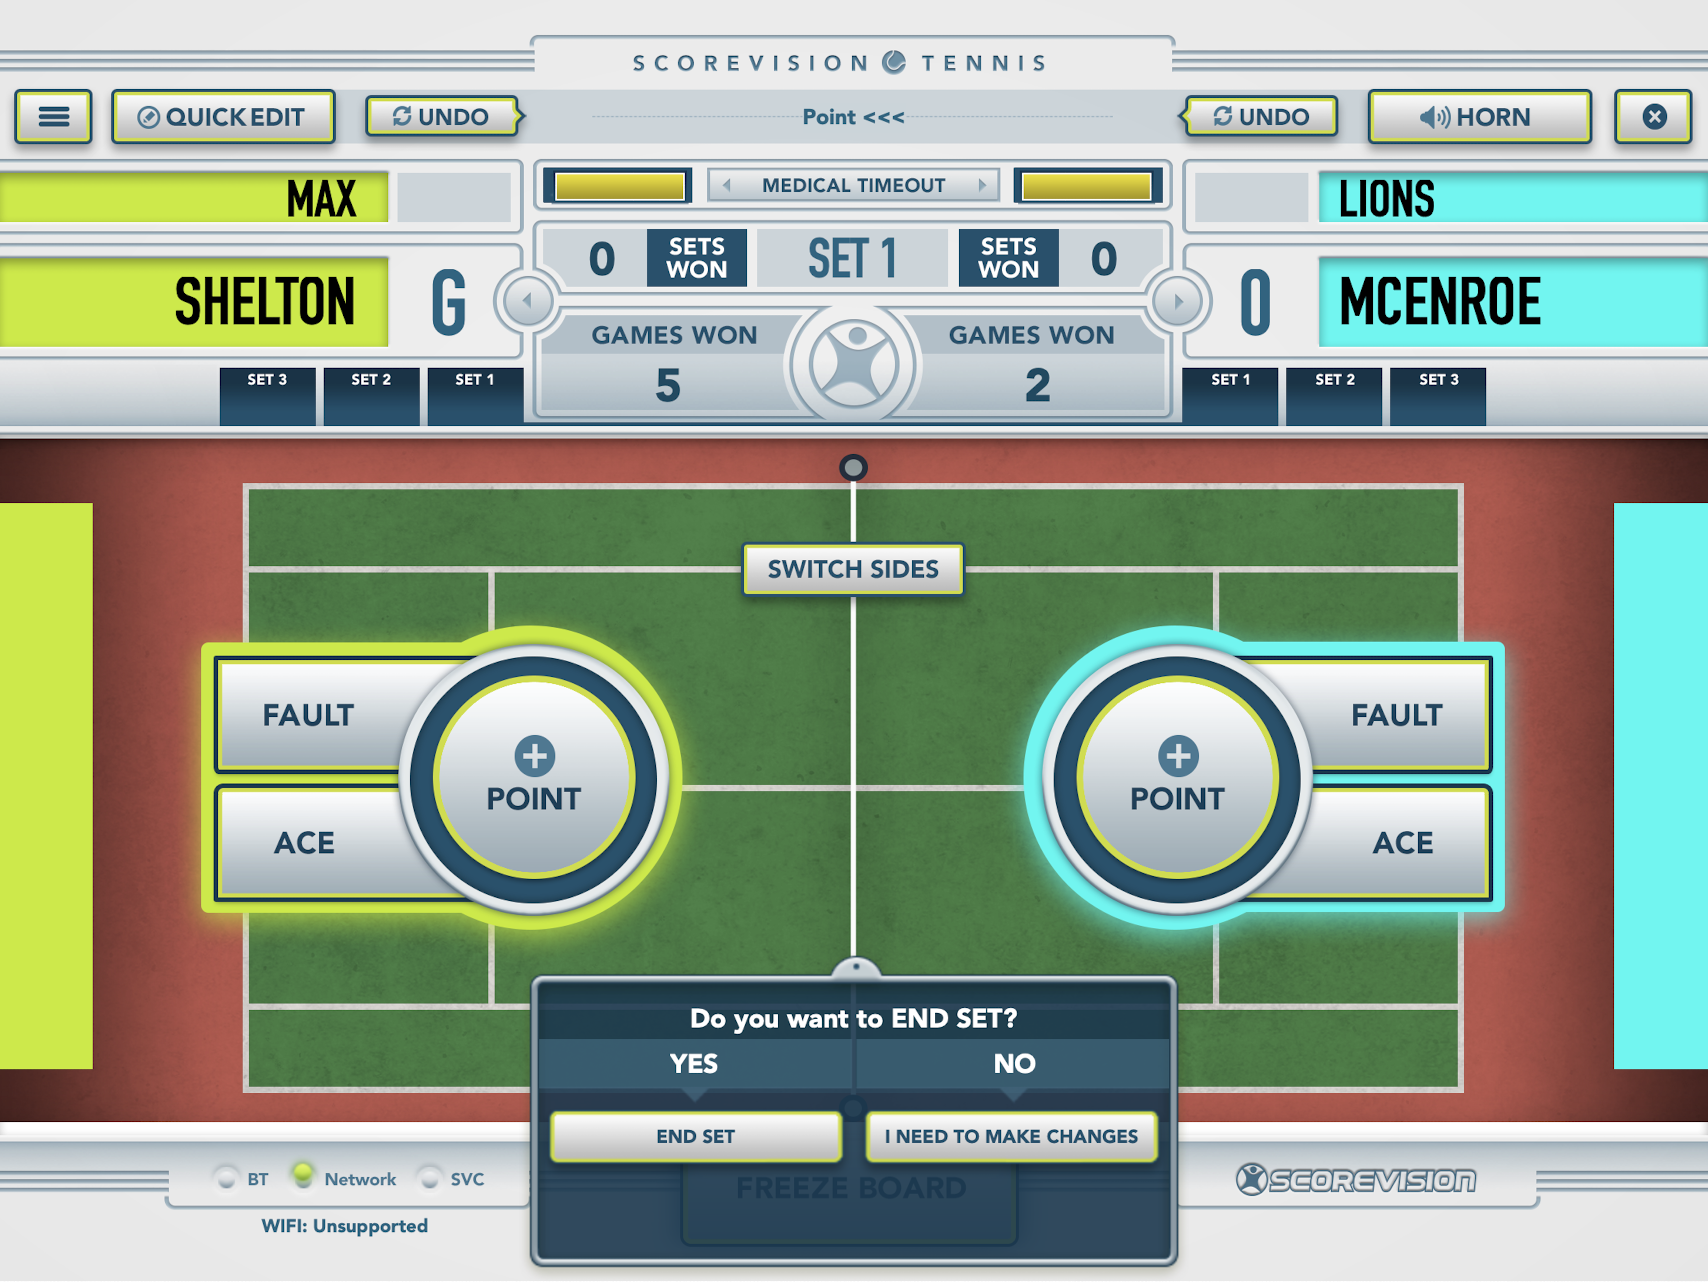
2. When a set has been won by one of the players, an End Set modal will appear. If you made a mistake scoring, you can select the I NEED TO MAKE CHANGES button to return to the previous game. If not, select the END SET button to begin a new set.
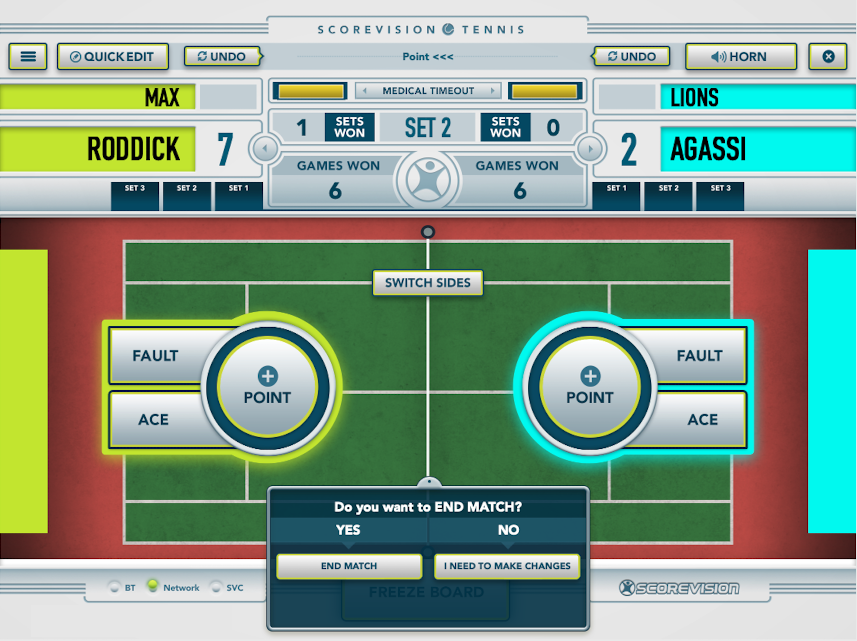
3. When the match has ended, an End Match modal will appear. If you made a mistake scoring, you can select the I NEED TO MAKE CHANGES button to return to the previous game. If not, select the END MATCH button and you will be guided back to the match list screen.
Quick Edit and Undo
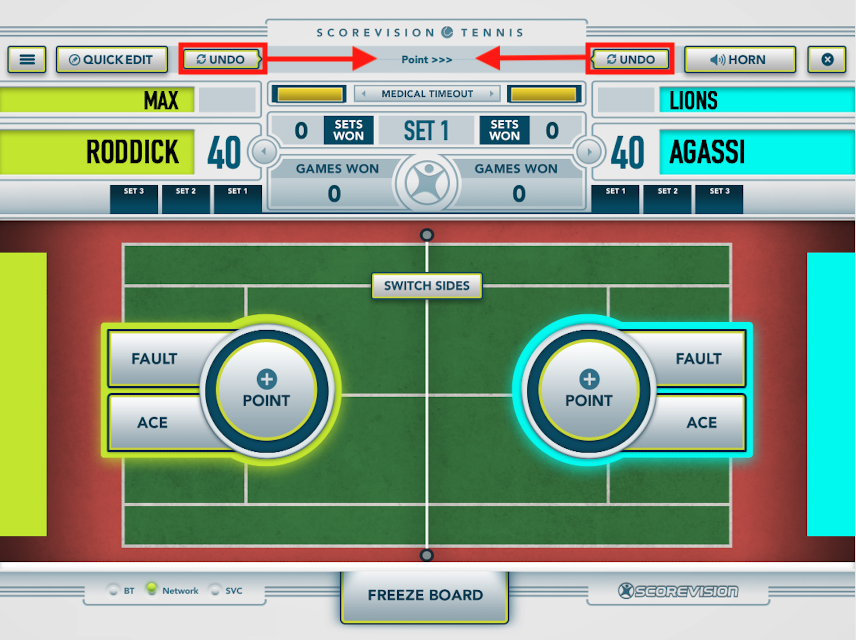
1. To correct mistakes, press either one of the Undo buttons at the top of the screen. It will undo the last action made in succession up to the beginning of the current game in play. The last action is listed between the two Undo buttons.
2. To quickly correct errors or update the information on the scoreboard (including team colors, team names, and player names) select the Quick Edit button in the scoring interface header. Press SAVE to apply any changes made.


Freeze Board
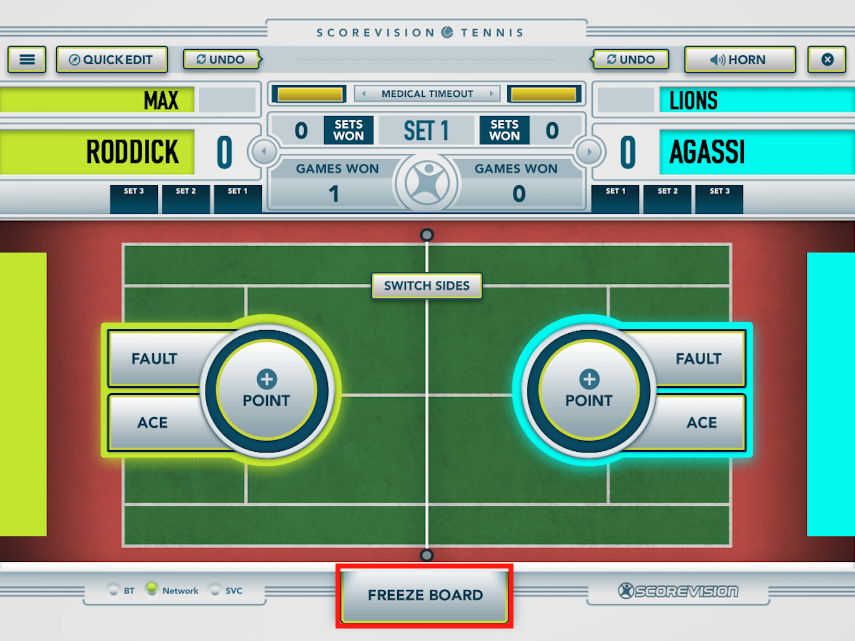
At times, dynamic scoreboard displays could be distracting for players. Use the Freeze Board button to lock the view of the current scoreboard, pausing all animations and changes being made to the scoreboard. NOTE: The scoreboard will not update scores when it is in Freeze mode.
Controlling the Display with Producer
IMPORTANT: Use the Producer for controlling the scoreboard only if showing multiple match's scores on one display.
The Producer App is a significant contributor to the multi-match Tennis experience, as it facilitates control over the view on the scoreboard display. Its potency lies in the variety of options it offers for presenting match scores to the audience.
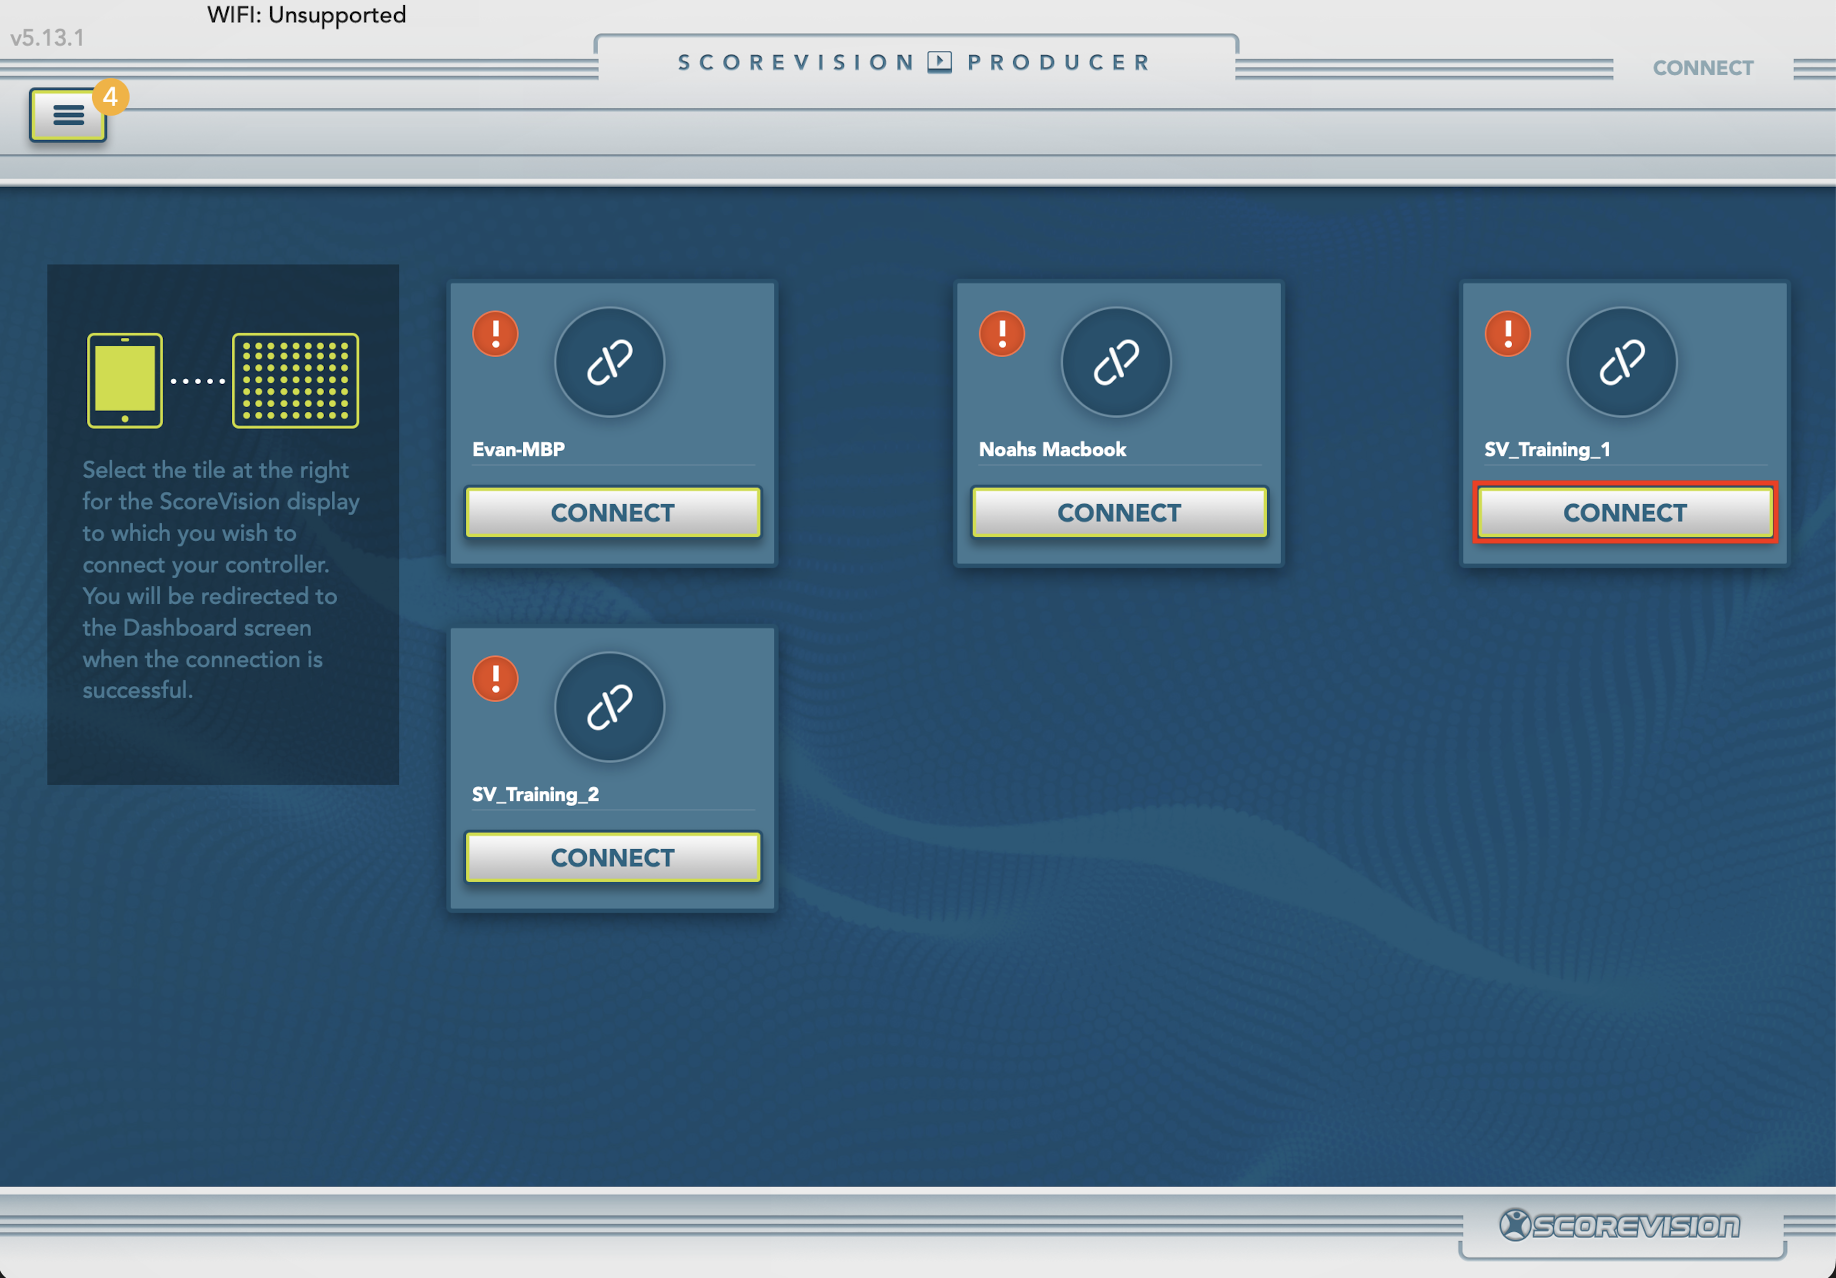
1. Start by logging in to the Producer App with your credentials. Next, connect to the display to which you wish to broadcast the scores.
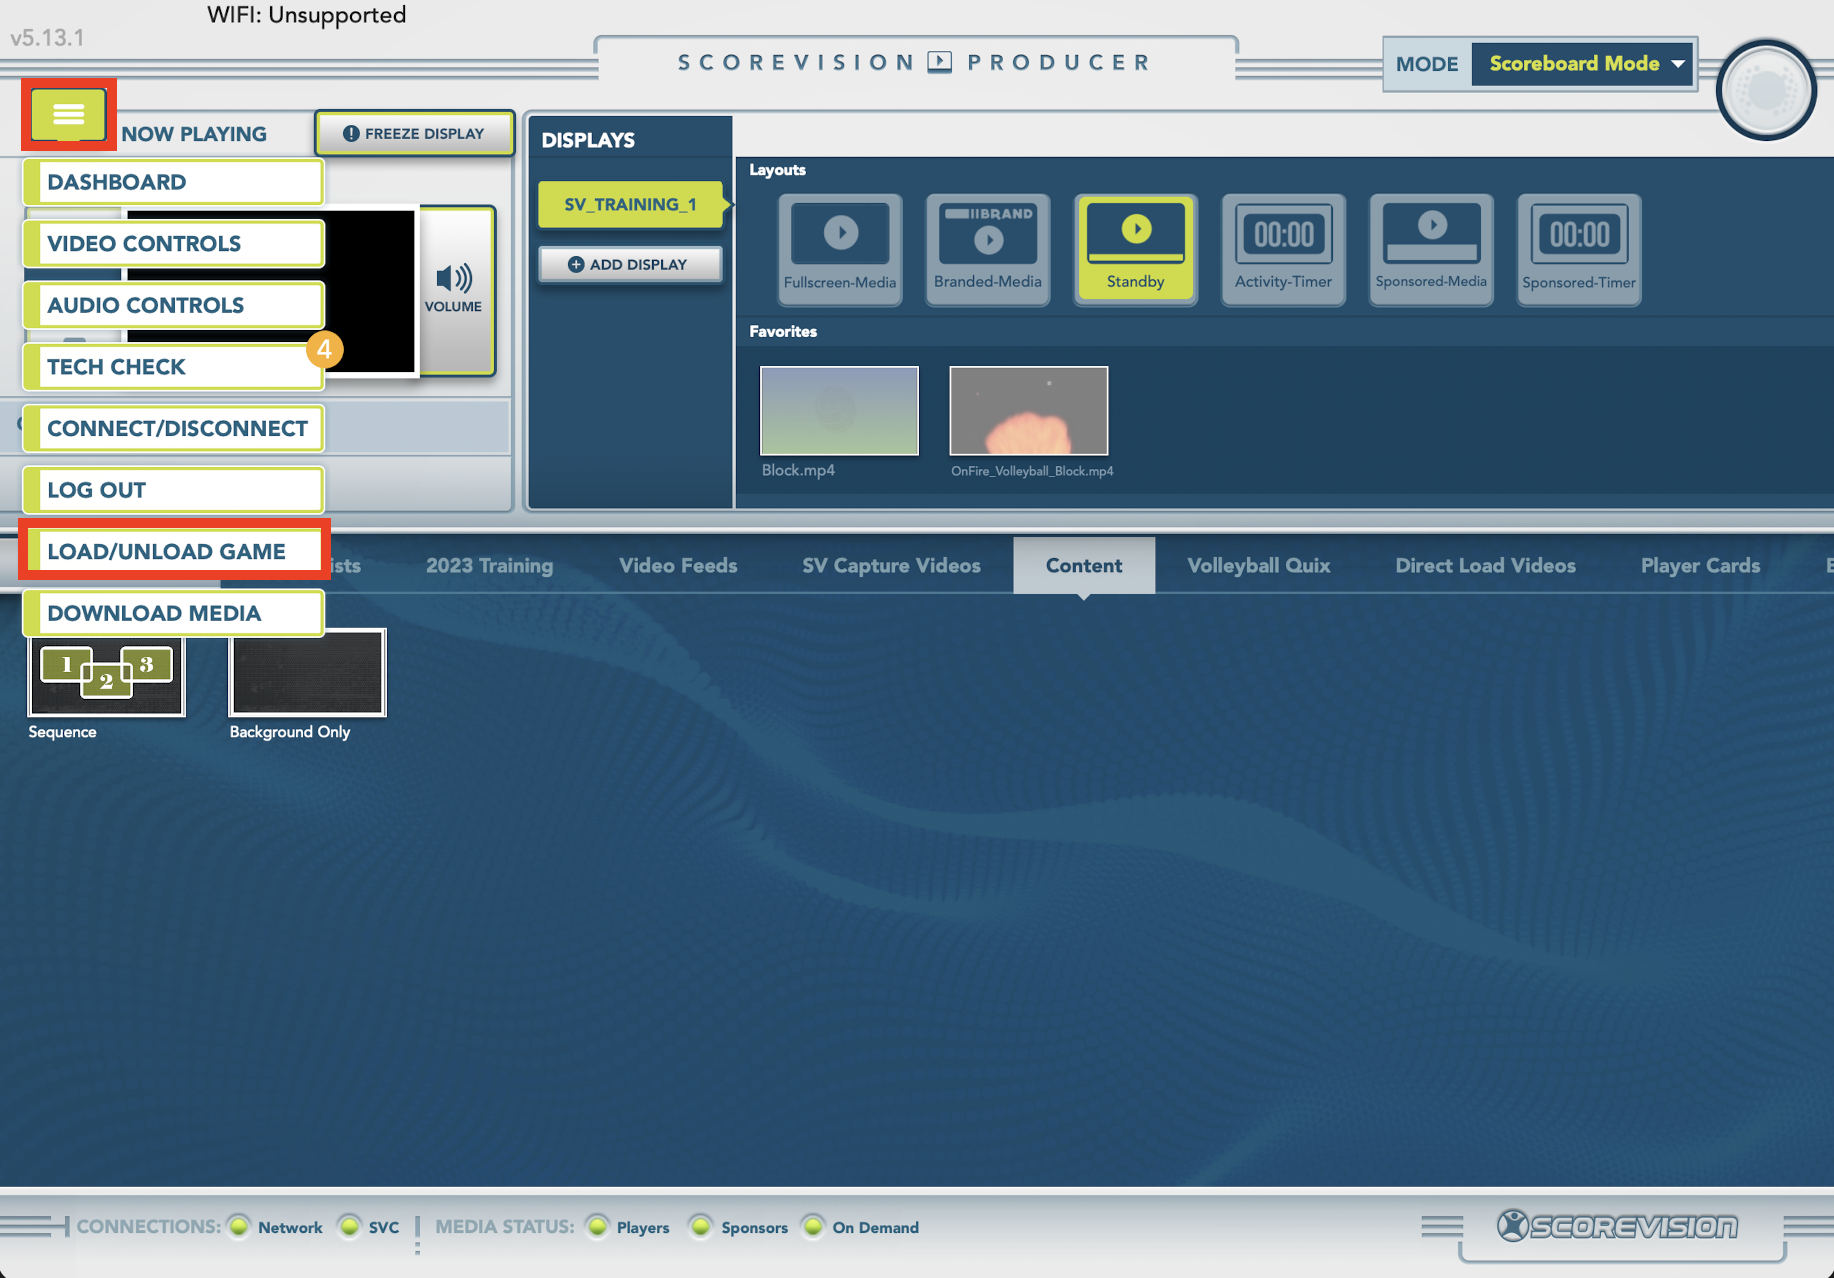
2. Now, load the Tennis Meet to which the matches being played are all associated. Press the navigation menu button in the upper left-hand corner of the screen. Press the “Load/ Unload Game” button in the dropdown menu.
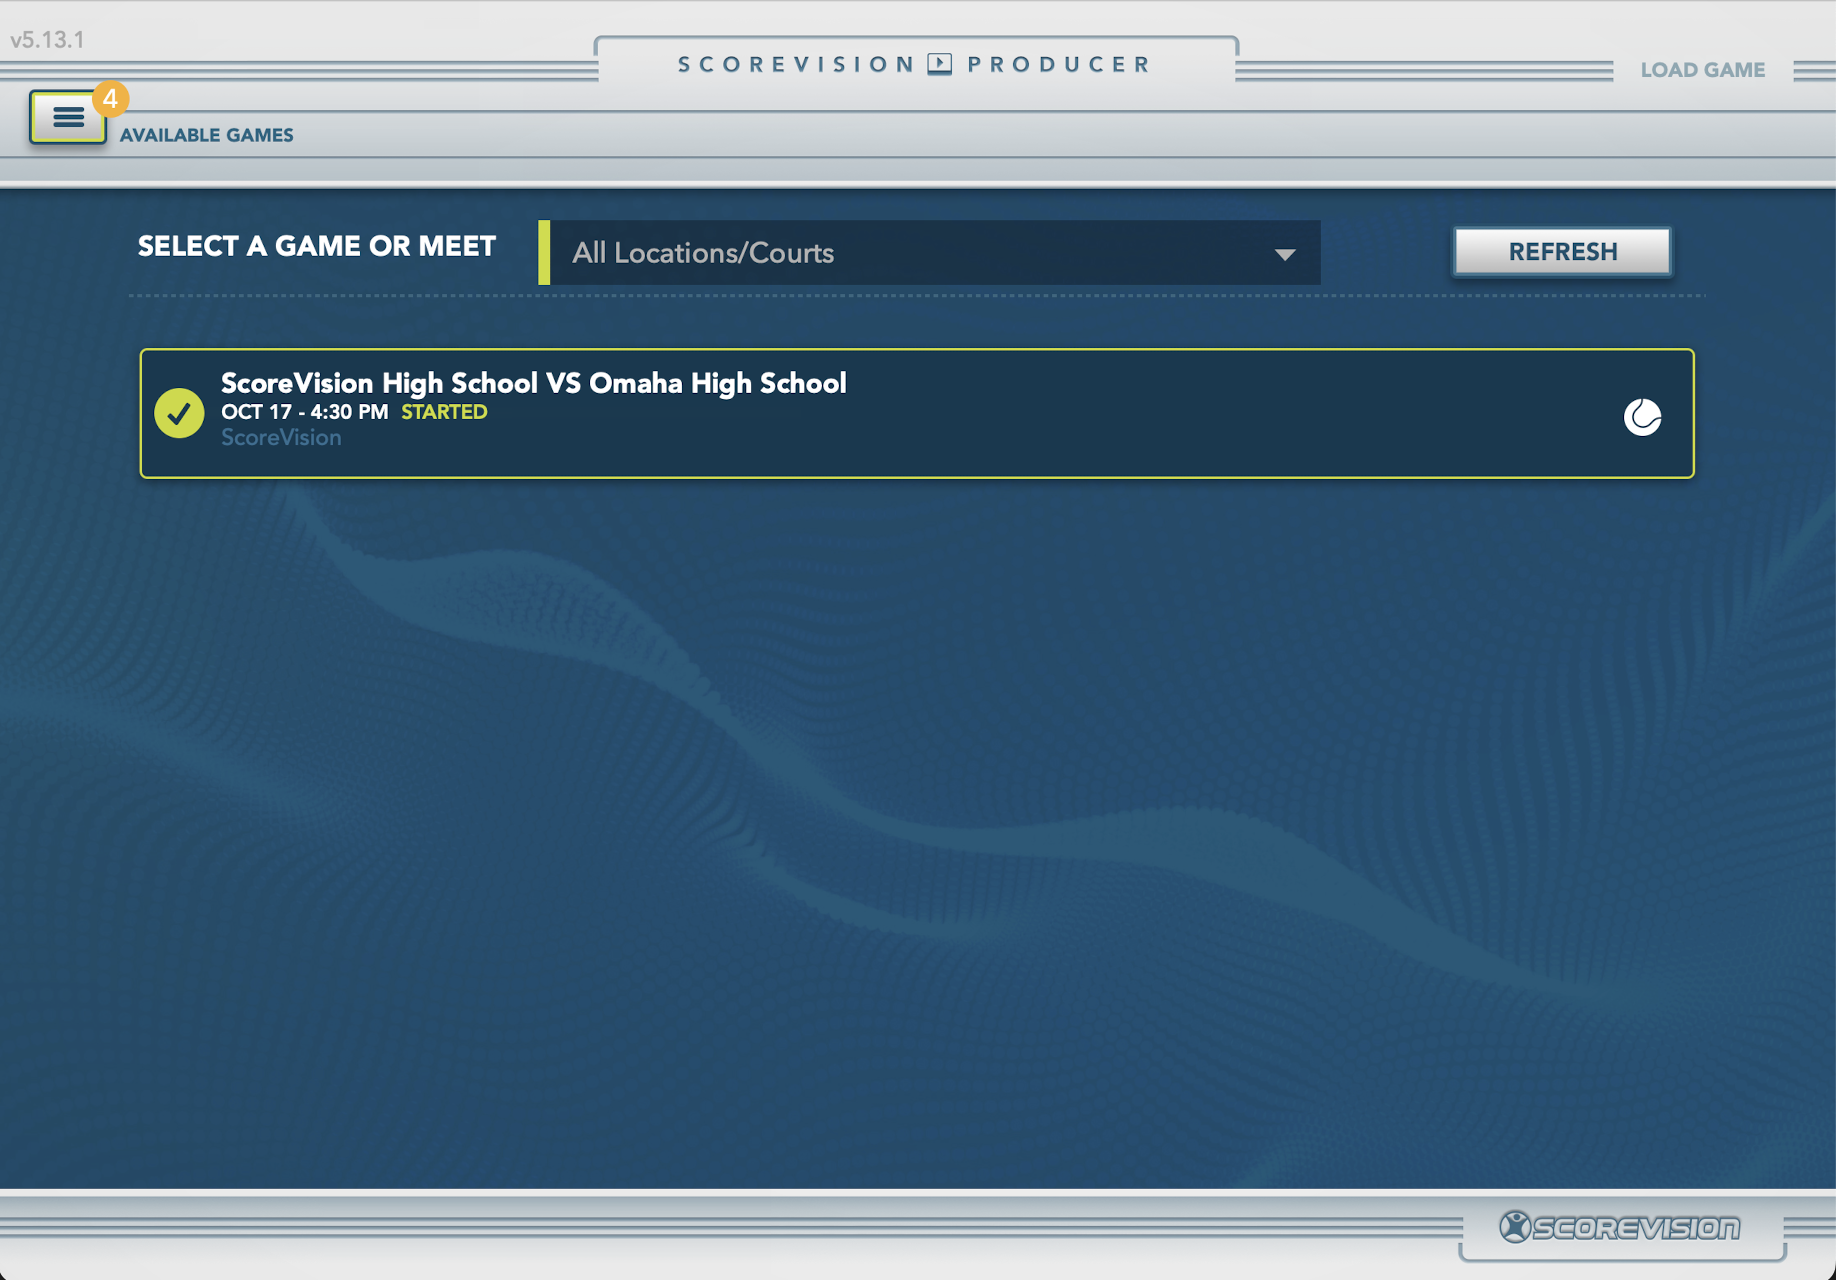
3. From the resulting screen, select the Meet you wish to load by pressing its bar. The bar will be highlighted with a green border once successfully selected. Then, navigate back to the Control Center Dashboard through the menu button.
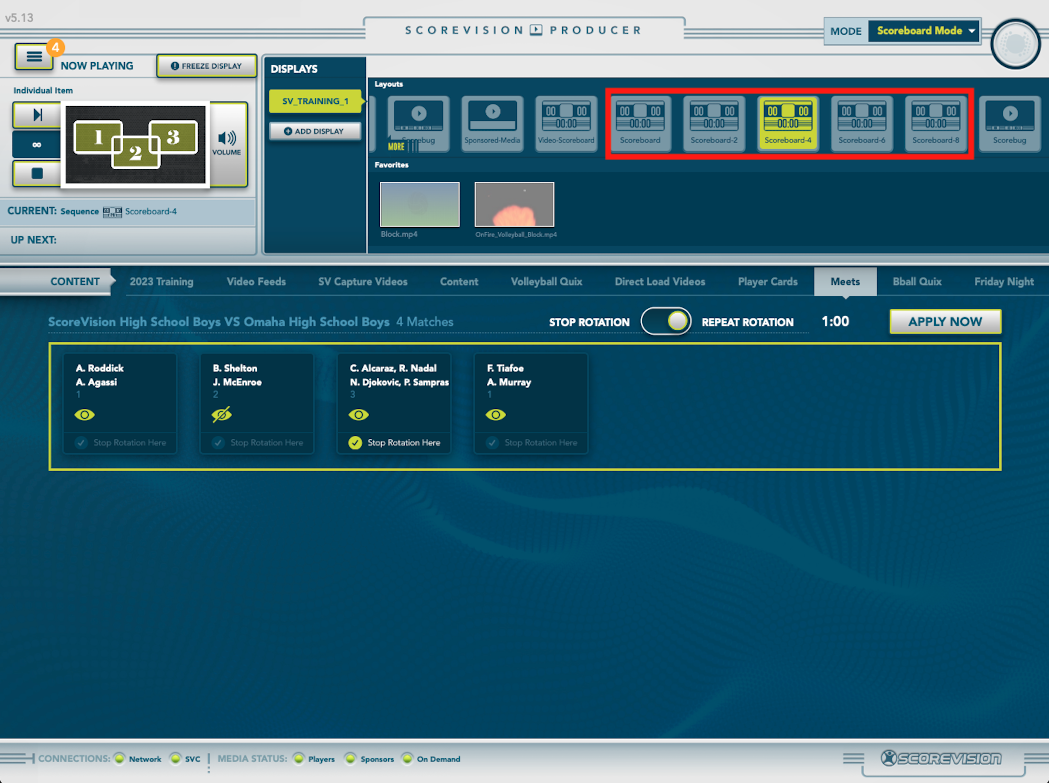
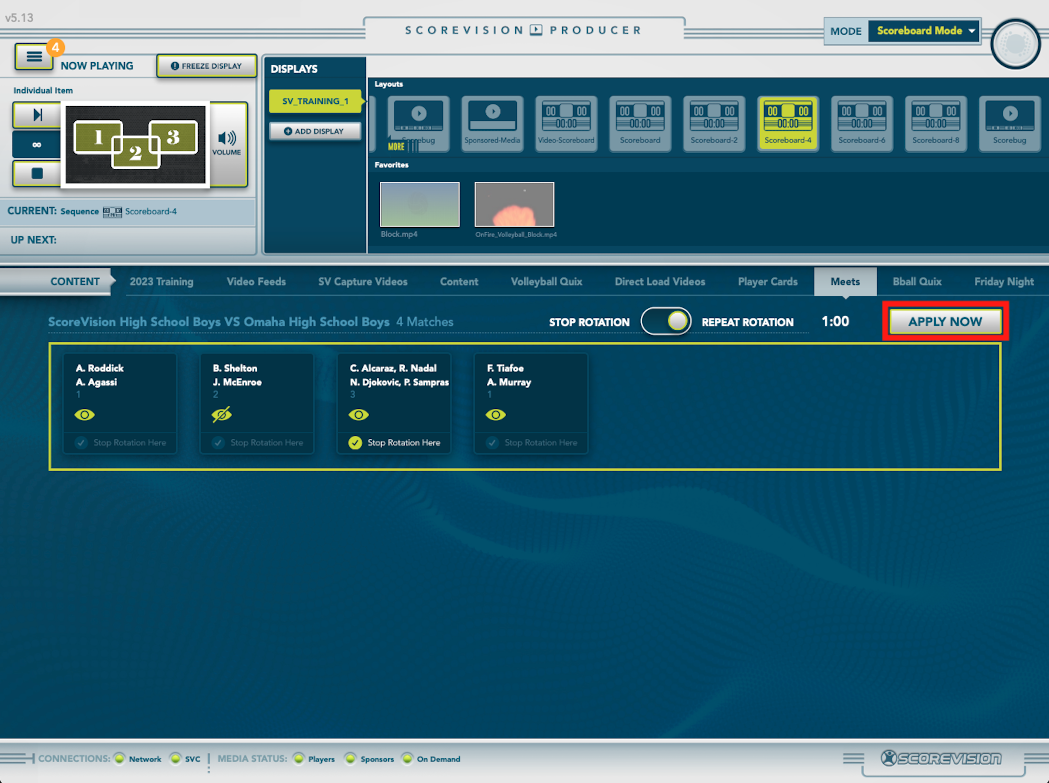
At this point, the Producer App empowers you to define exactly what you want the audience to see on the scoreboard. It’s important to note that the display will sit in a standby mode until you make your scoreboard selections and press the “APPLY NOW” button.
Scoreboard Selections:
1. Choose a SCOREBOARD layout from the layouts scroll bin in the upper right section of Producer. You have the option to show a single match or multiple (2, 4, 6 or 8) matches at one time on the display. You can toggle between the views as often as you’d like. The system will display the matches in accordance with how you’ve marked their visibility and rotation behavior.
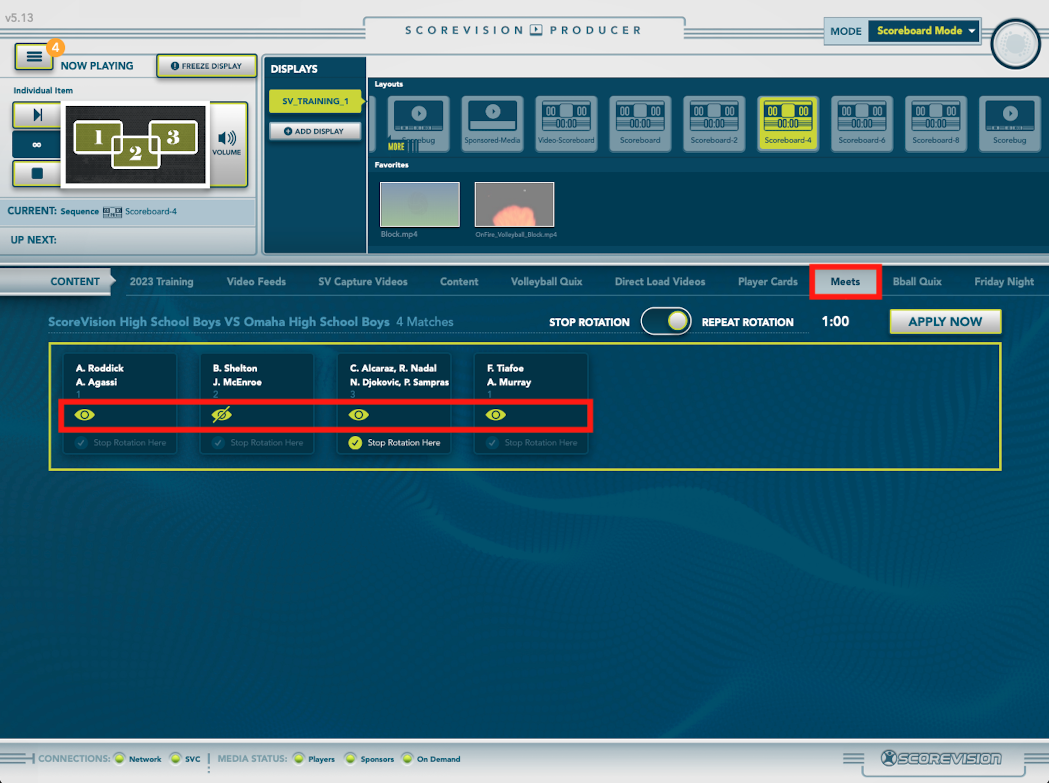
2. Toggle visibility for the matches you wish to show on the display. The MEETS tab in the CONTENT area of the Producer will display the group of Matches assigned to the Meet that is loaded on the Tennis Scorekeeper. Each Match appears as a tile within the grouping. By pressing the eye icon on a Match tile, you can tell the system which Matches you wish to include in the broadcast on the scoreboard display. The eye icon indicates the Match is available for view on the screen. The eye with a slash indicates the Match is not available for view on the screen regardless of other selected settings.
3. The rotation feature enables the system to intelligently rotate between the scoreboard for each Match available for view on the display.
- Below the CONTENT area within the MEETS tab is the toggle for turning the rotation functionality on and off. When OFF, the system will only show the first Match in the sequence marked as visible.
- Next to the rotation toggle is the duration for displaying a Match’s scoreboard before rotating to the next in sequence.
- Check the STOP ROTATION HERE button on the Match tile where you wish the rotation sequence to end. The system will ignore any Matches that follow regardless of their visibility setting.
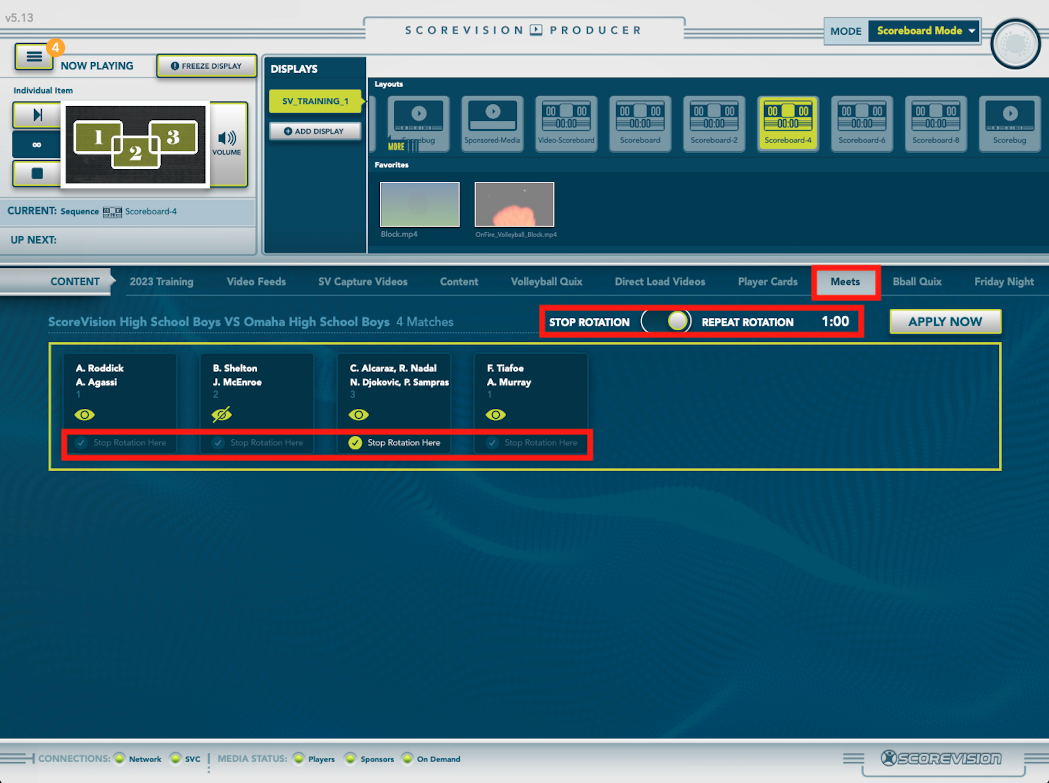
If there are more Matches in the rotation sequence than the current scoreboard view allows, the system will show as many of the Match scores as possible for the duration setting and then rotate to the next set of Matches in the sequence. It will continue rotating through until all of the matches have been displayed for the set duration, and then the rotation will start over.
Important Reminder: Please note that the display will sit in a standby mode (blank: without matchup information) until you make your scoreboard selections and press the APPLY NOW button.
ScoreVision Support Contact Information
If you have any questions or need assistance, our support team is available to help.

