This article provides steps on how to start and run a meet on the ScoreVision Wrestling Scorekeeper App or ScoreVision Wrestling LE App.
Setting Up a Wrestling Season in the Cloud
1. Log in to the cloud website using your ScoreVision credentials. Click on COMPETITIONS & EVENTS from the menu on the left and then scroll down to choose ADD/VIEW ALL SEASONS. 

2. Click on ADD NEW SEASON in the main window and choose WRESTLING from the drop-down menu.

3. Type a name for your season. NOTE: It is best practice to name your season starting with the year and including the level (such as varsity or JV) to make it easier to identify when looking at the archive of past seasons. Click on the Start Date field. The season will default to starting today - meaning it is an active season and can be managed even if the date is prior to the official start of your season. Click in the End Date field and choose an end date for your season. The end date indicates when the software should archive the completed season. It is recommended to carefully select this date ensuring that you account for the possibility of post-season playoffs. Extending a week or two beyond the expected completion of your season is recommended so that the season does not archive before you are ready for it to do so. Choose the Default Gender from the dropdown choices (optional).

4. Check the weight classes listed. If there is a weight class that is incorrect, click on REMOVE WEIGHT CLASS next to the class that is not needed and click on ADD WEIGHT CLASS at the bottom of the list to add classes as needed. NOTE: If you add or remove weight classes and they no longer appear in order, the software will reorganize the classes into numerical order once you have saved the season.

5. Scroll down to view the Periods. Enter the times for each period. NOTE: if you have different levels of wrestling that require shorter or longer periods, it is best to set up a separate season to accommodate those changes. Next, select your Near Fall Points. Remember to select 3 of the 5 options (common selections are 1, 2, 3 or 3, 4, 5, or 2, 3, 4).

Then, view and edit the Overtime Rules. Sudden Victory, Tiebreaker, Ultimate Tiebreaker, and Repeat are available types of overtime session. Adjust the duration of each as needed and press ADD OVERTIME RULE to set a series of rules to follow if needed. For example, you may set Overtime Rule #1 as Sudden Victory, Overtime Rule #2 as Tiebreaker, Overtime Rule #3 as Repeat of Rule 2, and Overtime Rule #4 as Ultimate Tiebreaker.

6. Scroll down to view the Meet Settings. Here you specify Takedown Points being worth 2 or 3 points. You can also indicate with a checkmark if you wish to Track Riding Time and/or include Stalling As Penalty for this season. Next click on the EXPAND buttons to reveal details related to Advanced Settings and Communication Settings.

7. In the Advanced Settings, confirm the amount of time for blood time, injury time, and recovery time. In the Communication Settings, select or deselect the box to have the season visible to the Fan App. When you are finished specifying setting for this season, click SAVE near the upper right section of the window.

Adding Teams and Meets in the Cloud
1. After saving the season details above, you will see the page dedicated to adding Teams and Meets. This process is consistent with adding teams and meets in our other ScoreVision sports. Click on MANAGE TEAMS and then ADD TEAM.


Click CREATE NEW TEAM to add a new team or by utilizing the Templates feature if you have previously saved team templates. NOTE: To learn more about Team Templates, search the Knowledge Base for our article explaining this feature.
2. If creating a new team, complete the team info form. Enter the team name, short name (which is what will show on the scoreboard displays), upload a team logo, select the team color, gender (optional), and grade/level (optional). NOTE: Choose YES or NO from the My Team dropdown menu to indicate if this is your organization's team. YES will enable schedules and rosters to be available in the ScoreVision Fan App. NO will indicate this is a visiting team. Then click SAVE at the bottom of the screen.

3. Next, add players to the Player Roster. Complete the first and last name fields and you also have the option of uploading a 500 x 750px player image. Then click SAVE or ADD ANOTHER if you have more players to enter.


4. Once your teams are entered, click on MEETS from the control panel on the left side of the screen and then ADD MEET.

The Name of the Meet will auto-populate as you select the Home and Away teams from their dropdown menus but you can rename it to anything you would like (such as SV District Duel). Enter the date and start time for the meet by clicking on the start time field. A calendar pops up and the left and right arrows can be clicked to change months. At the bottom, you see a clock icon. Click on the clock button to set the start time of the meet.


Select the home and away teams and then review the meet details. (In the case of a Triangular meet, the "home" team does not have to be the team from your school. Any two teams associated with the season can be schedule for a meet even if are visiting and are not the true home team. Details created for the season will default for the meet settings but can be changed as needed if this particular meet requires different settings than the rest of the season. Then click SAVE and you will see the meet appear in your list of meets. NOTE: Meets that have been completed have a red stripe at the top of their tile while meets that are upcoming have a blue stripe. Once all of your meets have been added, you are ready to score your meets using the ScoreVision Wrestling App on the iPad.
Scorekeeping a Meet Using the Wrestling Scorekeeper App
Connecting Your Scorekeeper App to a Scoreboard Display
1. Log in to your Scorekeeper App using your ScoreVision credentials. If you want to connect the Scorekeeper app to a ScoreVision display, ensure that the YES tab is selected. Then, press CONNECT on your ScoreVision display of choice (generally, you will select SV-1, but SV-2 also works; naming may vary based on your facility). If you do not want to connect to a ScoreVision display, refer to #2 below.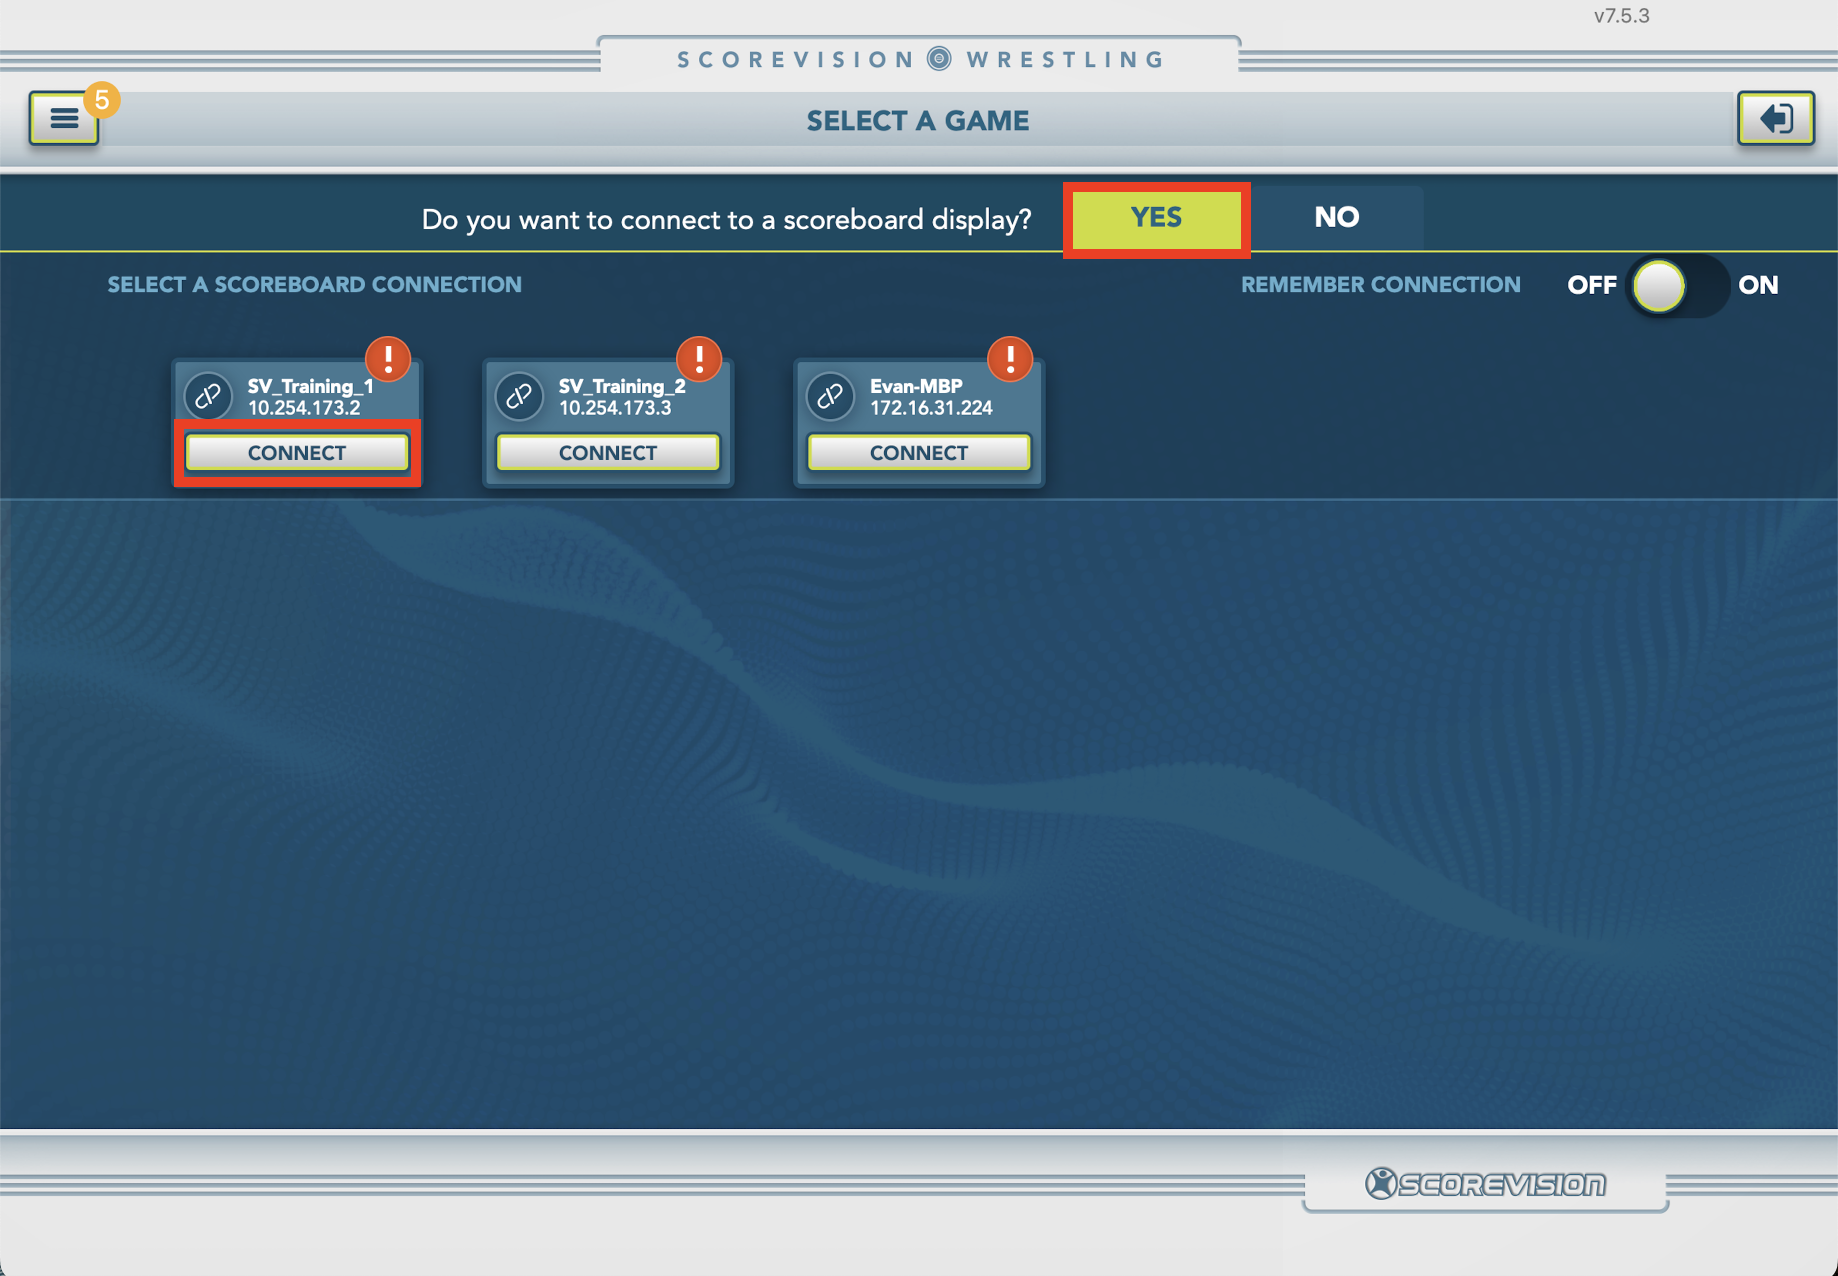
2. If you do not want to connect the Scorekeeper app to a ScoreVision display, ensure that the NO tab is selected. The most common reason for choosing NO is when you scoring at an away meet in order to send information to the ScoreVision Fan App. To do this, you will need a source of wifi such as a hotspot or a connection to the wifi in the facility you are visiting.
3. Press DEFAULT WRESTLING SEASON/TOURNAMENT to bring up a list of any active seasons created in the cloud.


4. A list of available pre-made seasons will appear in a pop-up window. Select the season that you want to use. NOTE: If Default Season/Tournament is the only season available in this list, seasons will need to be created as explained earlier in this article.
5. If you have previously-entered meets in the cloud, a list of those meets will appear in the open space below the filter menus and the settings you defined in the cloud will be automatically applied. Meets will be sorted by start date and time, the nearest upcoming meet first. Press SELECT to begin the meet of your choice. NOTE: Meets created in the cloud will be visible 24 hours prior to the scheduled start time. If you need help creating meets in the cloud, please refer to the beginning portions of this article. Another option is to press the ADD NEW GAME button and manually create a meet on the iPad.
6. On the Team Weigh-Ins screen, you can toggle between the two teams by pressing the team name on the left side of the screen.
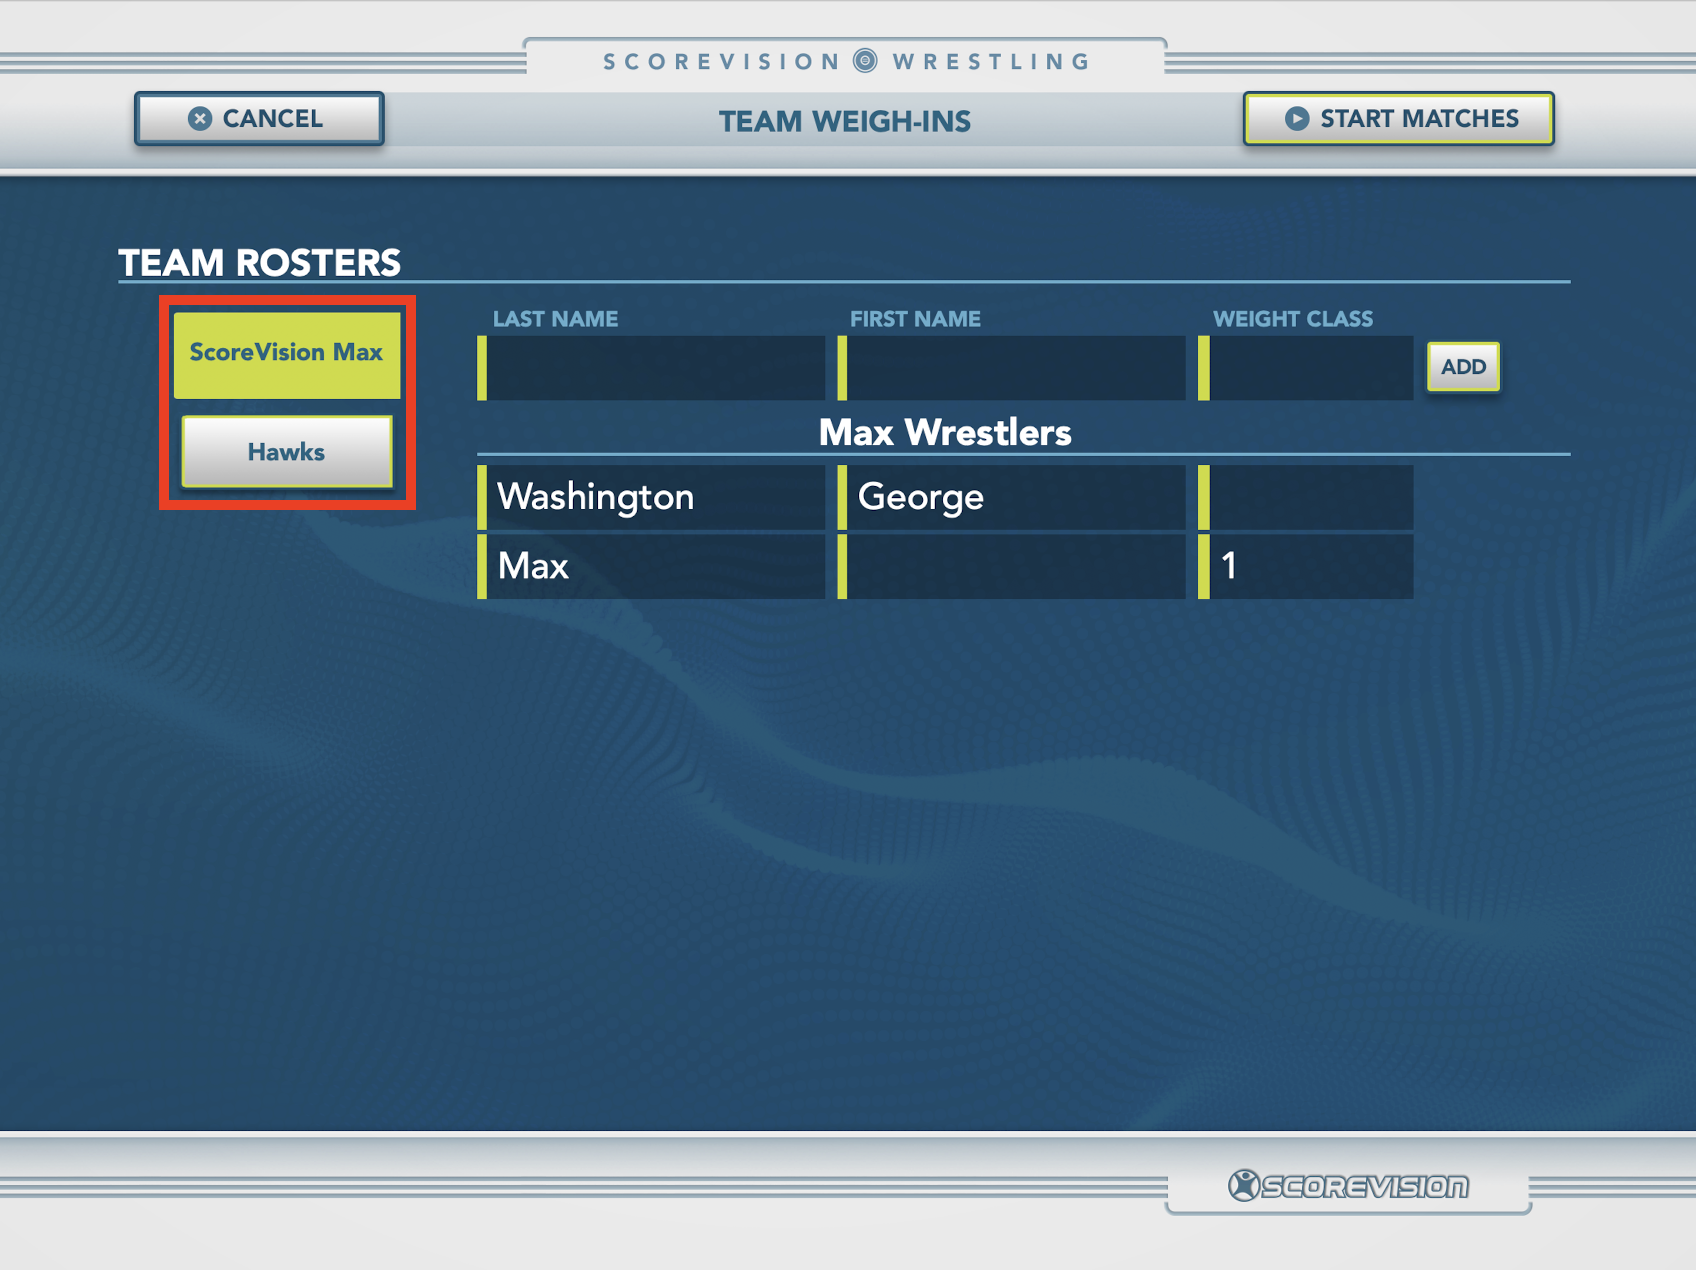 With regards to rosters, you have two options:
- Use the default wrestler (since it is in the weight class of 1, it can be applied to wrestle in any weight class).
- Enter the last name, first name, and weight class of each individual wrestler (If you’ve uploaded rosters in the cloud, they will import automatically and you’ll only have to select weight class for each wrestler).


7. Once you’re done preparing your wrestlers, press START MATCHES.
8. Once you’ve started the meet, you may be presented with a CONNECT TO SCOREBOARD DISPLAY scoreboard assistant. This indicates that you are not connected to a ScoreVision display. Press CONNECTION SETTINGS underneath the YES option and – in the pop-up window – select the CONNECT button for the display to which you wish to connect. Remember, you'll need to connect to the same display as your Producer App (SV1 or SV2). If this scoreboard assistant does not appear, you should already be connected to a ScoreVision display.
Pre-Game Clock
1. Once you’ve selected the meet, a scoreboard assistant for PRE-GAME CLOCK will appear giving you three options for pre-game:
- set clock to default time,
- set clock to custom time, or
- I am ready to keep score, skipping pre-game all together
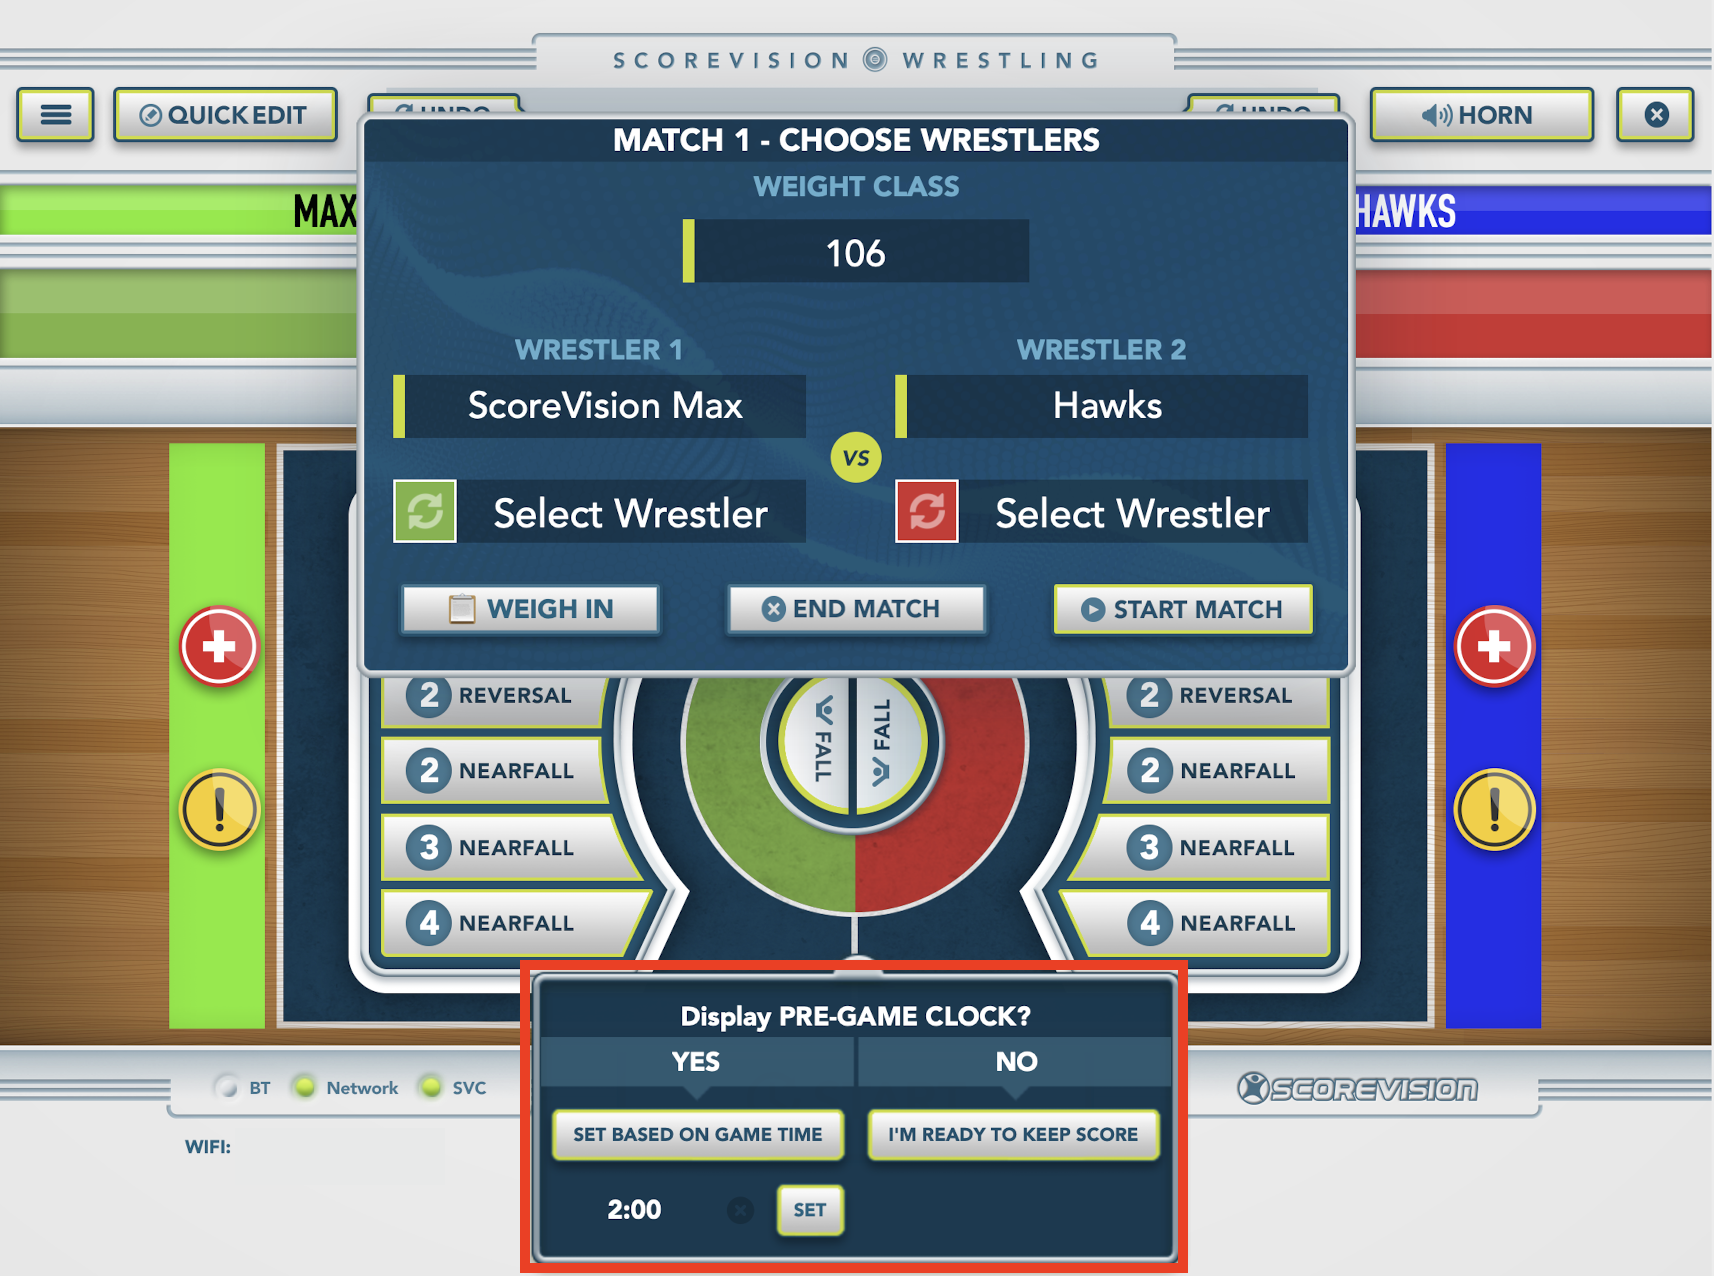 NOTE: The Pre-Game option from the MENU can be selected to restart the pre-game clock as many times as you need but will disappear from the menu once you start keeping score for this meet.
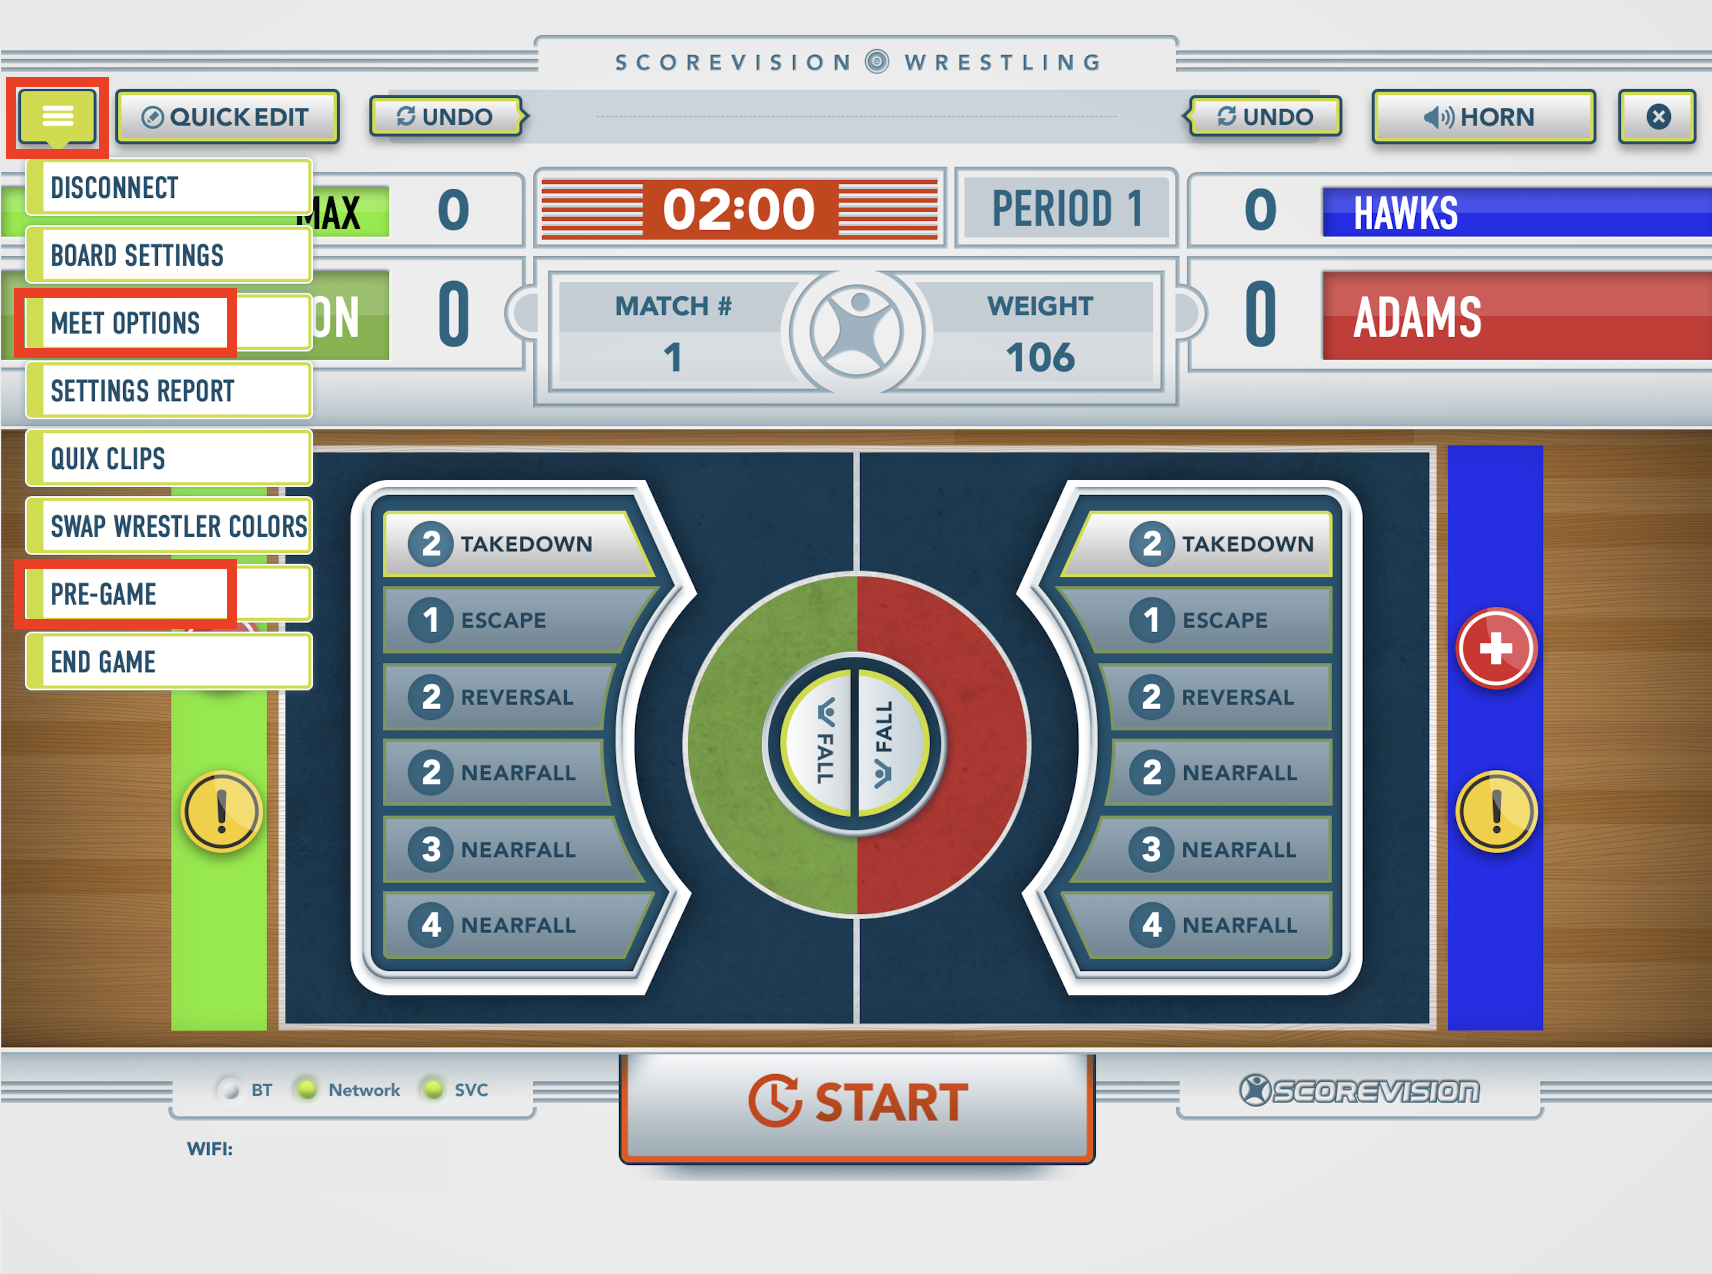
2. At any time during pre-game, press the menu icon in the top left corner and select MEET OPTIONS to review or alter the Meet Settings.
3. Select the weight class, followed by the wrestler for each team. Then, press START MATCH.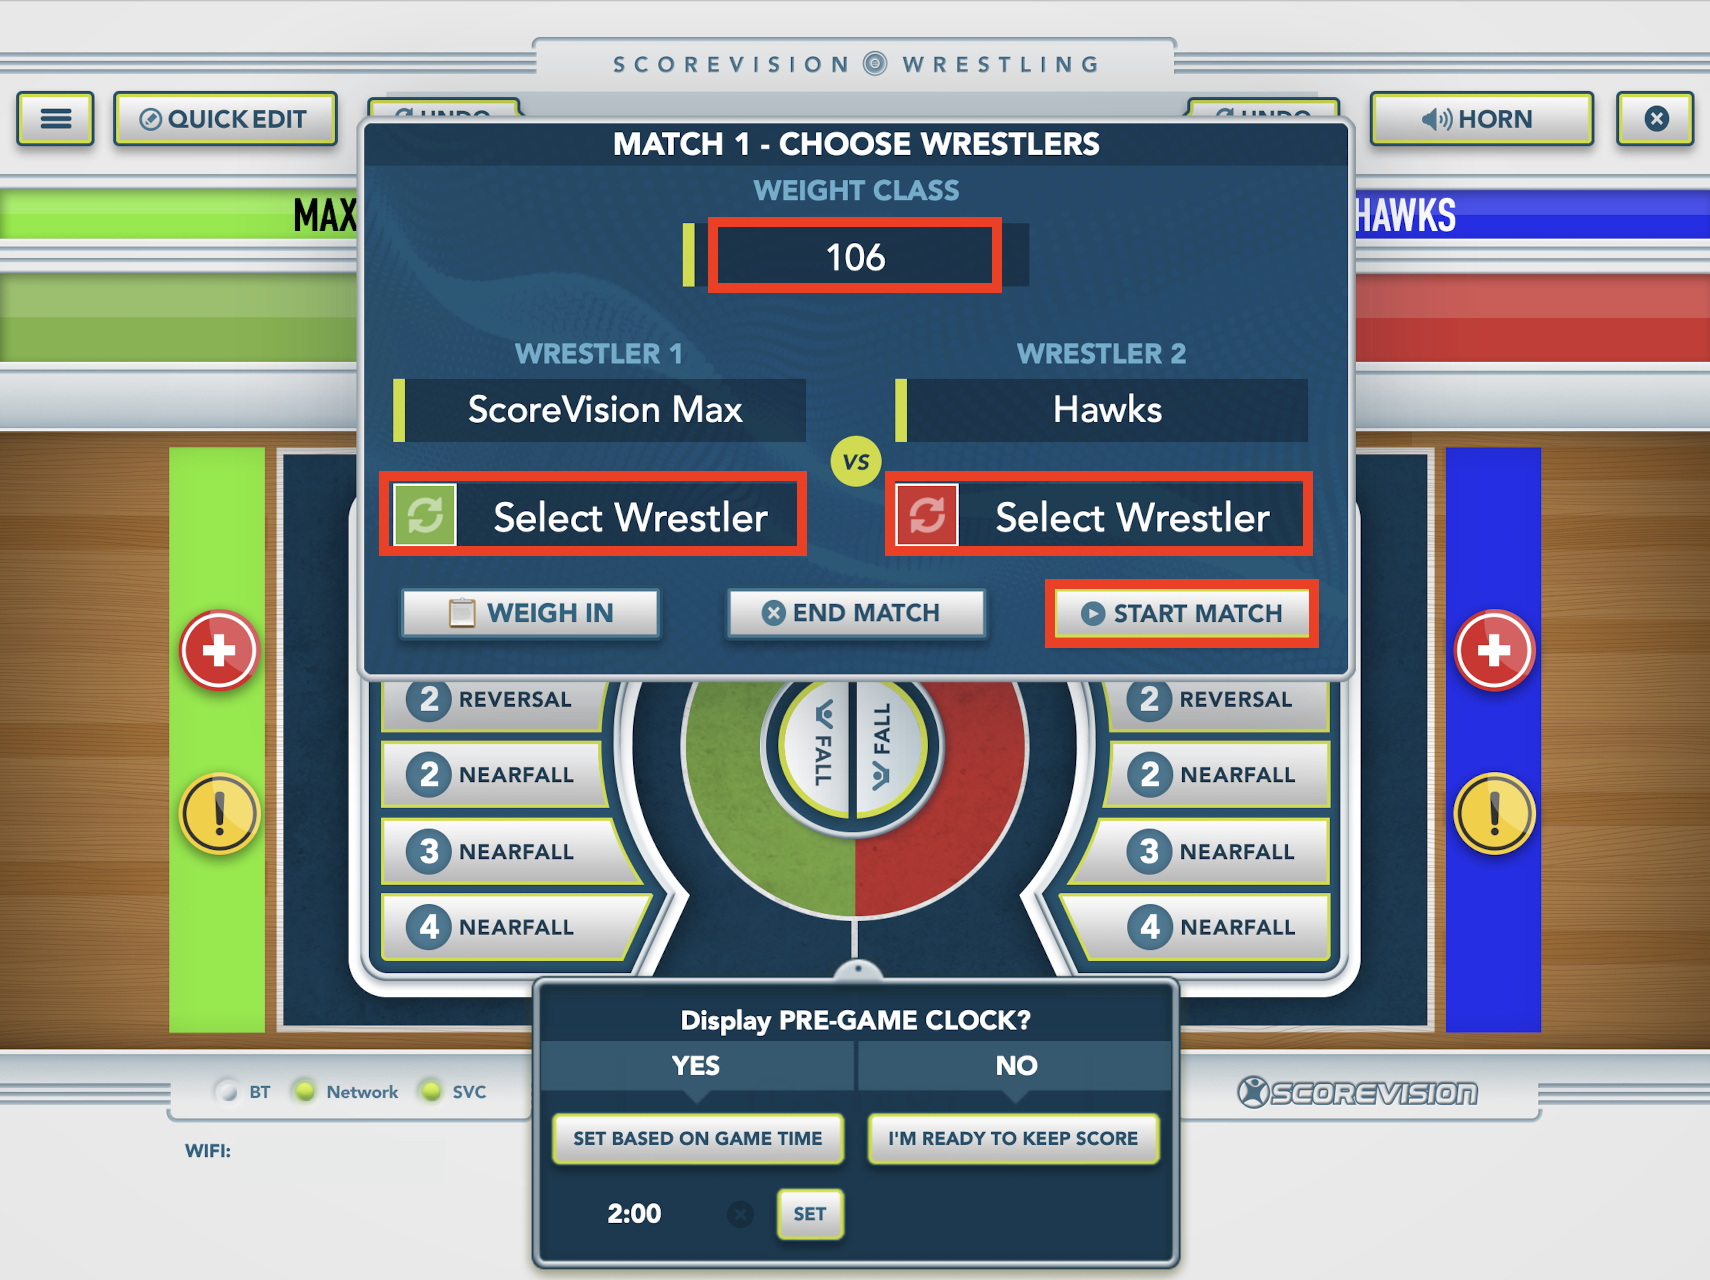
Scorekeeping During the Match
1. To add points, press the button on that coincides with the amount of points scored:
- 1 point: Escape
- 2 points: Reversal
- Takedown and Nearfall point values vary based on Season/Meet Settings
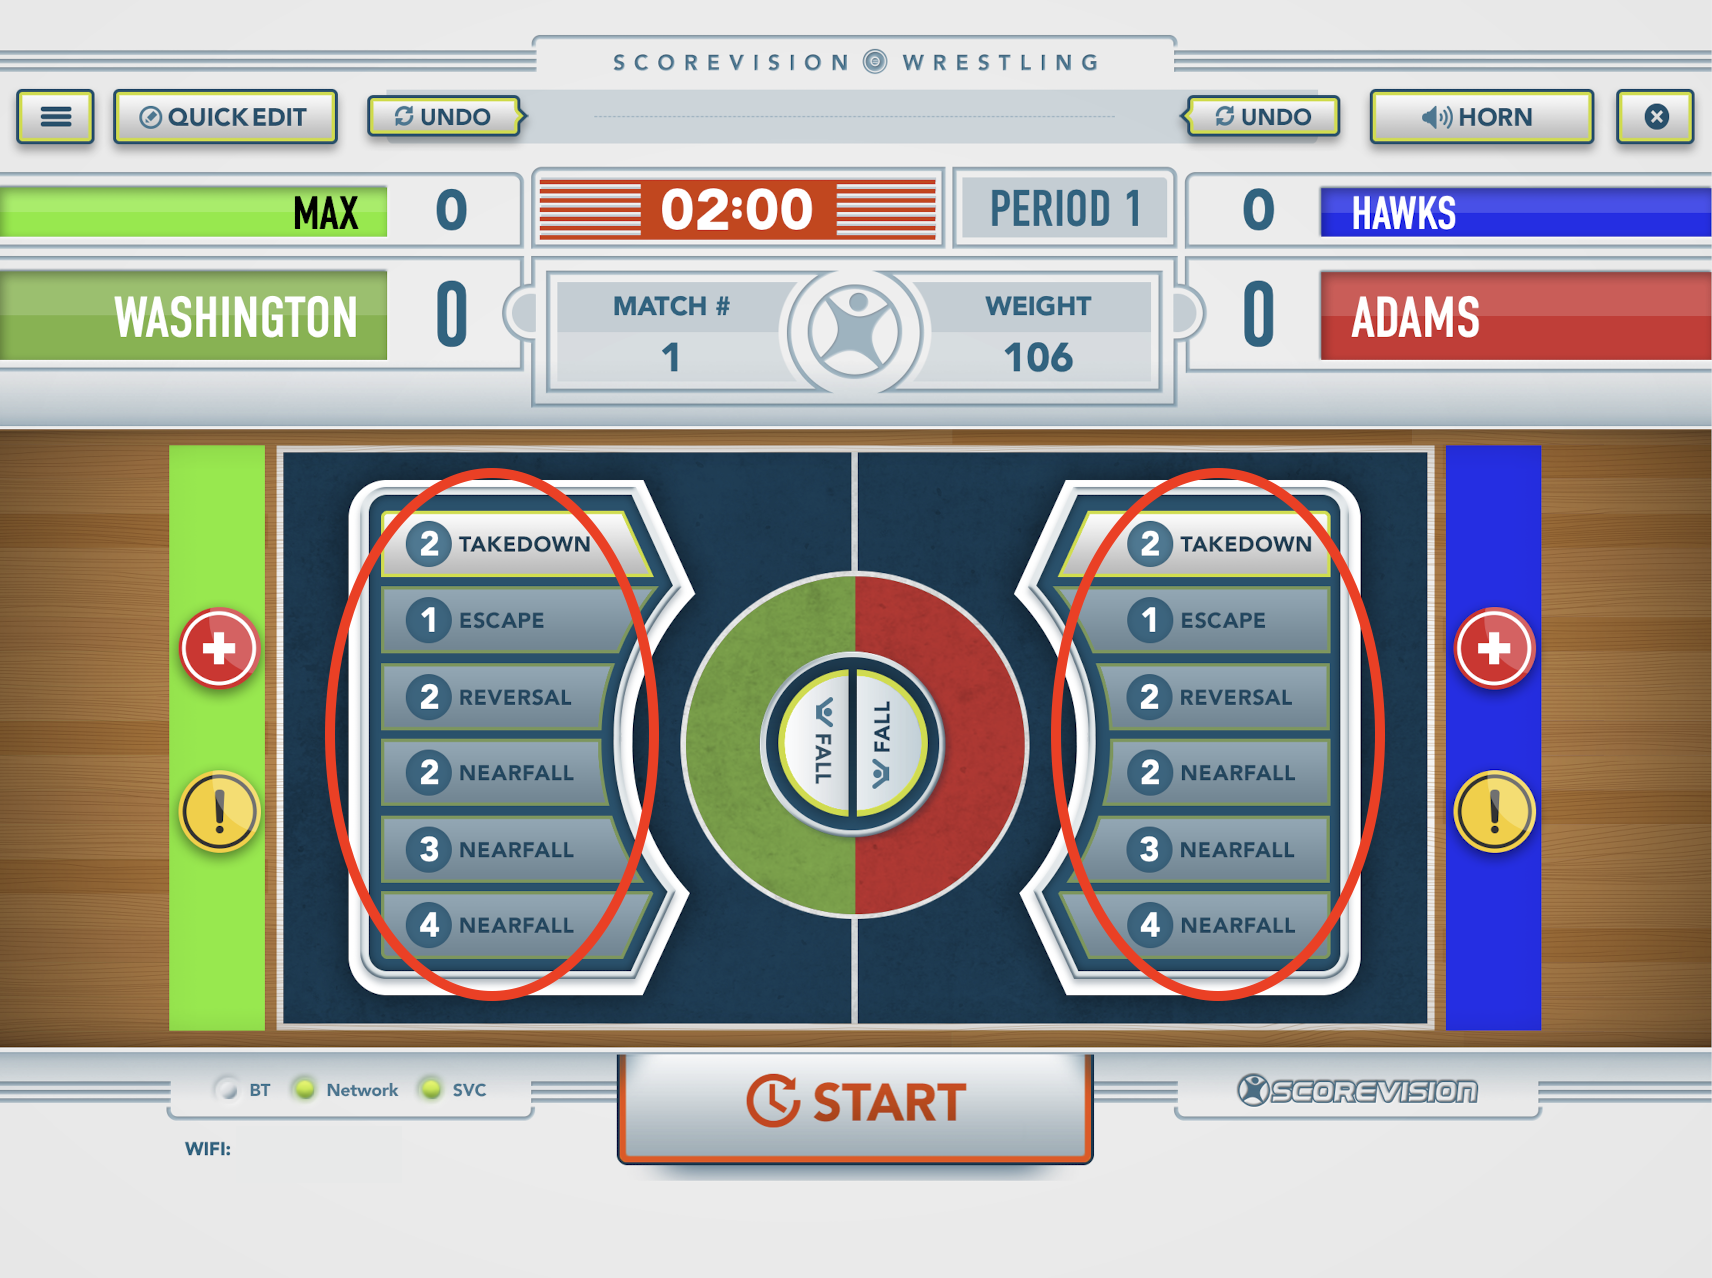 NOTE: You can edit your takedown and nearfall points in your Cloud account as mentioned earlier in this article when setting up your season (1 or 5 points for a nearfall is an option - 3 points for a takedown is an option).
2. The app will automatically recognize which points are available for each wrestler at any specific moment (i.e. if wrestler A completes a takedown, then only the three nearfall options will be available, and only escape/reversal will be available for wrestler Z).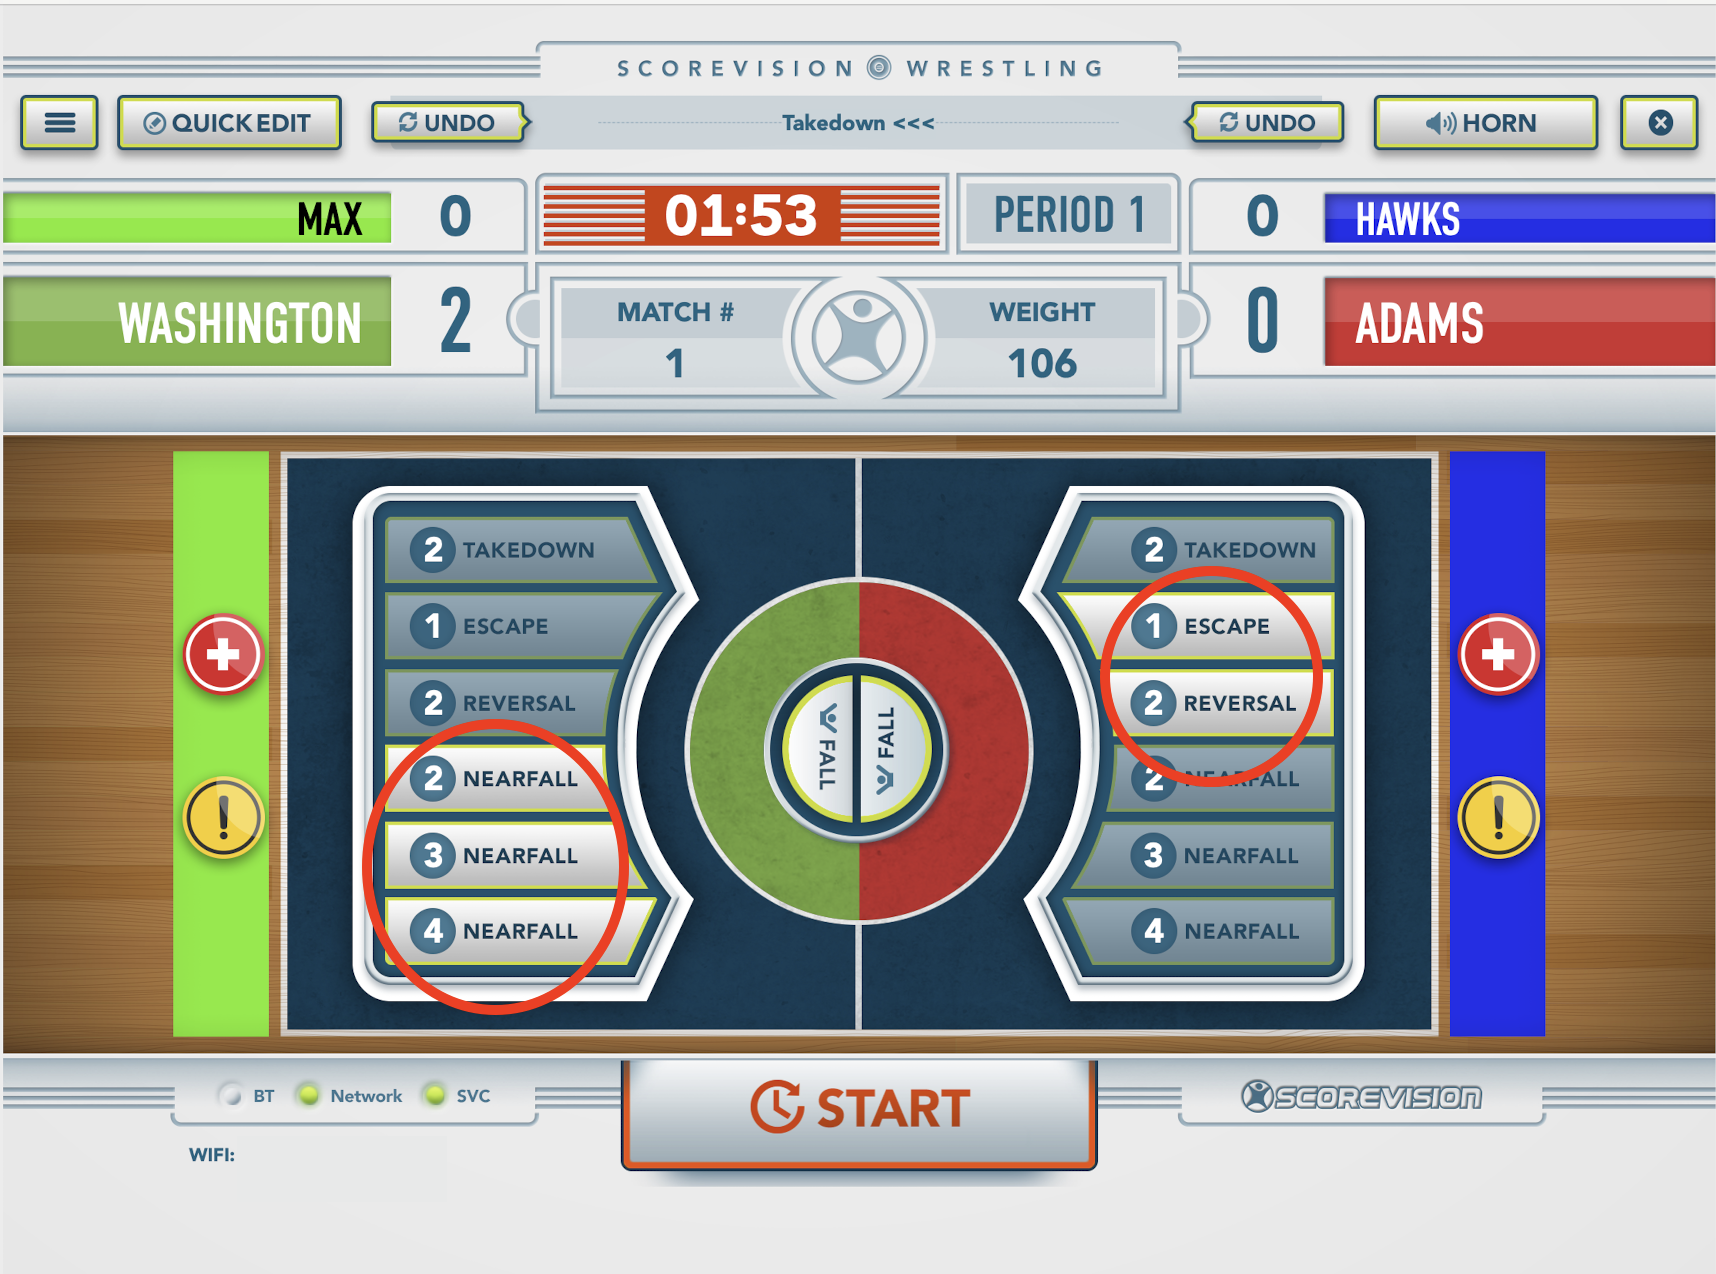
3. Press the Red Circle for the respective wrestler if Blood Time, Injury Time, or Recovery Time is needed. The app automatically imports a default time, but if you need to edit the amount of time needed, you can press EDIT and type in the time needed instead. NOTE: After you press START and STOP, the app will save the time remaining for each.


4. Press the Yellow Circle for the respective wrestler if Caution, Stalling, or Penalty points need to be awarded. The app will automatically recognize how many points need to be awarded based on the number of warnings, quantity, etc.

5. When the clock reaches zero, a scoreboard assistant will appear giving you the option to advance to the next period or, if you need to correct any scoring mistakes, press cancel to make those changes.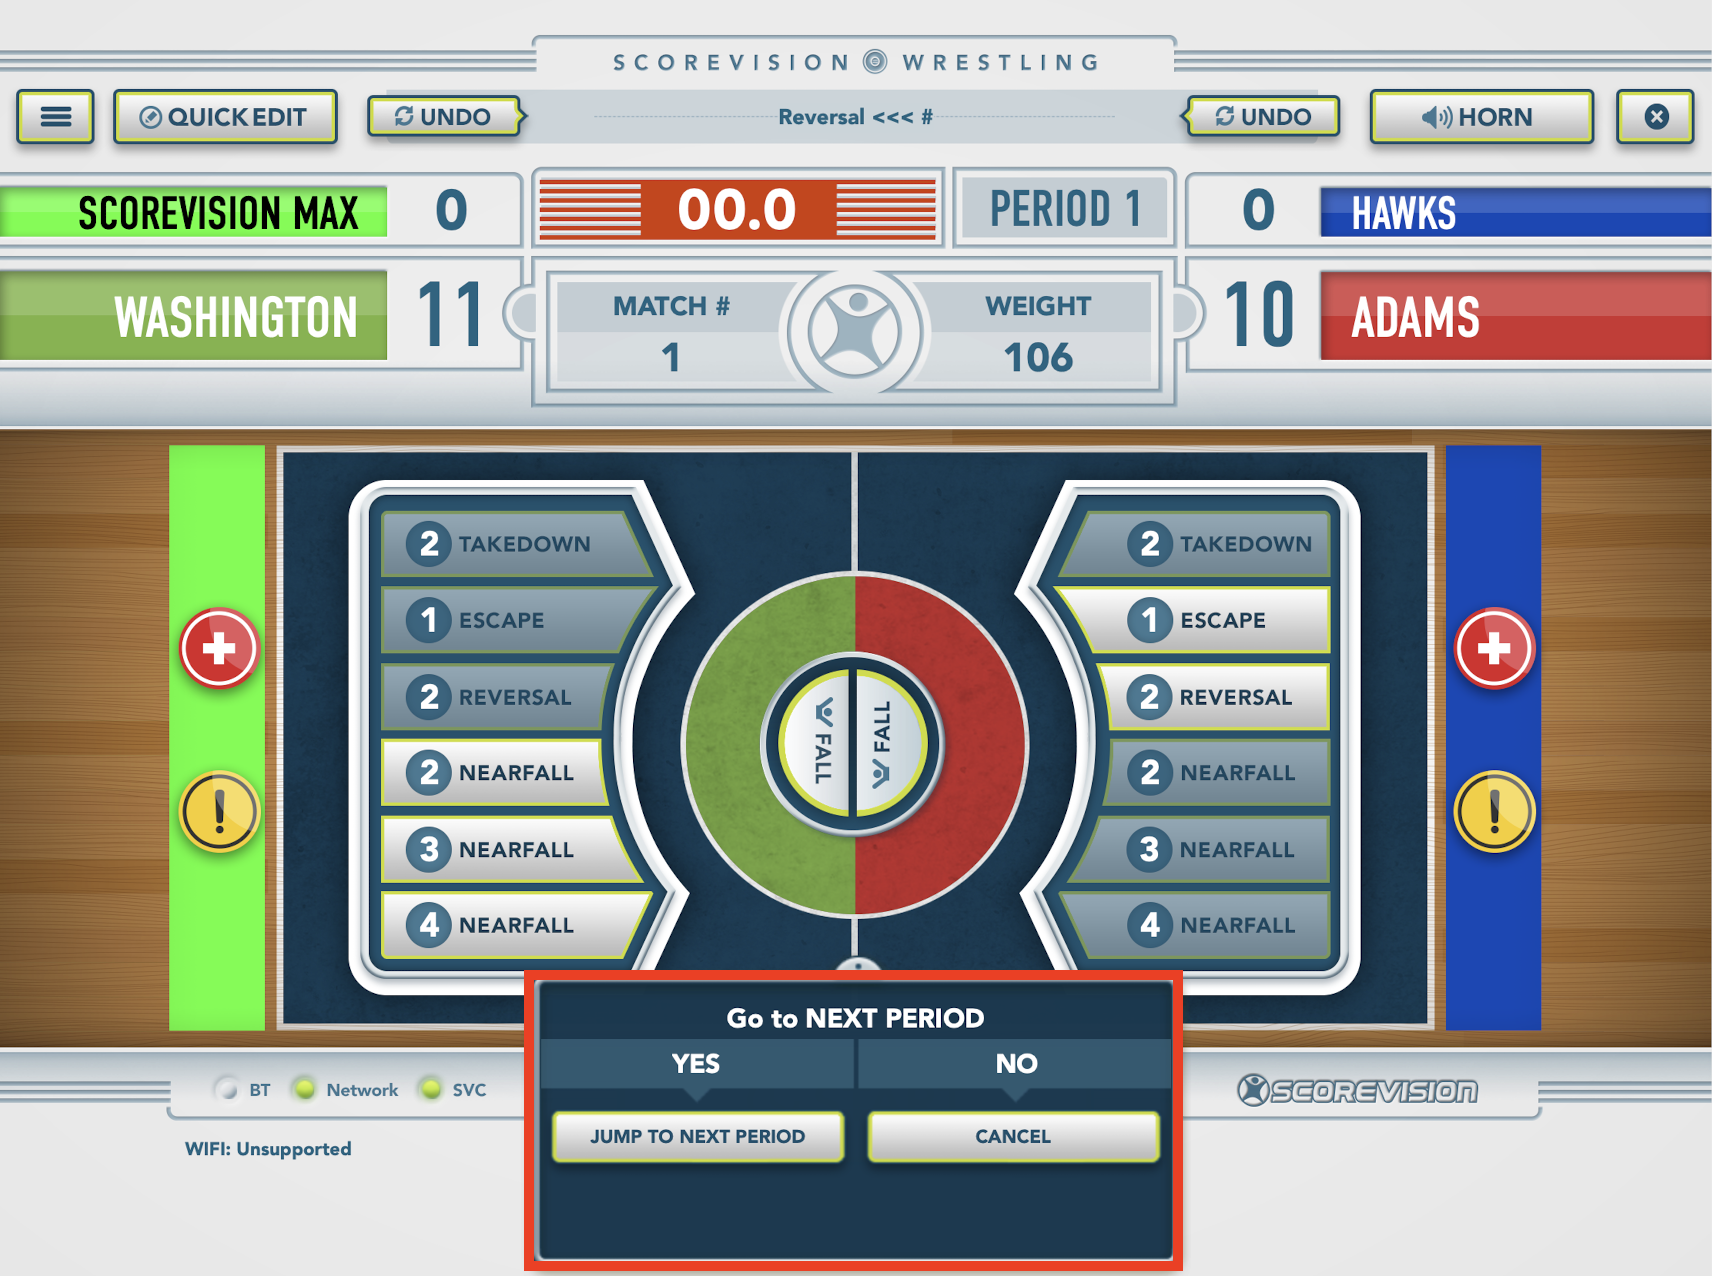
6. When you advance to the next period, it will prompt you to select the starting positions for each wrestler. Once you select the first wrestler's starting position, the app will automatically recognize and apply the starting position for the other position.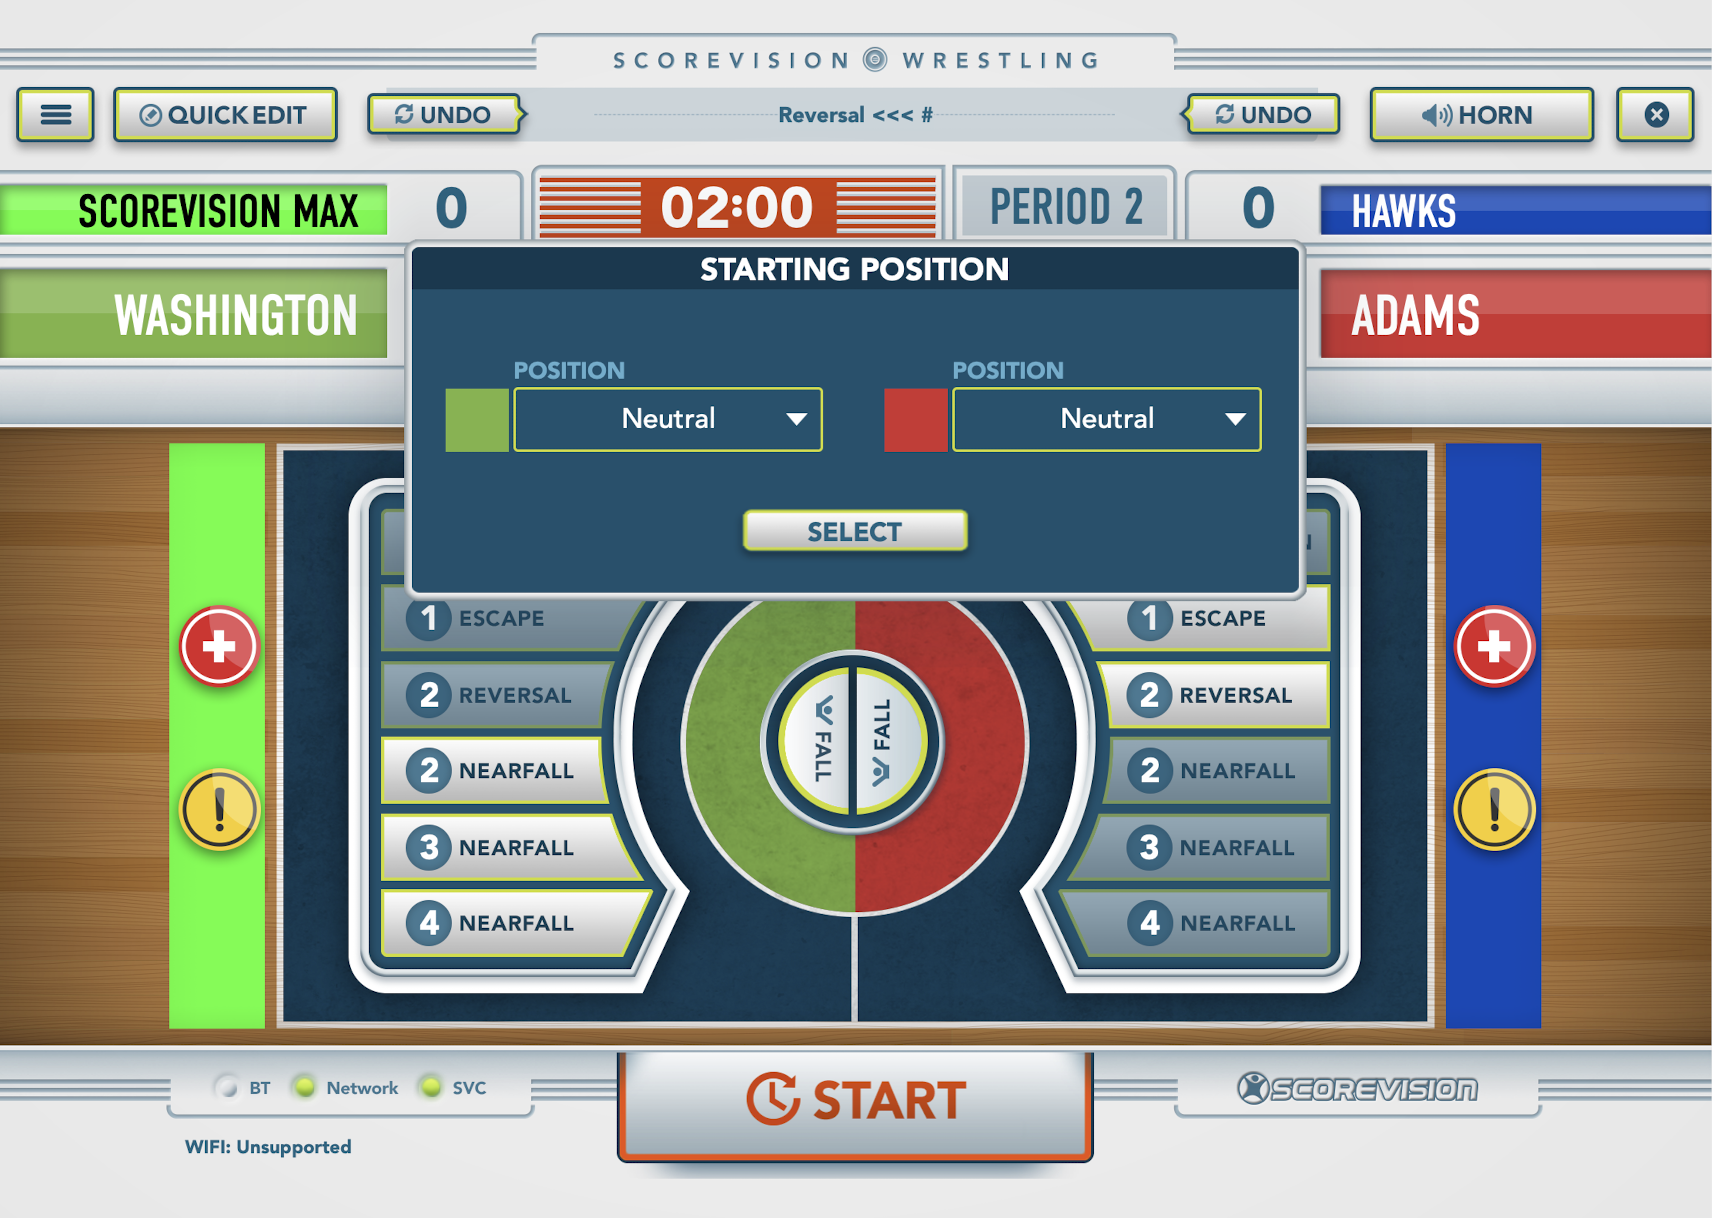
Quick Edit and Undo
1. The UNDO button allows you to undo in order of how actions or points were entered. The two buttons perform the same function but are conveniently placed for left or right handed scorekeepers. The most recent action is indicated in the space between the buttons to help the scorekeeper know which action will be undone.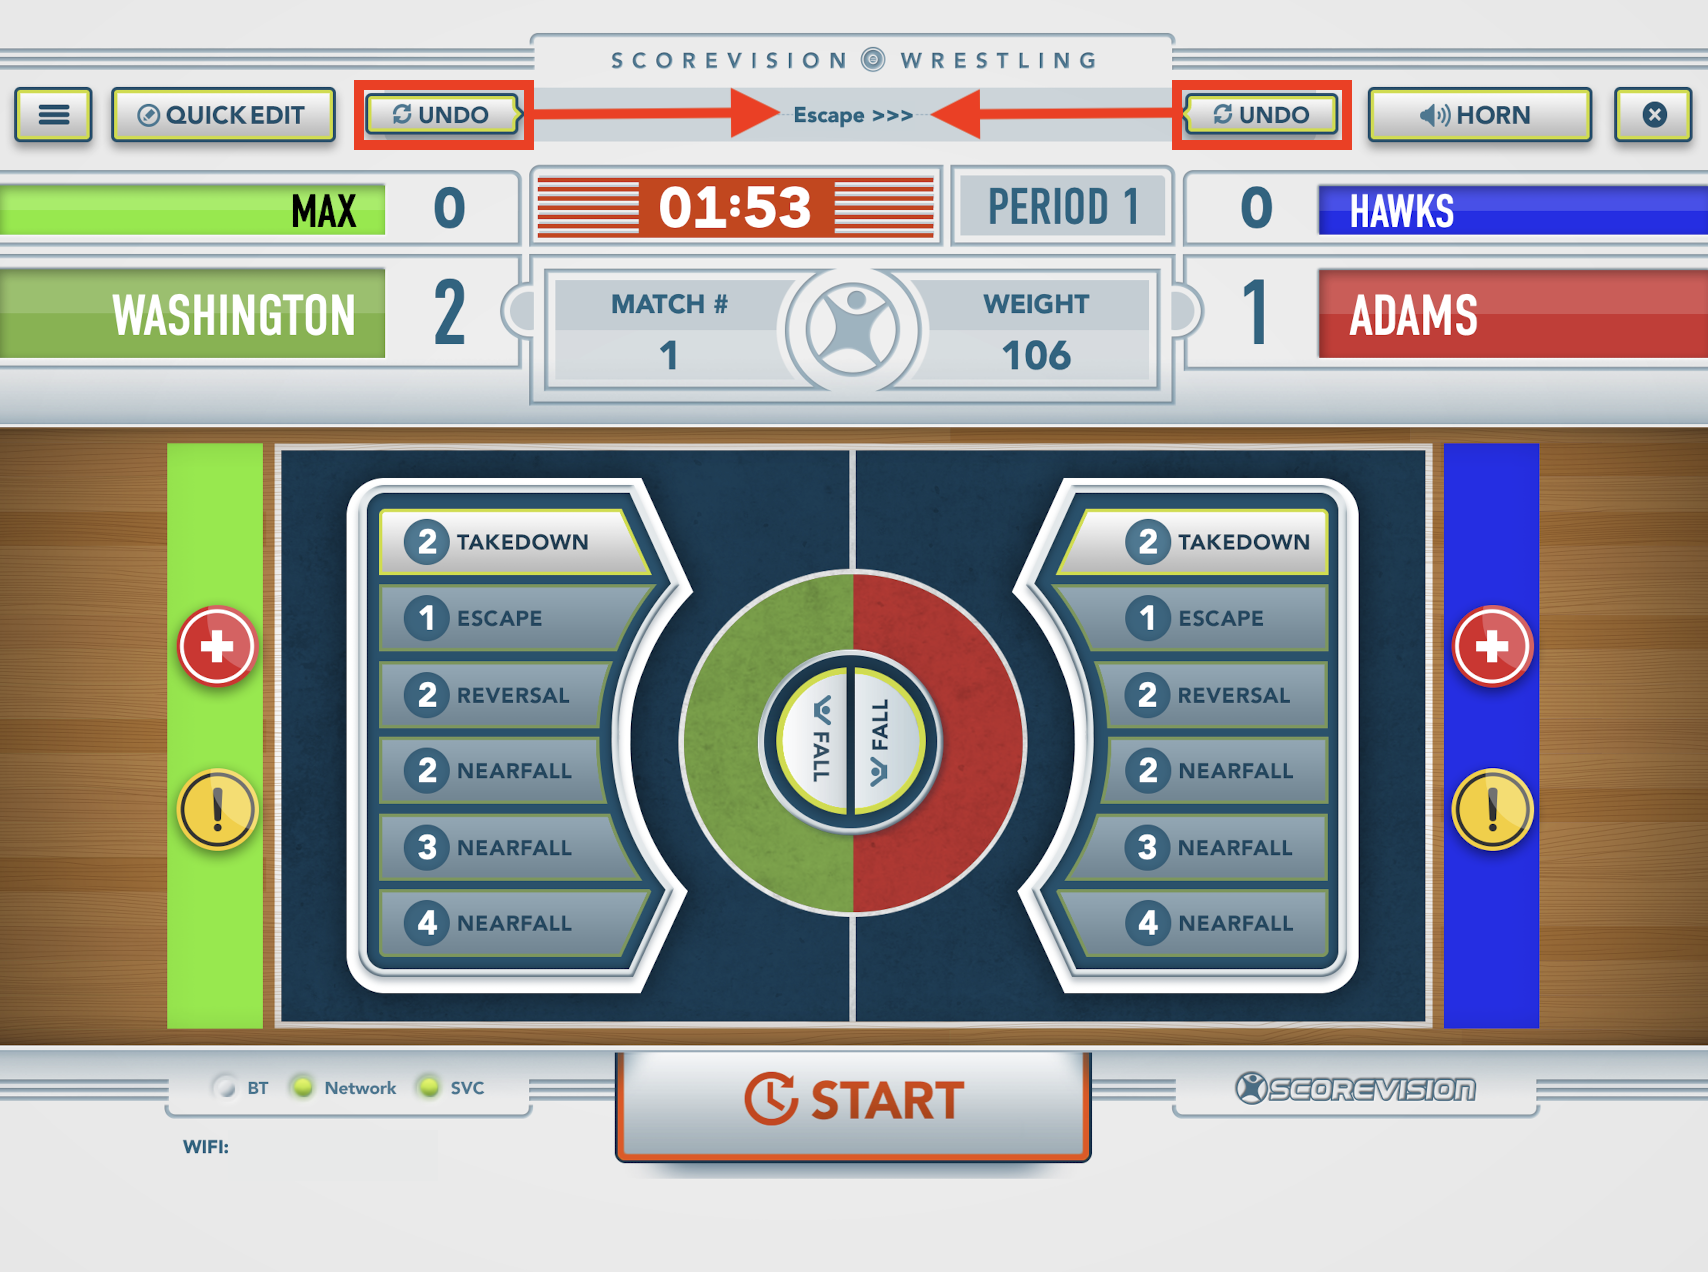
2. At any point throughout the match, you can use QUICK EDIT to edit points, period, team colors, team names, player names, advantage time, and position. You must press SAVE afterwards to establish any changes made on the Quick Edit screen.

Ending a Match
1. At any point throughout a match, you can press the FALL button in the center of the screen to end the match.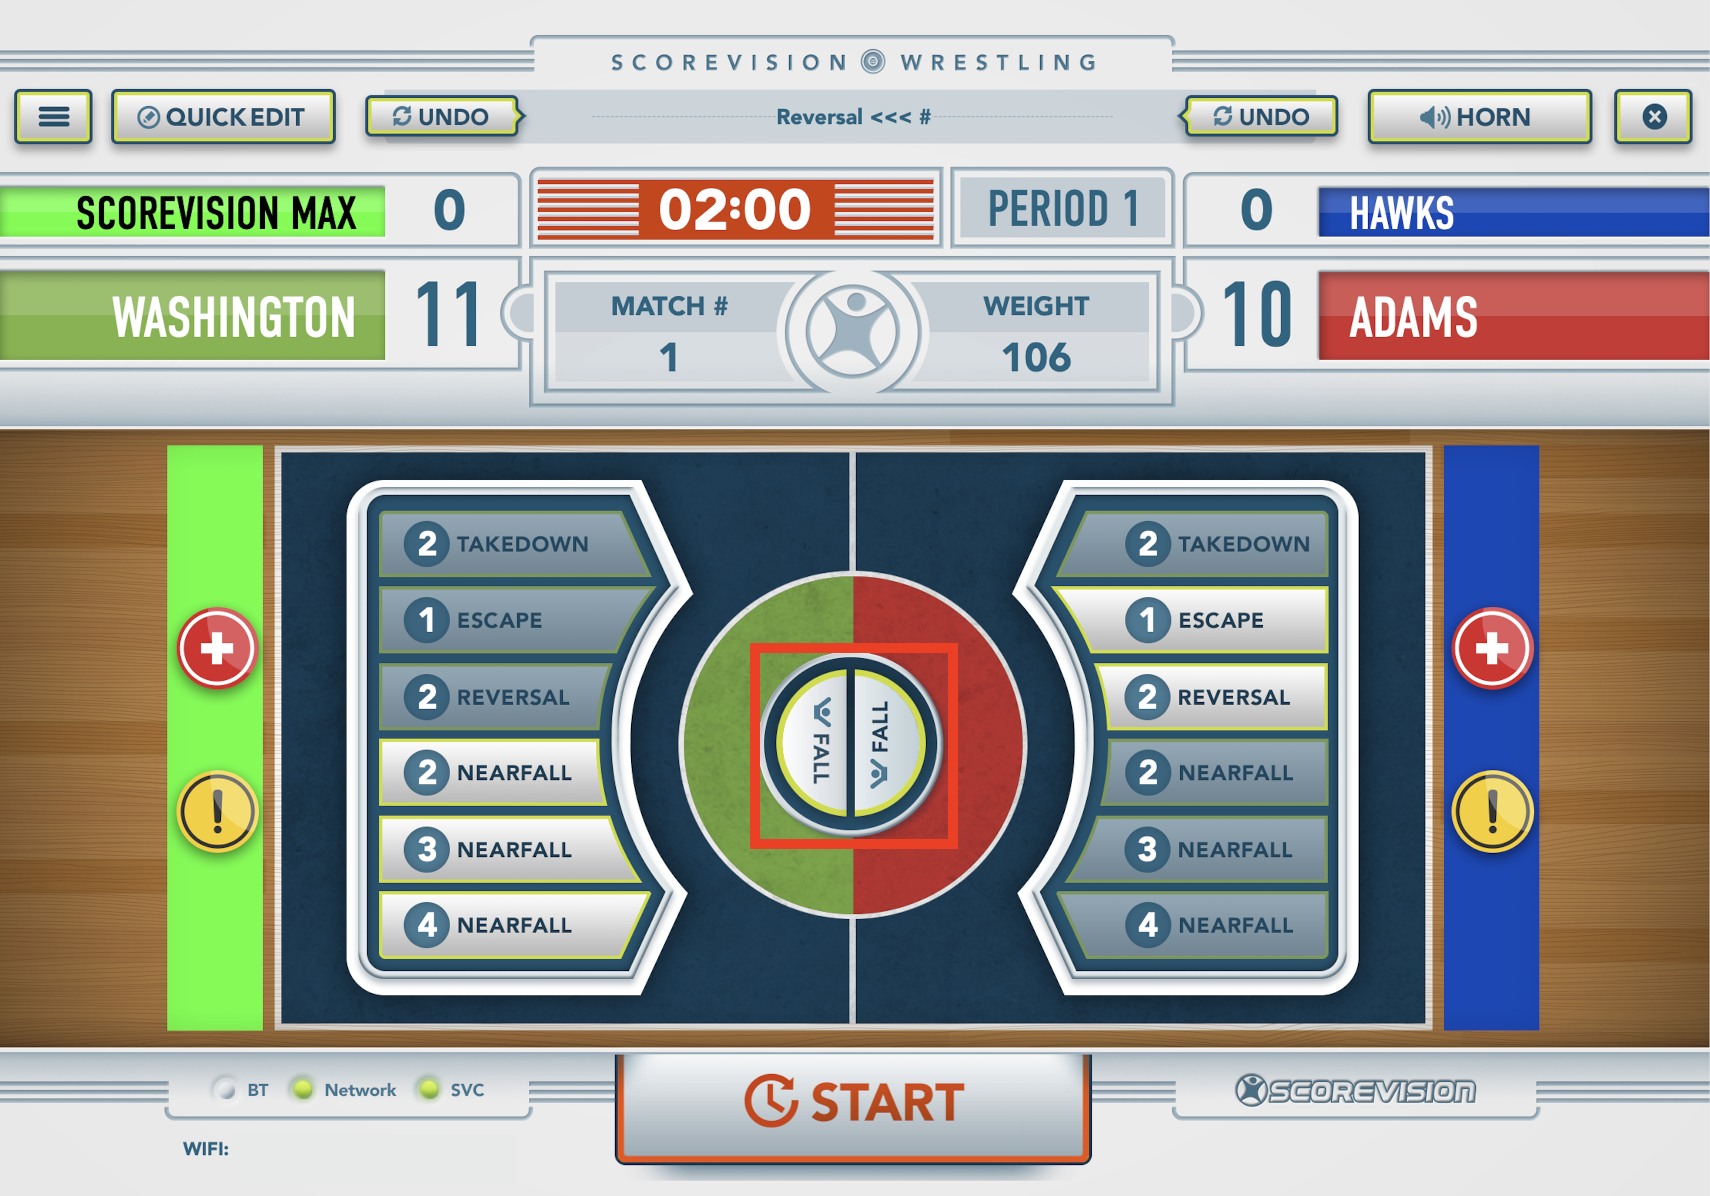
2. The app will show a screen for you to fill out the WINNER, WIN TYPE, and TEAM SCORES. If you are tracking Team Scores, then the app will automatically apply the correct amount of points based on win type. Press NEXT to move to the next match.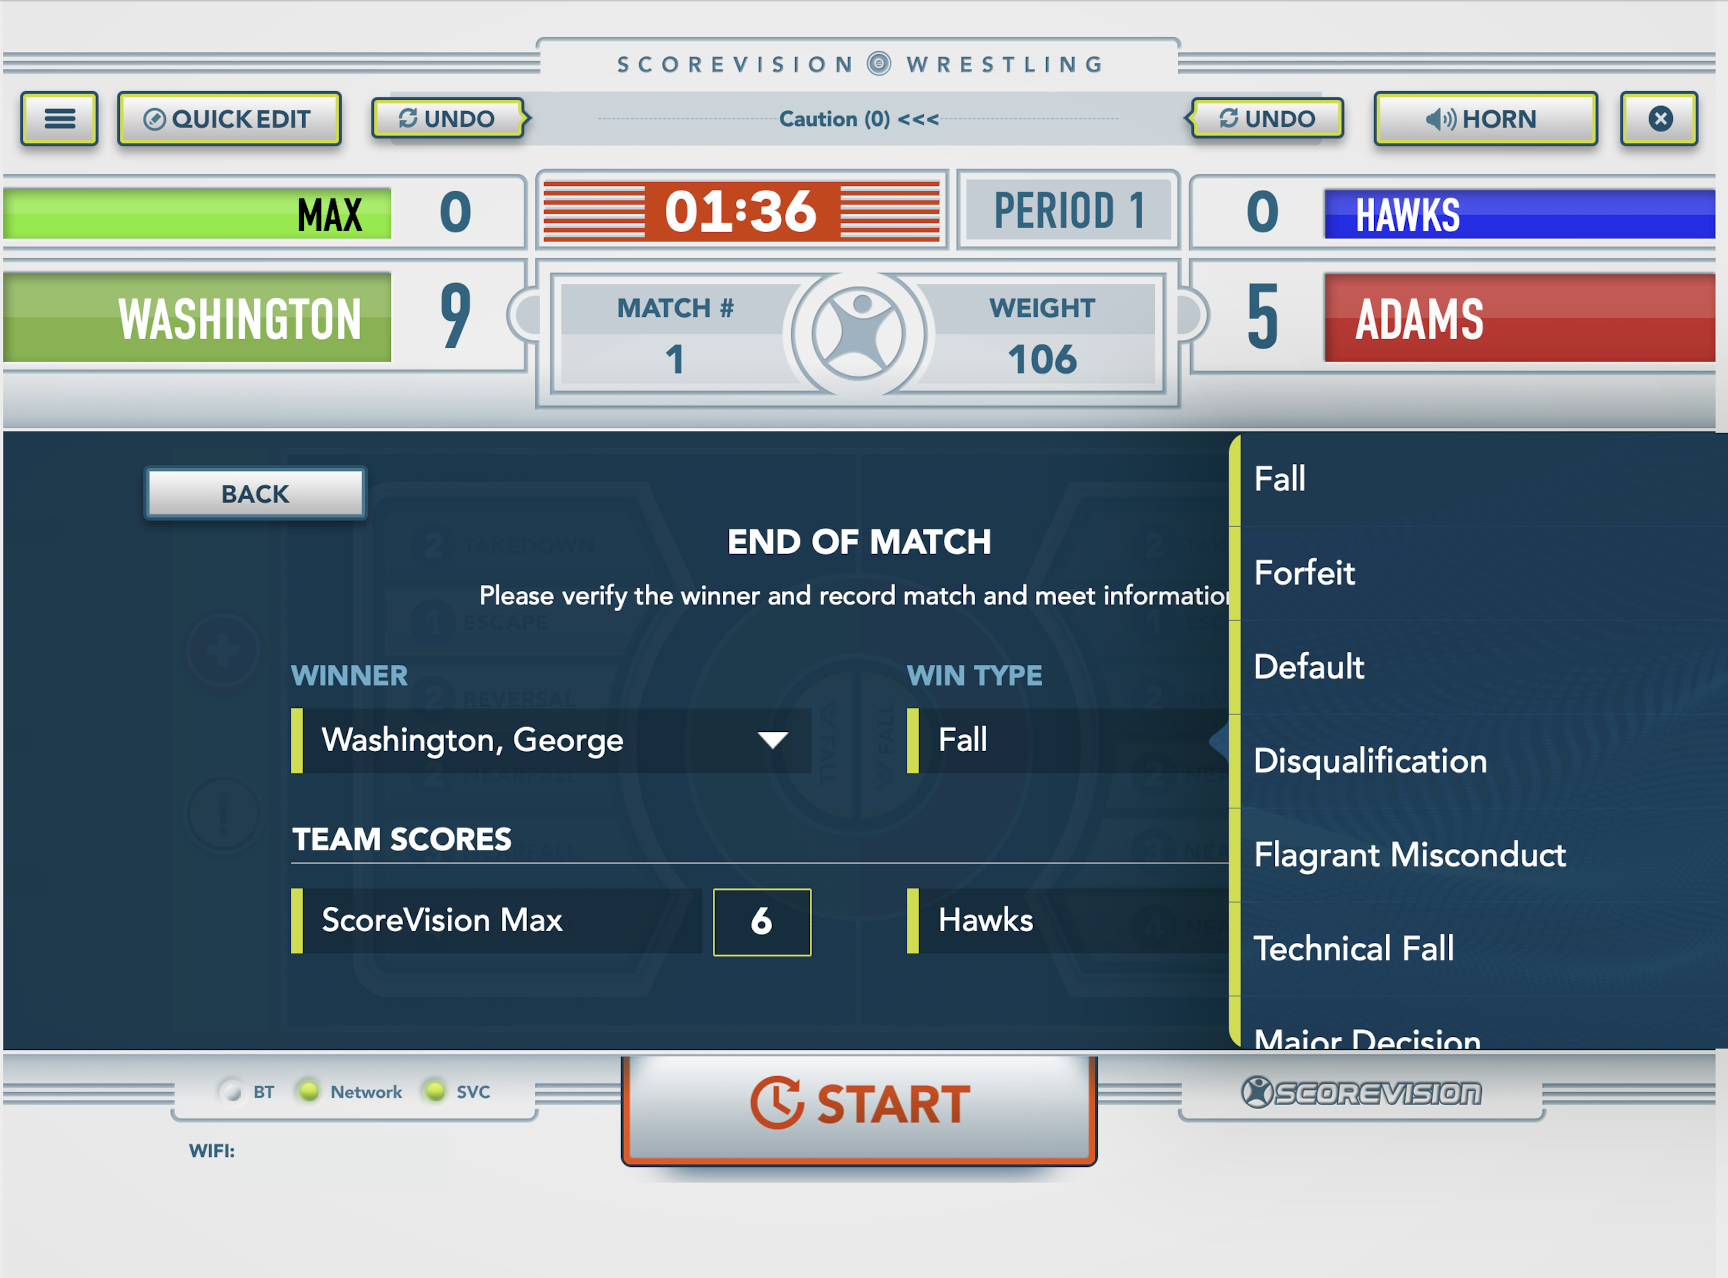
3. You will automatically be directed to set up the next match. Select the WEIGHT CLASS and select the wrestler. Then press START MATCH.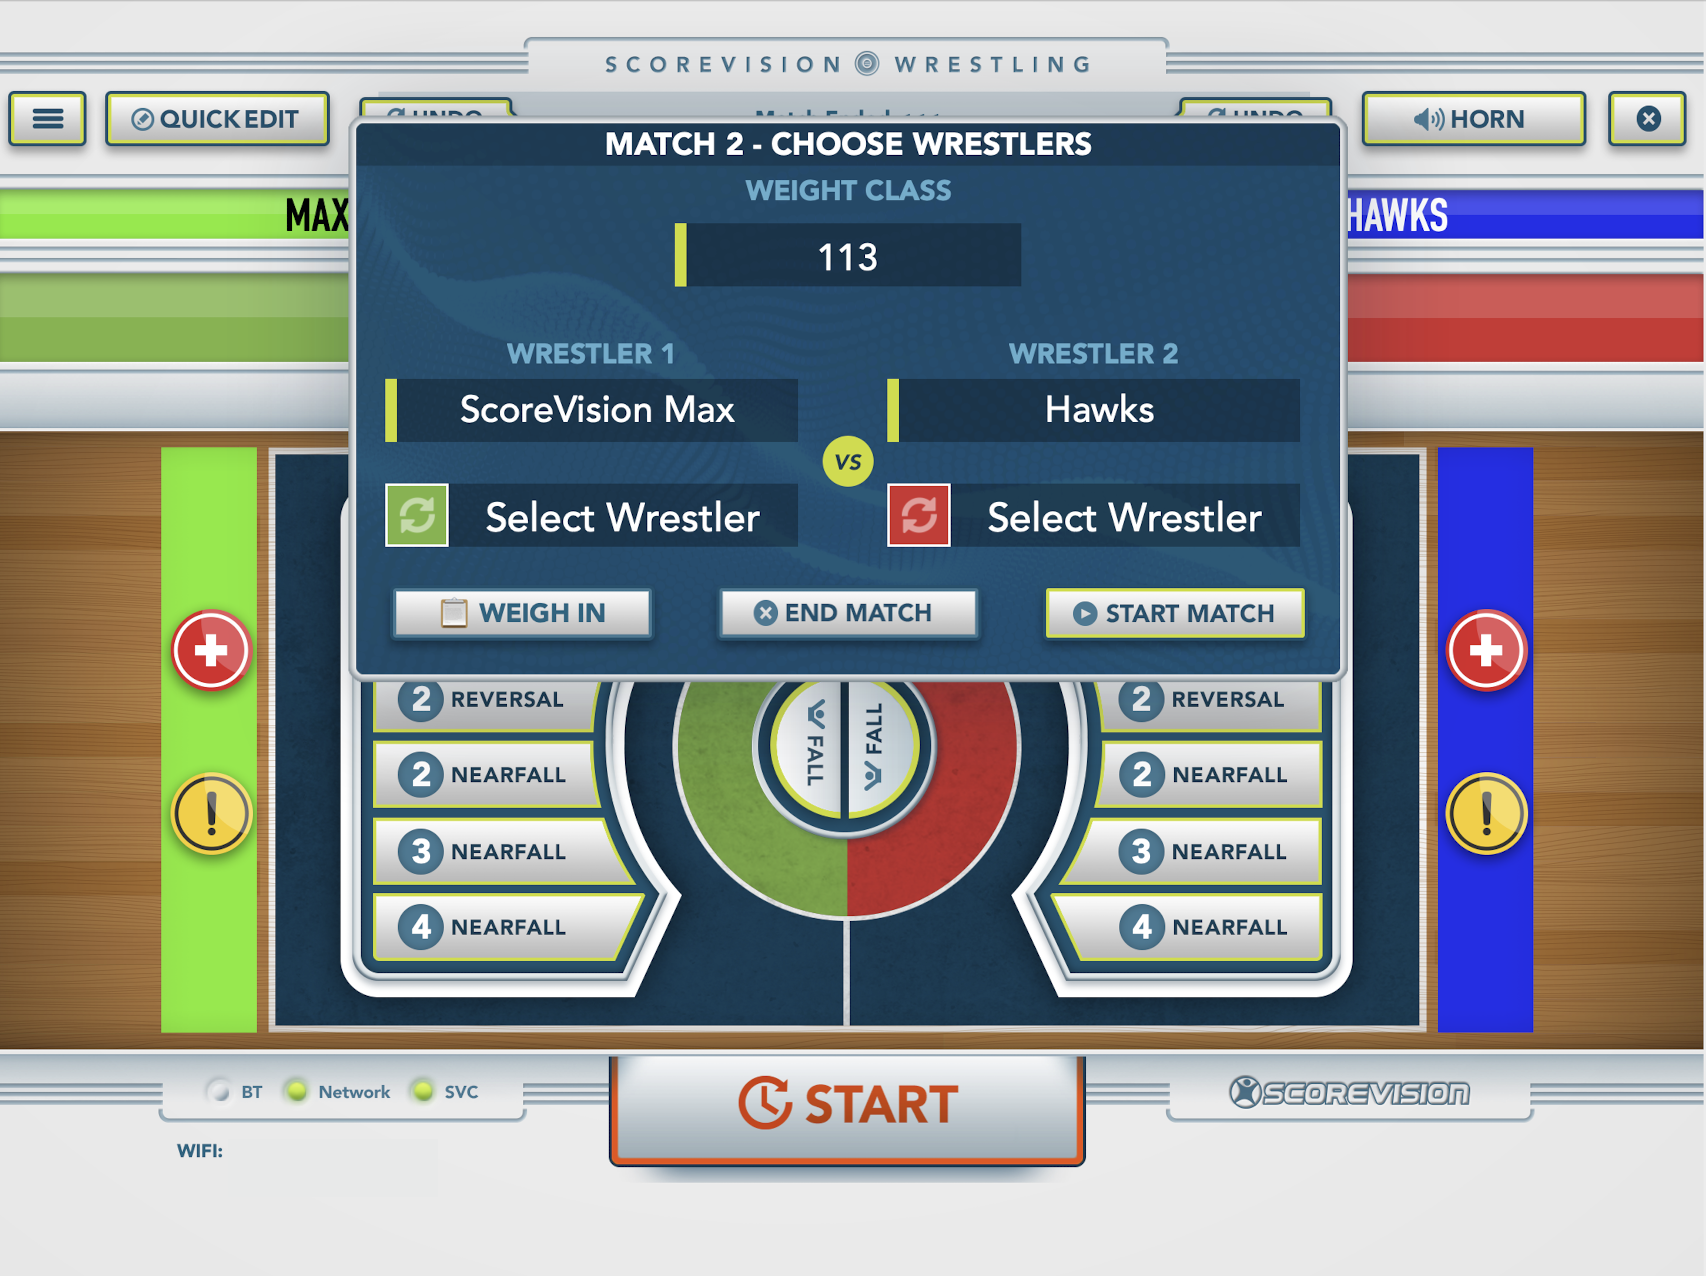
4. If at anytime during the game you would like to exit the meet, press the X button in the upper right corner. A window will appear giving you these 3 options:
- save & close out game,
- save & leave game open, or
- cancel


-
- Save & close out game will archive the meet in the cloud and you will be unable to access and change data at a future time.
- Save & leave game open leaves the meet available to access even after you have closed the app. This option may be needed if you need to leave the Scorekeeper App for whatever reason but wish to continue scoring the meet when you log back in.
- Cancel will return you to the scorekeeping screen with no changes.
WRESTLING LE APP
This is a simplified version of the Wrestling App. This app is intended to be a scorekeeping tool for individual matches without keeping track of an accumulation of team points.
1. After signing in to the ScoreVision Wrestling LE App, you won't see the connection screen that appears in our other scorekeeping apps. A scoreboard assistant will ask if you would like to connect to a scoreboard display. Press CONNECTION SETTINGS and then choose a your display (generally, you will select SV-1, but SV-2 also works; naming may vary based on your facility) and press CONNECT.


2. Press QUICK EDIT to change the names of the wrestlers from GREEN and RED to their respective names. Pressing the X will clear the current name and allow you to enter a new name. You can also swap the green/red colors for each wrestler by pressing on the green or red buttons beside the player names. Press SAVE to apply your changes.


3. During the match, click on the +1 or -1 buttons as the referee indicates. Then press FALL in the middle if a fall occurs and it will end the match.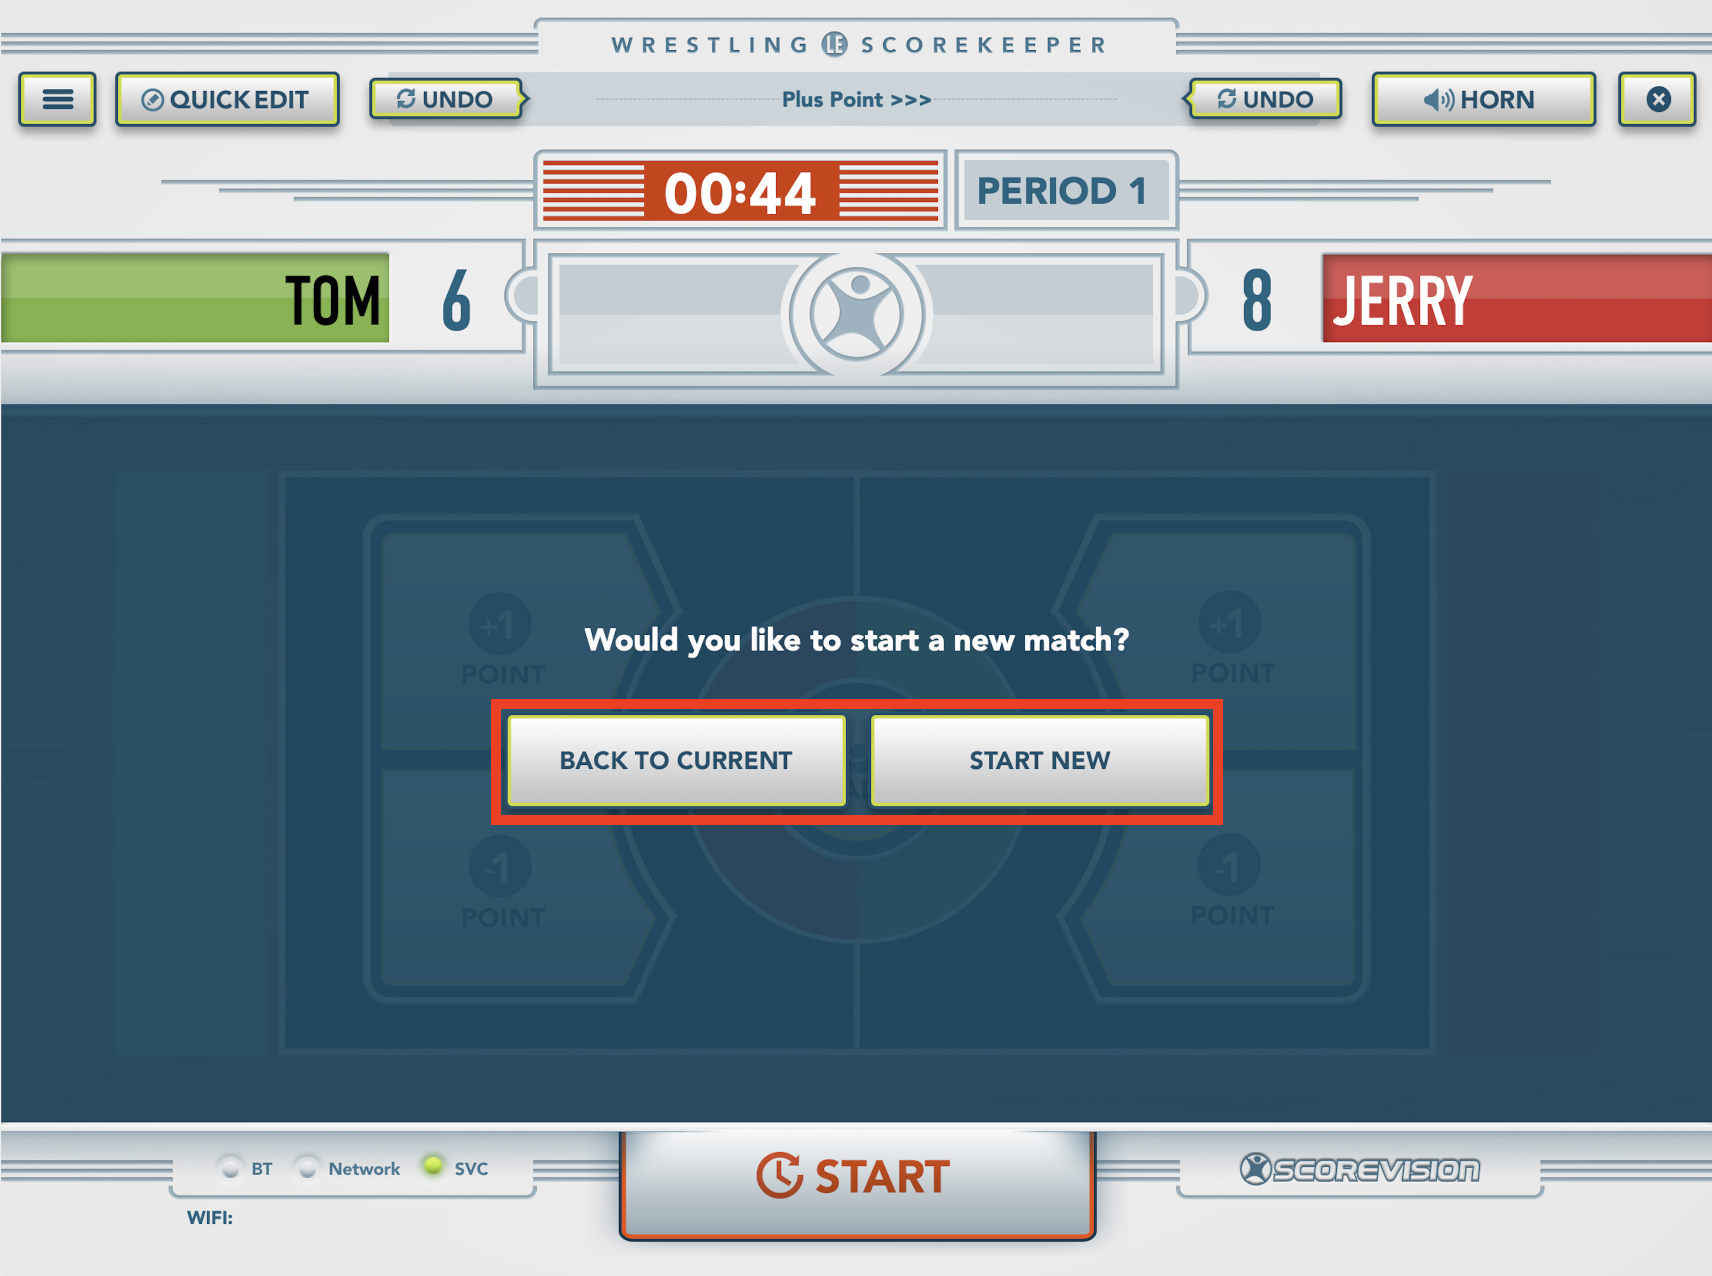
ScoreVision Support and Training Contact Information
If you have any questions or need assistance, our support and training teams are available to help.
-png.png?width=688&height=387&name=ScoreVision%20Support%20Contact%20Card%20(1)-png.png)
